State Water Heaters GPO 69-700(A) Installation &  Operation Instruction Download Page 4

4

OIL BURNER SPECIFICATIONS

The oil burner nameplate decal includes a series code which identifies
the major features of the oil burner. The series number is the last three
digits of the burner code number.

Table 3 below describes the oil burner characteristics for each series
number. The burners are to be used with fuel oil not heavier than No. 2.

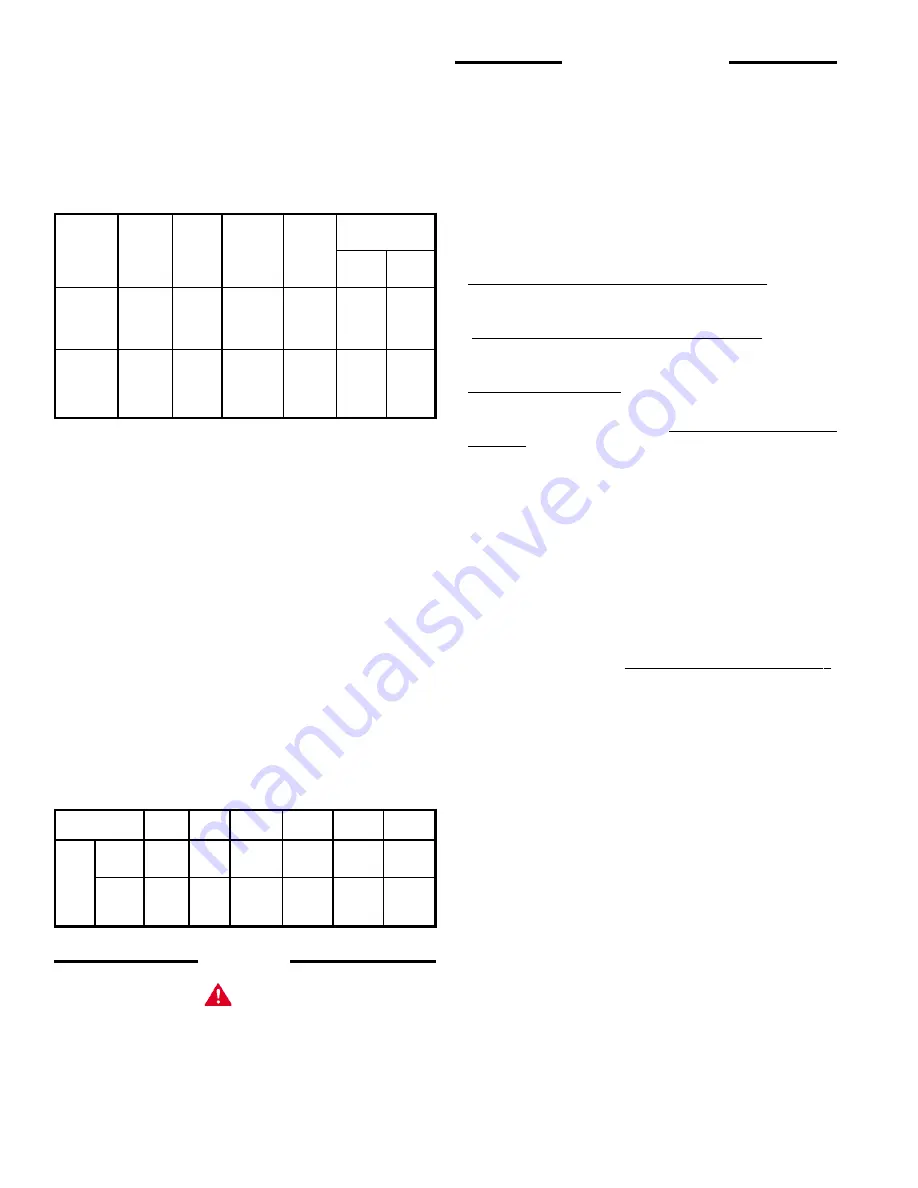
TABLE 3 SOME NOTABLE OIL BURNER FEATURES

R.W.

Suntec          Nozzle Type

State

Becket

Safety

Oil Pump

Oil

Burner

Burner

Timing

Type

Pump

Series

Model

+

Mode

Spray

Spray

Number*

Number

Pattern

Angle

A2VA

AFG

7118

Type B

940

15 Sec.

Single

-

Solid

80°

SF

Stage

A2YA-

Cone

7916

B2VA

8216

Type B

941

AFG

15 Sec.

Two-

-

Solid

80°

SF

15 Sec.

Stage

BY2A

Cone

8916

* To provide the proper firing rate for each model heater, see SPECIFICATIONS:

there are burner models for each heater model in table 2.

+ All oil burners are UL defined as having "interrupted ignition" . . . meaning the

ignition is on during the flame establishing period only. Ignition is off when the
burner is off. Standard safety timing is 15 seconds.

For installations where gravity  feed of fuel oil from the storage tank to the
heater is practical, an oil burner with a single-stage oil pump can be used.
The 940 series of burners have single-stage pumps which are shipped
for installation of a supply line to the tank only. A return line back to the
storage tank can be installed, if required, by making a small modification
to the pump, see the oil burner installation manual.

For installations where gravity feed cannot be employed, (the storage
tank is located significantly below, or remote from, the heater) an oil burner
with a two-stage oil pump should be used. The 941 series of burners
have two-stage pumps which are shipped for installation of a supply and
return line to the tank. However, in situations where the return line is not
required (low lift installations), the pump may be modified to operate without
the line, see the oil burner installation manual.

IMPORTANT

The oil-fired water heater shipment consists of two packages, heater and
oil burner. Check to be certain the model number on the heater and oil
burner packages match. To assure matching equipment, see preceding
information.

GPO 86 GPO86

GPO 84

GPO 75

GPO 75

GPO 69

Model Heater

199

245

315/315A 385/385A 455/455A 700/700/A

Min.

State

Firing Burner

1.42

1.75

2.25

2.75

3.25

5.0

Rate

In

Non

GPH

State

1.1

1.5

2.0

2.5

3.0

4.5

Burner

SAFETY

 DANGER

BE SURE TO TURN OFF POWER WHEN WORKING ON OR NEAR
THE ELECTRICAL SYSTEM OF THE HEATER. NEVER TOUCH
ELECTRICAL COMPONENTS WITH WET HANDS OR WHEN
STANDING IN WATER. WHEN REPLACING FUSES ALWAYS USE THE
CORRECT SIZE FUSE FOR CIRCUIT.

If it is necessary to reset the safety primary control, depress red button
one time only. If burner does not operate after depressing red button
one time, call serviceman.

INSTALLATION

REQUIRED ABILITY

INSTALLATION OF SERVICE OF THIS WATER HEATER REQUIRES
ABILITY EQUIVALENT TO THAT OF A LICENCED TRADESMAN IN
THE FIELD INVOLVED. PLUMBING, AIR SUPPLY, VENTING , OIL
BURNER AND ELECTRICAL WORK REQUIRED.

GENERAL

The installer should be guided by these instructions, local codes and the
following publications.

•  Standards for the Installation of Oil Burning Equipment, NFPA

Standard No. 31, Available from National Fire Protection
Association, Batterymarch Park, MA 02269.

•  Code for the Installation of Heat Producing Appliances,

Available from American Insurance Association, 85 John Street,
New York, NY 10038.

• The National Electrical Code, ANSI/NFPA No. 70-1996. Availability

same as NFPA Standard No. 31-1997.

• In Canada - CSA Standard No. B139, Installation Code for Oil Burning

Equipment.

When other than a State burner is used, this instruction manual can be
used as a general guide. The burner manufacturer's instructions will have
to be consulted on specific questions of wiring, air adjustment, etc.

Do not test the burner or control system before the heater is filled with
water. Follow the START-UP procedure in this manual.

UNCRATING

Uncrate the heater  by removing the outside mat and top locator. The
shipping pallet must be removed from the unit. It may be possible to
simply unbolt the base from the pallet and, with the help of two or more
persons, work the unit off the pallet. Some units will be too heavy and will
require the use of jacks or lifting equipment.  Safely remove the pallet
and move the unit into position. Be Careful When Moving This Heater. It
will tip over easily.

LEVELLING

Install the heater plumb to the ground.  If it is necessary to adjust the
heater, use metal shims under the channel type skid base.

LOCATION

The water heater should not be installed where the combustion air is
contaminated, see COMBUSTION AND VENTILATING AIR.  Temperature
in the location must be above 32°F (0°C) and free of combustible dusts
and flammable gases or vapors.

For the best installations, the water heater should be located:

1. On a level surface.

Shim the channel type skid base as necessary If leveling is required.

2. Near a floor drain.

The heater should be located in an area where leakage of the tank
or connections will not result in damage to the area adjacent to the
heater or to lower floors of the structure.

When such locations cannot be avoided, a suitable drain pan should
be installed under the heater.

The pan should be at least two inches deep, have a minimum length
and width of at least two inches greater than the diameter of the
heater and should be piped to an adequate drain.  The pan must
not restrict combustion air flow.

Summary of Contents for GPO 69-700(A)

Page 1: ... 000 COMMERCIAL OIL FIRED WATER HEATER FOR HOT WATER SUPPLY Installation Operation Service Maintenance MODELS GPO 86 199 THRU GPO 69 700 A CAUTION TEXT PRINTED OR OUTLINED IN RED CONTAINS INFORMATION RELATIVE TO YOUR SAFETY PLEASE READ THOUROUGHLY BEFORE USING APPLIANCE 500 Lindahl Parkway Ashland City TN 37015 www stateind com ...

Page 2: ...50 2357 2063 1833 1650 1500 1375 1269 1179 GPO 700 000 69 80 GPH 1677 1341 1118 958 838 745 671 610 559 516 479 69 700 A 205 261 LPH 6347 5077 4231 3627 3173 2821 2539 2308 2116 1953 1813 ALL DIMENSIONS IN INCHES mm Model numbers followed by the suffix A indicates the optional A S M E tank construction TABLE 1 NOMINAL MODEL DIMENSIONS GPO 86 199 GPO 86 245 GPO 84 315 A GPO 75 385 A GPO 75 455 A GP...

Page 3: ...ted by Underwriters Laboratories Inc Accordingly the burner bears one of the UL labels indicating periodic inspection of the production of this equipment All ASME tanks are built to the standards of Section IV of the American Society of Mechanical Engineers code and are stamped with their symbol The National Board of Boiler and Pressure Vessel Inspectors papers are furnished upon request The NB nu...

Page 4: ...UIT If it is necessary to reset the safety primary control depress red button one time only If burner does not operate after depressing red button one time call serviceman INSTALLATION REQUIRED ABILITY INSTALLATION OF SERVICE OF THIS WATER HEATER REQUIRES ABILITY EQUIVALENT TO THAT OF A LICENCED TRADESMAN IN THE FIELD INVOLVED PLUMBING AIR SUPPLY VENTING OIL BURNER AND ELECTRICAL WORK REQUIRED GEN...

Page 5: ...ng approved provisions must be made to overcome the problem see NFPA Standard No 31 Chapter 1 CHEMICAL VAPOR CORROSION Water heater corrosion and component failure can be caused by the heating and breakdown of airborne chemical vapors Spray can propellants cleaning solvents refrigerator and air conditioning refrigerants swimming pool chemicals calcium and sodium chlorides waxes and process chemica...

Page 6: ... supplied with a flue reducer which should be installed on the top cover In venting systems where a continuous or intermittent back positive draft is found to exist the cause must be determined and corrected In some cases a special vent cap may be required If the back draft cannot be corrected by normal methods or if a suitable draft cannot be obtained a blower type flue gas exhauster must be empl...

Page 7: ...burner shutoff system actuated by high water temperature CLOSED WATER SYSTEM A closed system will exist if a back flow preventer check valve pressure reducing valve or other similar device is installed in the cold water line between the water heater and the street main or well Excessive pressure may develope due to the thermal expansion of heated water causing premature tank failure or intermitten...

Page 8: ...0 30 4 7 2 1 31 9 4 100 30 4 3 0 9 50 15 2 100 30 4 8 2 4 26 7 9 100 30 4 4 1 2 45 13 7 100 30 4 9 2 7 21 6 4 83 25 2 5 1 5 40 12 1 100 30 4 10 3 0 16 4 8 64 19 5 Two Stage Supply and Return Lines This system fig 12 is required when long lines and high lifts requiring up to 20 of vacuum and 10 vertical lift are encountered Burner Series No 941 is used in this service Bypass plug must be installed ...

Page 9: ...eater or water system 3 All burners have intermittent ignition as defined by UL ignition is on during the time the burner is on and off when the burner is off 4 Do not test fire the heater to complete the oil burner certificate until the tank is filled with water see the oil burner manual The certificate and this manual must be left with the user for future reference TABLE 8 OIL PUMP NOZZLE SPECIF...

Page 10: ...NJURY OCCURS VARIES WITH THE PERSONS AGE AND TIME OF EXPOSURE THE SLOWER RESPONSE TIME OF CHILDREN AGED OR DISABLED PERSONS INCREASES THE HAZARDS TO THEM NEVER ALLOW SMALL CHILDREN TO USE A HOT WATER TAP OR TO DRAW THEIR OWN BATH WATER NEVER LEAVE A CHILD OR DISABLED PERSON UNATTENDED IN A BATHTUB OR SHOWER THE WATER HEATER SHOULD BE LOCATED IN AN AREA WHERE THE GENERAL PUBLIC DOES NOT HAVE ACCESS...

Page 11: ...l Annually Anode Semi Tank Inspection Annually Lime Scale As UN LIME Removal Required Delimer Circulating Four SAE No 20 non detergent Pump Oiling Months motor oil Inspection Combustion test and Semi kit test specifications Oil Burner Adjustment Annually Page 26 Nozzle Semi Replacement Annually New Nozzle Flue Baffle Pipe Cleaning Annually Wire Brush Venting Semi System Inspected Annually RELIEF V...

Page 12: ...nt using care not to damage the glass lining 5 Inspect cleanout plate gasket If new gasket is required replace with State Part no 99038 6 Install cleanout plate Be sure to draw plate up tight by tightening screws securely 7 Fill the water heater according to the FILLING section on Page 10 8 Check for water leakage 9 Replace outer jacket cover plate Flo jug Method of Deliming The Flo Jug is the sta...

Page 13: ... connector and top cover of heater from heater Clean out all soot deposits from connector and chimney opening A wire brush is recommended for this operation 2 Remove flue baffles by lifting from tank 3 Using a wire brush remove soot from flue passages in heater tank CAUTION While cleaning tank flue passages care must be taken that brush does not come in contact with the top of the combustion chamb...

Page 14: ...ATION WITH OR WITHOUT BUILDING RECIRCULATION DANGER TEMPERATURE SETTING SHOULD NOT EXCEED SAFE TEMPERATURES AT FIXTURES SEE WATER TEMPERATURE CONTROL WARNING ON PAGE 10 IF HIGHER PREHEAT TEMPERATURES ARE NECESSARY TO OBTAIN ADEQUATE BOOSTER OUTPUT ADD AN ANTI SCALD VALVE FOR HOT WATER SUPPLIED TO FIXTURES NOTE WHEN USING A STATE T 140 200 350 OR 400 STORAGE TANK USE LOWER 3 4 19 mm OPENING FOR TAN...

Page 15: ...E TEMPERATURES AT FIXTURES SEE WATER TEMPERATURE CONTROL WARNING ON PAGE 10 IF HIGHER PREHEAT TEMPERATURES ARE NECESSARY TO OBTAIN ADEQUATE BOOSTER OUTPUT ADD AN ANTI SCALD VALVE FOR HOT WATER SUPPLIED TO FIXTURES WIRING DIAGRAM FOR 180 F 82 2 C LOOP IF USED INSET A INSTALL THERMAL EXPANSION TANK IN COLD WATER SUPPLY LINE IF CHECK VALVE OR PRESSURE REDUCING VALVE IS USED IN SUPPLY INSET B VACUUM R...

Page 16: ...FE TEMPERATURES AT FIXTURES SEE WATER TEMPERATURE CONTROL WARNING ON PAGE 10 IF HIGHER PREHEAT TEMPERATURES ARE NECESSARY TO OBTAIN ADEQUATE BOOSTER OUTPUT ADD AN ANTI SCALD VALVE FOR HOT WATER SUPPLIED TO FIXTURES WIRING DIAGRAM FOR 180 F 82 2 C LOOP IF USED INSTALL IN ACCORDANCE WITH LOCAL CODES WIRING DIAGRAM FOR TEMPERED WATER LOOP IF USED INSET A INSTALL THERMAL EXPANSION TANK IN COLD WATER S...

Page 17: ...E TEMPERATURES AT FIXTURES SEE WATER TEMPERATURE CONTROL WARNING ON PAGE 10 IF HIGHER PREHEAT TEMPERATURES ARE NECESSARY TO OBTAIN ADEQUATE BOOSTER OUTPUT ADD AN ANTI SCALD VALVE FOR HOT WATER SUPPLIED TO FIXTURES INSET B VACUUM RELIEF VALVE INSTALL PER LOCAL CODES INSET A INSTALL THERMAL EXPANSION TANK IN COLD WATER SUPPLY LINE IF CHECK VALVE OR PRESSURE REDUCING VALVE IS USED IN SUPPLY WIRING DI...

Page 18: ...ROL IN AN UNINSULATED TEE BEYOND THE DISHWASHING MACHINE TAKEOFF IN THE SANITIZING LOOP CONTROL SHOULD BE SET AT 185 F 85 C NOTE 3 ADJUST PLUG COCK SO THE SANITIZING LOOP FLOW RATE DOES NOT CAUSE UNNECESSARY TURBULENCE IN THE TANK NOTE 4 IF TEMPERED WATER IS RECIRCULATED RETURN LINE SHOULD BE CONNECTED AT POINT A WIRING DIAGRAM FOR 180 LOOP IF USED INSET A INSTALL THERMAL EXPANSION TANK IN COLD WA...

Page 19: ...nits with the higher water flow may have a shortened life Unions and T P valves shown in piping diagrams are not included in the manifold kits Dimensions shown are for minimum space occupied by complete assemblies Service space in front of units must be added DANGER TEMPERATURE SETTING SHOULD NOT EXCEED SAFE TEMPERATURES AT FIXTURES SEE WATER TEMPERATURE CONTROL WARNING ON PAGE 10 IF HIGHER PREHEA...

Page 20: ... the most common cause of relief valve leakage It is often caused by a closed system If a check valve is in the inlet system it will not permit the expanded hot water volume to equalize pressure with the main The relief valve must release this water or the water heater or plumbing system will be damaged When such a condition is encountered local codes or inspection agency should be consulted to de...

Page 21: ...ust be reset before trying again for ignition When this occurs allow about 5 minutes for safety heater to cool before depressing the red safety button Depress red button one time only If burner does not operate after depressing red button one time check combustion chamber If combustion chamber is soaked with oil the combustion chamber must be replaced Some of the possible reasons for flame failure...

Page 22: ...nting screws slightly and shift Noisy fuel pump in different positions until noise is eliminated Operation Retighten mounting screws Air in inlet line Check all connections Use only good flare fittings Tank turn on two line pipe system and inside tank Install return line hum eliminator Partially clogged strainer or filter Remove and clean strainer Air leak in intake line Tighten all fittings Air l...

Page 23: ... GPO XX 199 245 315 385 455 700 AND GPO XX 315A 385A 455A 700A ITEM NO 13 ITEM NO 25 REPLACEMENT PARTS LIST CLEANOUT ASSEMBLY OIL STATE WATER HEATERS 500 Lindahl Parkway Ashland City TN 37015 Phone 800 821 2017 Fax 800 644 9306 www stateind com ...

Page 24: ...5 192495 192495 192495 Hot 192484 192484 192484 192484 192484 192484 Relief Valve 191068 191068 191068 191068 191068 191068 UL 193657 193657 1 193657 2 193657 3 193657 4 193657 5 Inlet 94518 94518 94518 94518 94518 94518 Outlet 94519 94519 94519 94519 94519 94519 Wiring Diagram 193694 193694 193694 193695 193695 193695 17 Gasket Skirt Ring 76443 76443 76443 76443 76443 76443 18 Insulation Foil Fac...

Reviews: