background image

Instruction Manual

3

Cascaded configurations

NOTE:


The Master KVM switch must have equal or more PC ports than that of the Slave 

KVM switches. For example, if an 8-port switch is the Master, an 8-port or 4-port switch 

can be a Slave, but not a 16-port switch.
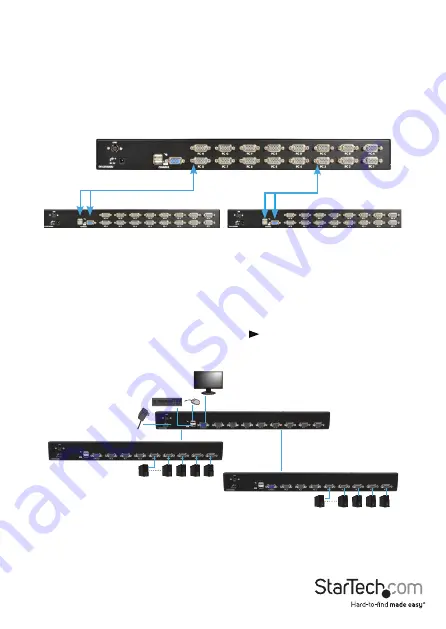
The ports labelled PC 1 - PC 8 can be connected to either a computer or a Slave KVM 

switch’s CONSOLE port. On a 16-port KVM switch, the ports marked PC A - PC H can 

only be connected to computers. Use only the appropriate StarTech.com KVM cables 

to connect the Master KVM switch’s PC ports and Slave KVM switch’s CONSOLE port. 

The maximum number of computers controlled by a Master/Slave configuration with all 

8-port KVM switches used is 64, with 8 Slaves and each Slave connecting to 8 computers:
The maximum number of computers controlled in a Master/Slave configuration with 

all 16-port KVM switches used is 136, with 8 units of 16-port Slaves (to PC 1 - PC 8) and 

each Slave connected to 16 computers, plus 8 more computers connected directly to 

the Master (to ports PC A - PC H):
After the connection has been completed, please re-activate the OSD menu to verify that 

the Master recognizes the Slaves. A triangle mark (     ) is placed next to the right of the 

channel name indicating that the port is connected to a Slave, not a computer. A number 

to the left of the triangle mark indicates the Slave model, i.e. ‘8’ for an 8-port switch.

*SV1631DUSBU shown

KVM cables

PC 4

PC 3

PC 2

PC 1

PC 5

PC 4

PC 3

PC 2

PC 1

PC 5

Slave

Slave

Master

Console

NOTE!

 A device (computer or KVM switch) at any ‘PC x’ port can be changed at any 

time after initial power-up. If you change any one of the PC 1 to PC 8 port connections 

from a computer to a Slave KVM switch or vice versa, or replace the devices of a port, 

the OSD will update this change the next time it is activated.

Summary of Contents for SV1631DUSBU

Page 1: ...ch com FR Guide de l utilisateur fr startech com ES Guía del usuario es startech com IT Guida per l uso it startech com NL Gebruiksaanwijzing nl startech com PT Guia do usuário pt startech com SV431DUSBU SV831DUSBU SV831DUSBUK SV1631DUSBU SV1631DUSBUK 4 8 16 Port 1U Rack Mount VGA USB KVM Switch with OSD SV831DUSBU shown ...

Page 2: ... 3 A NMB 3 A This device complies with Industry Canada licence exempt RSS standard s Operation is subject to the following two conditions 1 This device may not cause interference and 2 This device must accept any interference including interference that may cause undesired operation of the device Le présent appareil est conforme aux CNR d Industrie Canada applicables aux appareils radio exempts de...

Page 3: ...ystem Requirements 1 Installation 2 Hardware Installation 2 Connecting Computer to the KVM Switch 2 Cascaded configurations 3 Operation 4 OSD On Screen Display Operation 5 Hot key commands 9 Change Leading Hotkey 11 Specifications 14 Technical Support 15 Warranty Information 15 ...

Page 4: ...im 1U design that fits neatly into a server equipment rack cabinet with optional mounting bracket SV431RACK and offers rear cable connections to eliminate cable tangles and minimize workspace disruption Backed by a StarTech com 3 year warranty and free lifetime technical support Packaging Contents 1 x KVM switch 1 x universal power adapter NA EU UK AU 4 x foot pads 2 x rackmount brackets 8 port an...

Page 5: ...d VGA monitor must be used for the local console A USB keyboard mouse combo device that uses a single USB connector may also be used but must be connected to the USB Keyboard port Connecting Computer to the KVM Switch To connect a computer to the KVM switch use the appropriate StarTech com KVM cable to connect from one of the PC ports located on the rear panel of the KVM switch to the keyboard mou...

Page 6: ... a Master Slave configuration with all 16 port KVM switches used is 136 with 8 units of 16 port Slaves to PC 1 PC 8 and each Slave connected to 16 computers plus 8 more computers connected directly to the Master to ports PC A PC H After the connection has been completed please re activate the OSD menu to verify that the Master recognizes the Slaves A triangle mark is placed next to the right of th...

Page 7: ...es the higher ports Ports 1 and A share the same pushbutton as do 2 and B 3 and C etc EXAMPLE If port 1 is already selected and you wish to switch to Port A tap the shared pushbutton once to select Port A If Port 1 is not selected press and hold pushbutton 1 for two seconds to select Port A K M Reset K M Reset resolves the majority of problems developed by keyboard and or mouse device replacement ...

Page 8: ...ed an OSD option Or by hitting the left CTRL key three times within two seconds you will see a KVM MENU screen showing a list of the computers with corresponding channel addresses names and status The channel address port number of the currently selected computer is displayed in red same as the front indicator to the right of the OSD title KVM MENU ...

Page 9: ...ress the ESCAPE key to exit the OSD and to return to the selected computer The computer name is also shown on the screen Function key F1 To edit the name entry of a computer or a Slave First use the UP and DOWN arrow keys to highlight a channel then press F1 followed by name entry Valid characters are A Z 0 9 and the dash character Lowercase letters are converted to uppercase ones Press the BACKSP...

Page 10: ...mputer to the next sequentially in a fixed interval During AutoScan mode the OSD displays the name of the selected computer When Auto Scan detects any keyboard or mouse activity it suspends the scanning till activity stops it then resumes with the next computer in sequence To abort Auto Scan mode press the left CTRL twice or press any front button Scan Type and Scan Rate set the scan pattern Scan ...

Page 11: ...ores the Position setting Upper Left Upper Right Middle Lower Left Lower Right Country Code for Sun Sun keyboards of different languages have different layouts The KVM switch is able to emulate a Sun keyboard for a specific language type or country such as Arabic Belgian US Yugoslavia etc Select the proper country code that matches all of your Sun computers NOTE The country code must be set prior ...

Page 12: ... instruction Keyboard Type Computer Type Sun Mark USB non Sun PC Mac No USB non Sun Sun Yes USB Sun keyboard PC Mac No USB Sun keyboard Sun Yes ESC To exit the OSD press the ESCAPE key Hot key commands Hot key command is a short keyboard sequence used to select a computer to activate computer scan etc StarView interprets keystrokes followed by one or two more keystrokes A built in buzzer generates...

Page 13: ...n this mode the KVM Switch automatically switches from one power on computer to the next sequentially in a fixed interval During AutoScan mode the OSD displays the name of the selected computer Left CTRL Left CTRL F1 When Auto Scan detects any keyboard or mouse activity it suspends the scanning until the activity stops It then resumes with the next computer in sequence The length of the Auto Scan ...

Page 14: ...void accidental activation due to using the left CTRL key for functions such as Copy Paste To change the leading hotkey sequence to Right CTRL Left CTRL Left CTRL hold ALT press Right CTRL All hotkey commands that previously required pressing the Left CTRL will be switched to requiring the right CTRL instead To change the leading hotkey sequence back to Left CTRL Right CTRL Right CTRL hold ALT pre...

Page 15: ... Select For keystroke emulation of Sun Mac computers please refer to chart and conduct the following two examples Stop A function in Sun Press right CTRL and release then within two seconds press F1 and A in sequence Help function in Sun Press right CTRL and release then within 2 seconds press H From Standard Keyboard Map to Sun Keyboard Map to Mac Keyboard Press right Ctrl and release 1 Press rig...

Page 16: ...Sun Keyboard Map to Mac Keyboard Press right Ctrl and release F10 Cut Print Screen F13 Scroll Lock F14 Pause Break F15 Press right Ctrl and release H Help Right Right Right Left Left Left Compose Right Alt Alt Graph Right Option Left Alt Alt Left Option ...

Page 17: ...hods Hot key Push Button and OSD LEDs 4 x Power Active 8 x Power Active 16 x Power Active Front Push Buttons 4 x Push Button 8 x Push Button 8 x Push Button Maximum Video Resolution 1920x1440 On Screen Display OSD Yes Cascadable Yes Maximum Number of Cascaded Computers 16 64 136 Operating Temperature 5o C to 40o C Storage Temperature 20o C to 60o C Humidity 80 RH Power Adapter 9 12VDC 500mA min Di...

Page 18: ...be returned for repair or replacement with equivalent products at our discretion The warranty covers parts and labor costs only StarTech com does not warrant its products from defects or damages arising from misuse abuse alteration or normal wear and tear Limitation of Liability In no event shall the liability of StarTech com Ltd and StarTech com USA LLP or their officers directors employees or ag...

Page 19: ...stered manufacturer of connectivity and technology parts StarTech com was founded in 1985 and has operations in the United States Canada the United Kingdom and Taiwan servicing a worldwide market Reviews Share your experiences using StarTech com products including product applications and setup what you love about the products and areas for improvement To view manuals videos drivers downloads tech...

Reviews: