StarTech.com SAT5210U2E Instruction Manual Download Page 6

Instruction Manual

3

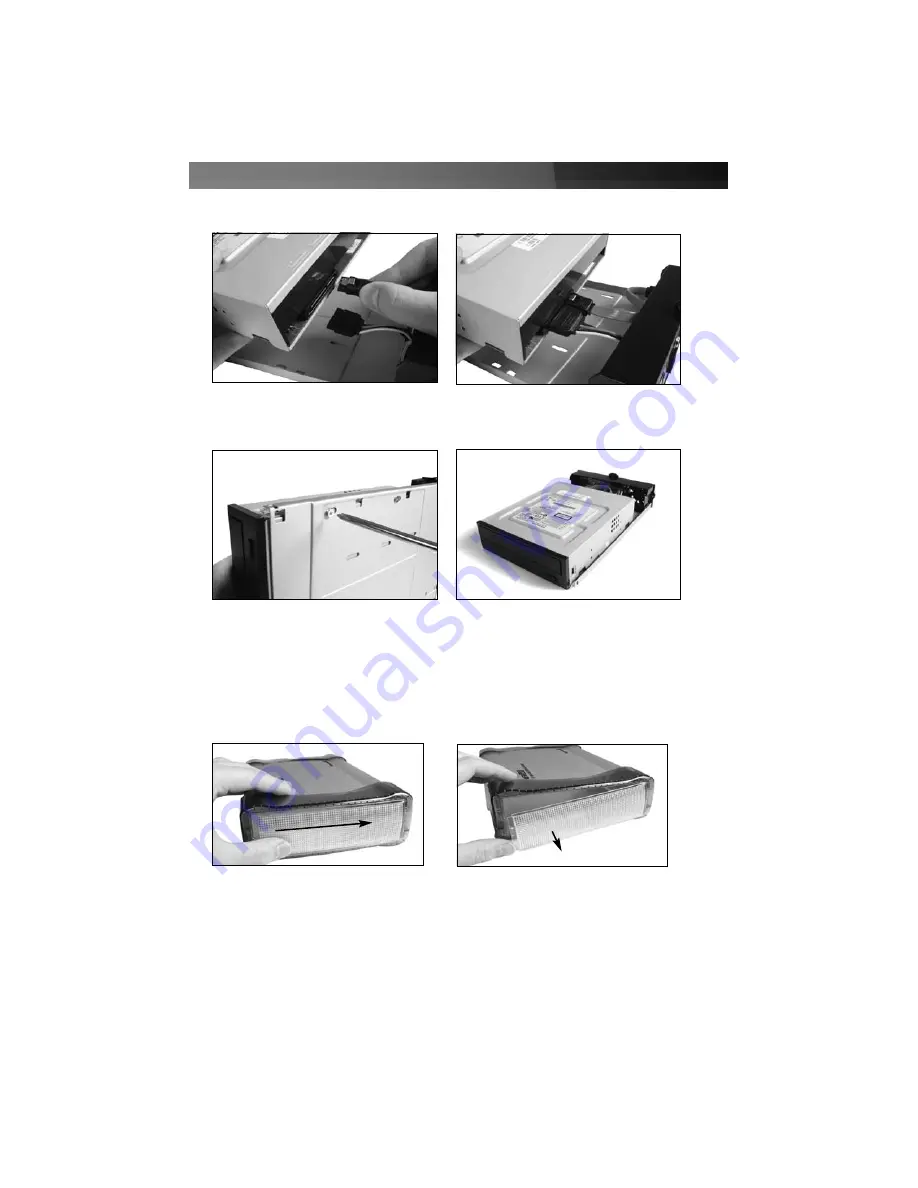
3. Connect the drive you wish to install (hard drive, optical drive) to the SATA data and 

power cables provided by the circuit board attached to the Drive Tray:

4. Once the drive interface connection has been made, please fasten the drive (label side 

up) to the Drive Tray using the screws provided:

5.

If you are installing an optical drive:

Once the SATA connections to the drive have been secured, and the drive has been 

fastened  to the Drive Tray, remove the plastic cover from the Front Panel as pictured 

below, to allow access to an installed optical drive.

If you are installing a 3.5” hard drive

, please skip to step #6.

5. b) Apply gentle pressure from 

left to right (with Enclosure 
facing you) to loosen the 
plastic cover

5. c) Once loosened, gently pry 

the plastic cover away from 
the Enclosure.

Summary of Contents for SAT5210U2E

Page 1: ...SATA Optical Drive Enclosure SAT5210U2E Instruction Manual Actual product may vary from photo InfoSafe 5 25 eSATA USB 2 0 SATA Optical Drive Enclosure...

Page 2: ...uipment and receiver Connect the equipment into an outlet on a circuit different from that to which the receiver is connected Consult the dealer or an experienced radio TV technician for help U Us se...

Page 3: ...ements 1 Package Contents 1 Hardware Guide 2 Installation 2 Installing a Drive in the Enclosure 2 Connecting the Enclosure to the Host Computer 4 Driver Installation 5 Disconnecting an External Hard D...

Page 4: ...yet attractive aluminum casing and a 40mm fan to help cool the drive for optimal performance IIn nt tr ro od du uc ct tiio on n Aluminum casing and 40mm fan for maximum heat dissipation Features Pack...

Page 5: ...ARNING Hard drives require careful handling especially when being transported If you are not careful with your hard disk lost data may result Always handle your hard drive and storage device with caut...

Page 6: ...s provided 5 If you are installing an optical drive Once the SATA connections to the drive have been secured and the drive has been fastened to the Drive Tray remove the plastic cover from the Front P...

Page 7: ...e host computer is powered on 1 If you will be using an eSATA connection insert one of the connectors provided by an eSATA cable not provided please see Accessory Products from StarTech com for a solu...

Page 8: ...on If you are installing an optical drive such as a CD DVD ROM drive etc you may be required to install software that is specific to the drive If this is the case please ensure you have the files avai...

Page 9: ...ensure that Specify a location and CD ROM drive are selected with checkmarks and click on Browse to locate the driver file D JM20336_Win98 driver where D designates the CD DVD ROM drive Once the file...

Page 10: ...Windows click on the Safe Remove icon located in the taskbar and select the connected enclosure from the menu provided then click Stop From the menu that appears next pictured below select the device...

Page 11: ...ects or damages arising from misuse abuse alteration or normal wear and tear L Liim miit ta at tiio on n o off L Liia ab biilliit ty y In no event shall the liability of StarTech com Ltd and StarTech...

Page 12: ...f computer parts cables server management solutions and A V products and serve a worldwide market through our locations in the United States Canada the United Kingdom and Taiwan Visit www startech com...

Reviews: