background image

Instruction Manual

2

IIn

ns

stta

alllla

attiio

on

n

Host Controller installation

In order to provide a software and hardware link between the host computer and the
SAT3550ESR Drive Enclosure, it is required that the included PCI Express Host
Controller be installed on the host computer. You may also use another Host Controller,
provided it features port multiplier support, however it is not guaranteed that all host
controllers with port multiplier support are compatible with the drive enclosure.

1. Insert the Driver CD into your CD/DVD-ROM drive

2. Power down the computer, ensuring the system is unplugged and you are grounded.

3. Remove the cover of your system (see your computer's user manual for details, if 

necessary) and gently turn your computer onto its side, so that the PCI Express 
expansion slot on the motherboard is facing upward.

4. Locate an empty PCI Express slot and remove the metal plate that covers the 

corresponding rear bracket. You may need a Phillips screwdriver to perform this step.
Retain the screw! You will need it to secure the card later.

5. Gently insert the card into the empty slot, making sure it is firmly seated.

6. Secure the card to the rear panel, using the screw you removed in Step 3.

7. Power on the computer. Once the operating system is fully booted, insert the Driver 

CD (included) into the CD/DVD-ROM drive. You will notice several message 
balloons originating in the taskbar, indicating that the required drivers are being 
installed for the devices found.

The SiI 4726 Manager GUI provides a convenient way to manage disks installed within
the Drive Enclosure. To install the Sil 4726 Manager GUI:

1. Locate the 

Setup.exe

file, by browsing to the 

BT3045_Manager\

SiI_4726_Graphic_User_Interface_V4.0.0.9

subfolder.

2. Double-click on the 

Setup.exe

file to begin installation. Follow the on-screen prompts 

to complete installation.

Sil 4726 Manager GUI installation
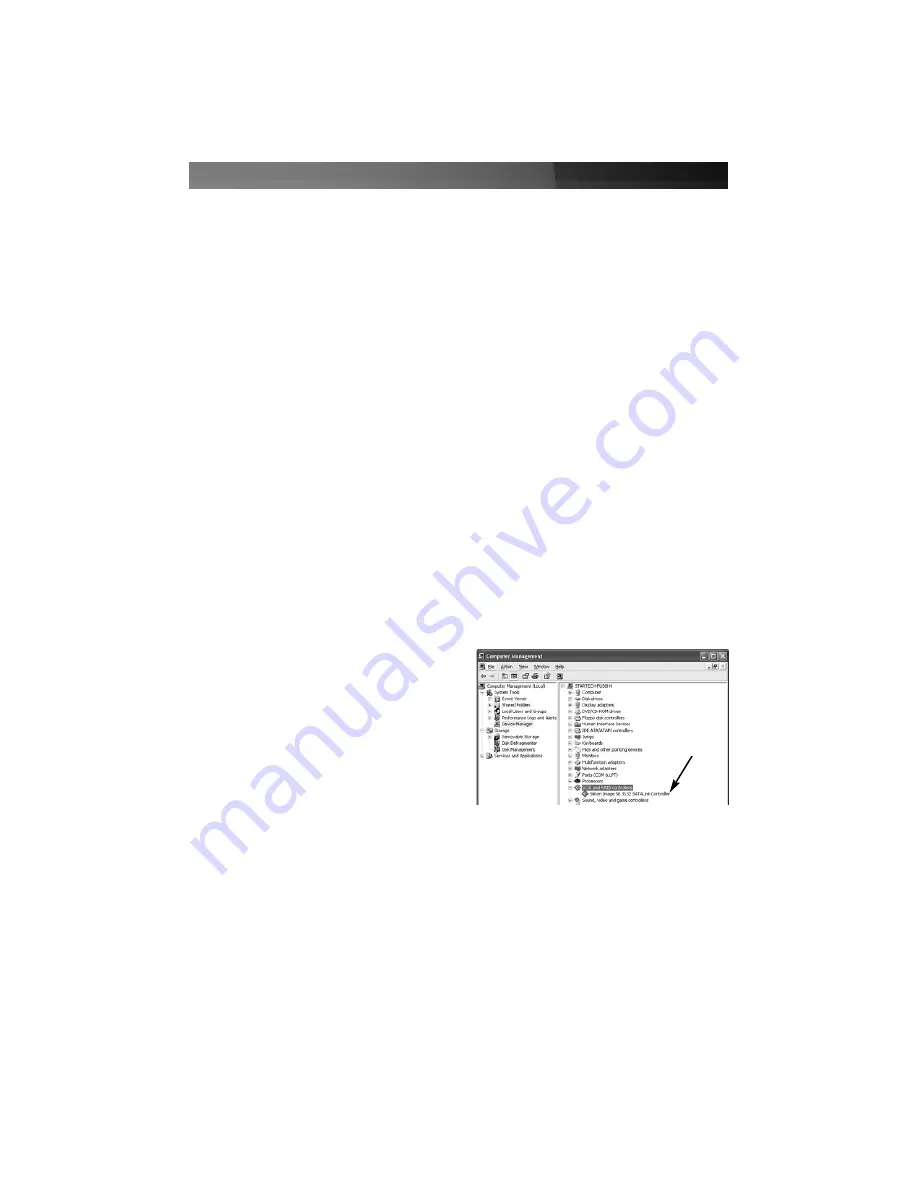
SiI 3132

SATALink

Controller

Once the card has been properly installed, 
you can verify that it is detected by the 
operating system by browsing to the 
device manager (i.e.

Start - Control Panel 

-  System - Hardware - Device Manager

):

Summary of Contents for SAT3550ESR

Page 1: ...SATA RAID Drive Enclosure SAT3550ESR Instruction Manual Actual product may vary from photo 5 Drive 3 5 eSATA to SATA RAID Drive Enclosure...

Page 2: ...uipment and receiver Connect the equipment into an outlet on a circuit different from that to which the receiver is connected Consult the dealer or an experienced radio TV technician for help U Us se...

Page 3: ...on 5 Status Window 6 Elements of the Status window 6 Basic Configuration 8 Advanced Configuration 11 Multiple Volume Configuration 13 Manage Configuration files 16 Partition Configured Volumes 18 Admi...

Page 4: ...TA interface to host to manage access to each hard drive Supports data transfer speeds up to 3 Gbps Each hard drive bay is hot swappable x86 platform An Intel Pentium 3 500MHz equivalent or faster Sys...

Page 5: ...may need a Phillips screwdriver to perform this step Retain the screw You will need it to secure the card later 5 Gently insert the card into the empty slot making sure it is firmly seated 6 Secure th...

Page 6: ...truction Manual 3 Error Condition Indicator OK Indicator Key Lock Drive Bays Safety latch Rear Panel Front Panel closed Power Button Hardware Guide Front Panel open Front Panel Door eSATA port Power P...

Page 7: ...ys 6 Slide the Safety Latch to the right to ensure that the installed drive is not accidentally released from the enclosure 7 Repeat steps 1 6 for the remaining hard drives you wish to install 8 Once...

Page 8: ...r Click the SiI 4726 icon to start the SiI 4726 Manager If the launch sequence does not locate an active Daemon a warning will appear click OK to advance past the warning 2 You will be asked to enter...

Page 9: ...nternal temperature of the SAT3550ESR Drive Enclosure Fan Speed Indicates the system fan status Use this data to monitor possible malfunctions Drive Status section Box Status Indicates the drive statu...

Page 10: ...hange Connections Opens a dialog to establish remote connections Edit Menu Configure Box Opens the Basic Configuration Wizard From here you can access the Advanced Configuration Wizard Specify Policy...

Page 11: ...se see the section entitled Change Password 1 2 3 1 Storage Policy Identifies available storage policies to assign to the SAT3550ESR configuration 2 Volume List Shows Volume Mode storage policy and Si...

Page 12: ...ion Wizard Apply Submits configuration changes to the Drive Enclosure and closes the Configuration Wizard Cancel Aborts the changes and closes the Configuration Wizard Volume Configuration 1 Select Co...

Page 13: ...e space Makes the remaining drive the Hot Spare SAFE and FAST RAID 1 0 Creates one volume consisting of four hard drives data is written to the mirrored disks in a striped format Makes the remaining d...

Page 14: ...ols Elements of the Advanced Configuration Wizard Storage Policy Displays available storage policies that you can assign to volumes The options are enabled after you create a new volume or select an e...

Page 15: ...Cancels proposed changes Available in Basic and Advanced modes Create a new volume Creates a new volume on which to set the storage policy and capacity You can create up to 2 volumes on each hard disk...

Page 16: ...IG volume that uses all of the capacity on drives 2 3 and 4 The same sequence of steps applies to any configuration you choose to implement only the storage policy and capacity allocation vary for dif...

Page 17: ...e click No In some configurations you may want the added redundancy of a Hot Spare The goal of this example is to use all available system capacity to deliberately avoid the Hot Spare Cross hatches id...

Page 18: ...locate all of the remaining system capacity to the BIG volume 17 Click Update Volume Please note Only the last Volume listed in the above example Volume 2 can be edited In order to edit Volume 1 Volum...

Page 19: ...he procedures in the Basic Configuration chapter prompts you to save a configuration file Import a configuration file Please note A configuration file must be saved and available prior to being able t...

Page 20: ...click the Configure Box toolbar button in the Status window to open the Basic Configuration Wizard 2 Select Save to Config File from the File menu in the Basic Configuration Wizard 3 Navigate to the a...

Page 21: ...eelVine processor the Not Initialized disk with no capacity allocated to it After the new volumes are configured and partitioned the backed up data can be restored to the new configuration Note The Di...

Page 22: ...726 Manager software Remember do not partition the disk that represents the SteelVine processor Mac OS X 1 Launch Disk Utility from the Application Utilities folder 2 Select a configured disk and clic...

Page 23: ...The default password is admin 1 Select Change Password from the File menu Change Password 2 Enter the current password or use admin if the default password has not yet been changed 3 Enter the new pas...

Page 24: ...ata redundancy is restored through a rebuild Host access takes precedence over the rebuild process If continuing to use the SAFE volume during the rebuild the rebuild process will take a longer time t...

Page 25: ...selected the end user will have the following additional choices Immediate Rebuild causes the Daemon to rebuild immediately following detection of an offline hard disk drive Rebuild Only If Needed del...

Page 26: ...nd user should type in his her own email address 4 Select Test Email at the bottom of the screen to verify that you have correctly set up the email portions of this feature 5 The Email Notification fe...

Page 27: ...Fan Speed PSF Box Serial Number B The drive was unplugged Install New Firmware Software Warning Do not power off or access the Drive Enclosure while upgrading firmware Please note that this process ma...

Page 28: ...this file Right Click on the file name select Open With and select Notepad Once opened the following will be displayed As an example to change the Status Screen Title Bar Change the line that reads S...

Page 29: ...any errors in the XML tag value the Advanced Configuration button will not be available in the Configuration Setup If there is an error in the XML tag value a pop up window will appear displaying the...

Page 30: ...ly in the bay Otherwise replace as necessary Light Blue New drive New drive Yellow Rebuilding Drive is being rebuilt Purple Wrong slot There is a mismatch between the Serial and Expected Serial becaus...

Page 31: ...ot spinning or spinning slower than expected Review Event Logs Event logs are helpful for troubleshooting and locating a system malfunction 1 Select Event Log from the Edit menu in the Status window 2...

Page 32: ...ED LED 1 LED 0 When SAT3550ESR is powered on the host scans the disks in sequence as indicated by a brief flash of lights on LED 1 Once the host scan is complete LED 1 is lit for each drive present Du...

Page 33: ...Off On Startup or ON indication OK LED will flash during reset and will remain green in all other cases On ERROR The LED will light as a result of an EEPROM error during boot or following a runtime er...

Page 34: ...ll data must be stored twice To implement the SAFE storage policy the Basic Configuration Wizard creates two volumes Each volume consists of two hard disk drives that mirror each other The remaining h...

Page 35: ...striped format In the SAFE and FAST storage policy data is written to mirrored disks in a striped format The Basic Configuration Wizard creates a virtual drive consisting of four hard disk drives des...

Page 36: ...ity In no event shall the liability of StarTech com Ltd and StarTech com USA LLP or their officers directors employees or agents for any damages whether direct or indirect special punitive incidental...

Page 37: ...of computer parts cables server management solutions and A V products and serve a worldwide market through our locations in the United States Canada the United Kingdom and Taiwan Visit www startech co...

Reviews: