background image

Instruction Manual

3

Installation

Hardware Installation

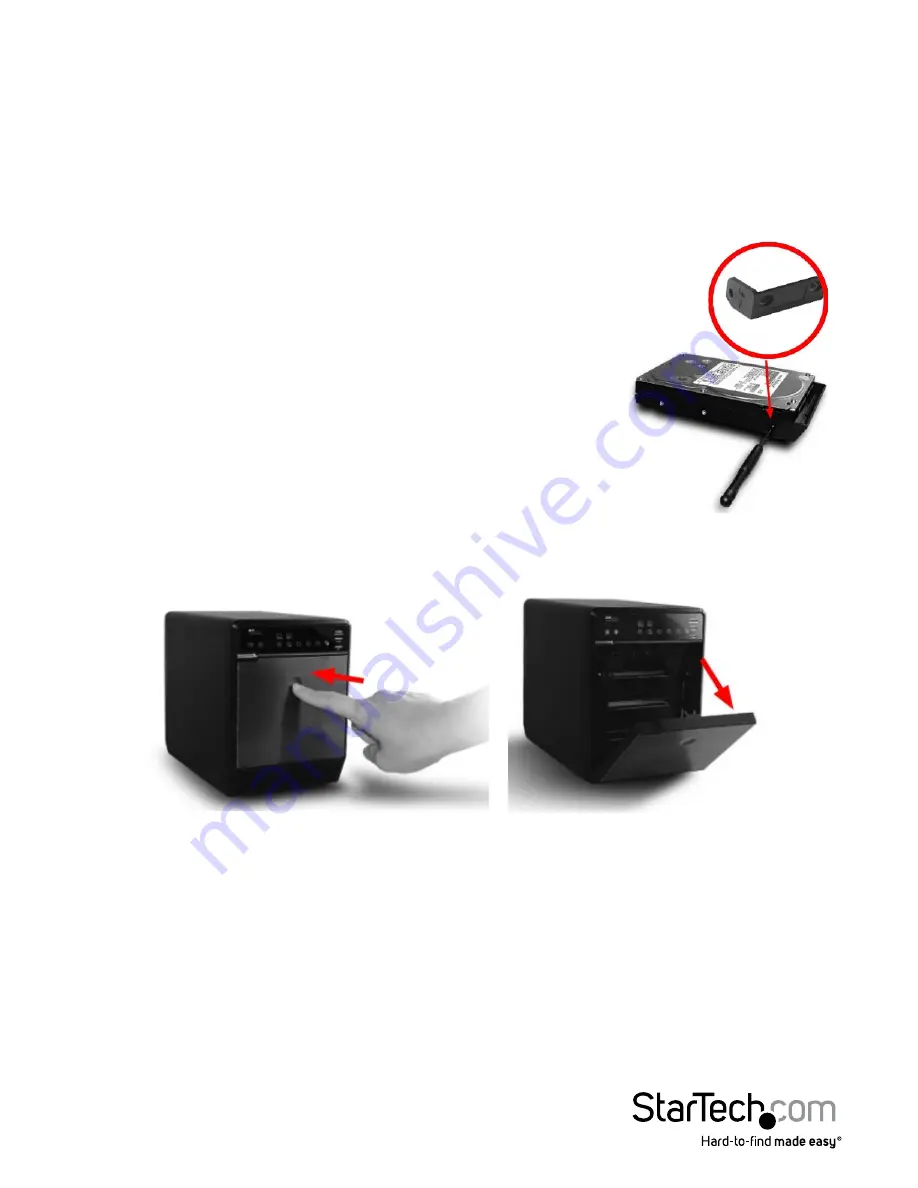
1.  Attach the included Hard Drive Handles to each of the hard 

drives with the supplied screws and screw driver.  

2.  Press the front door in to release the latch and open the door.  The door is also 

removable for easier access.

3.  Inside will be a metal drive cage in front of the drive bays.  Along the top of the drive 

cage are two small tabs.  Press them down to release the cage and remove it.

*installation photos for reference only

WARNING!

 Hard drives and storage enclosures require careful handling, especially 

when being transported. If you are not careful with your hard disk, lost data may 

result. Always handle your hard drive and storage device with caution. Be sure that 

you are properly grounded by wearing an anti-static strap when handling computer 

components or discharge yourself of any static electricity build-up by touching a large 

grounded metal surface (such as the computer case) for several seconds.

Summary of Contents for SAT3540U3ER

Page 1: ...eitung de startech com FR Guide de l utilisateur fr startech com ES Gu a del usuario es startech com IT Guida per l uso it startech com NL Gebruiksaanwijzing nl startech com PT Guia do usu rio pt star...

Page 2: ...eceiving antenna Increase the separation between the equipment and receiver Connect the equipment into an outlet on a circuit different from that to which the receiver is connected Consult the dealer...

Page 3: ...ents 1 System Requirements 1 Front View 2 Rear View 2 Installation 3 Hardware Installation 3 Driver Installation 5 How to Use RAID Mode 5 Drive Status Indicators 6 eSATA USB Connectivity 6 Fan Speed C...

Page 4: ...t provide RAID information and simple hard drive status and activity monitoring The enclosure also features a built in 3 speed 80mm fan with automatic or manual controls that allow you to customize th...

Page 5: ...ion Manual 2 Front View Rear View USB 3 0 type B connector eSATA connector RAID Mode Confirmation button under cover Mode button Fan button DC Power connector Power button Drive Bay Front Cover LED in...

Page 6: ...small tabs Press them down to release the cage and remove it installation photos for reference only WARNING Hard drives and storage enclosures require careful handling especially when being transporte...

Page 7: ...ll of the hard drives are installed reinstall the metal cage and front door Make sure the bottom of the cage stays inside of the track before closing the cover 6 Connect the power adapter DIN connecto...

Page 8: ...isk array The data is split evenly across each disk simultaneously Read write performance is increased as a result but failure of any one disk will make the entire array unusable OFF ON RAID 1 Mirror...

Page 9: ...which host interface is currently active on the enclosure To switch interfaces shut the enclosure off and disconnect old cable and then connect the new cable and turn the enclosure back on Only one i...

Page 10: ...losure less than 45 C between 45 C 54 C and greater than 55 C or set manually to run constantly at a single speed LED Status Description ON Smart Fan Auto Mode OFF ON Smart Fan Manual Mode OFF ON Low...

Page 11: ...ild 1 x Hard Drive Error Fans 1 x 80mm Compatible Hard Drives 3 5 SATA Hard Drives Maximum Data Transfer Rate USB 3 0 5 Gbps eSATA 3 Gbps RAID Modes Span 0 1 3 5 10 1 0 Power Adapter 12V DC 5000mA 4 p...

Page 12: ...returned for repair or replacement with equivalent products at our discretion The warranty covers parts and labor costs only StarTech com does not warrant its products from defects or damages arising...

Page 13: ...ts and we quickly deliver them wherever they need to go Just talk to one of our tech advisors or visit our website You ll be connected to the products you need in no time Visit www startech com for co...

Reviews: