background image

Instruction Manual

46

Accessing KVM Features 

OSD Operations

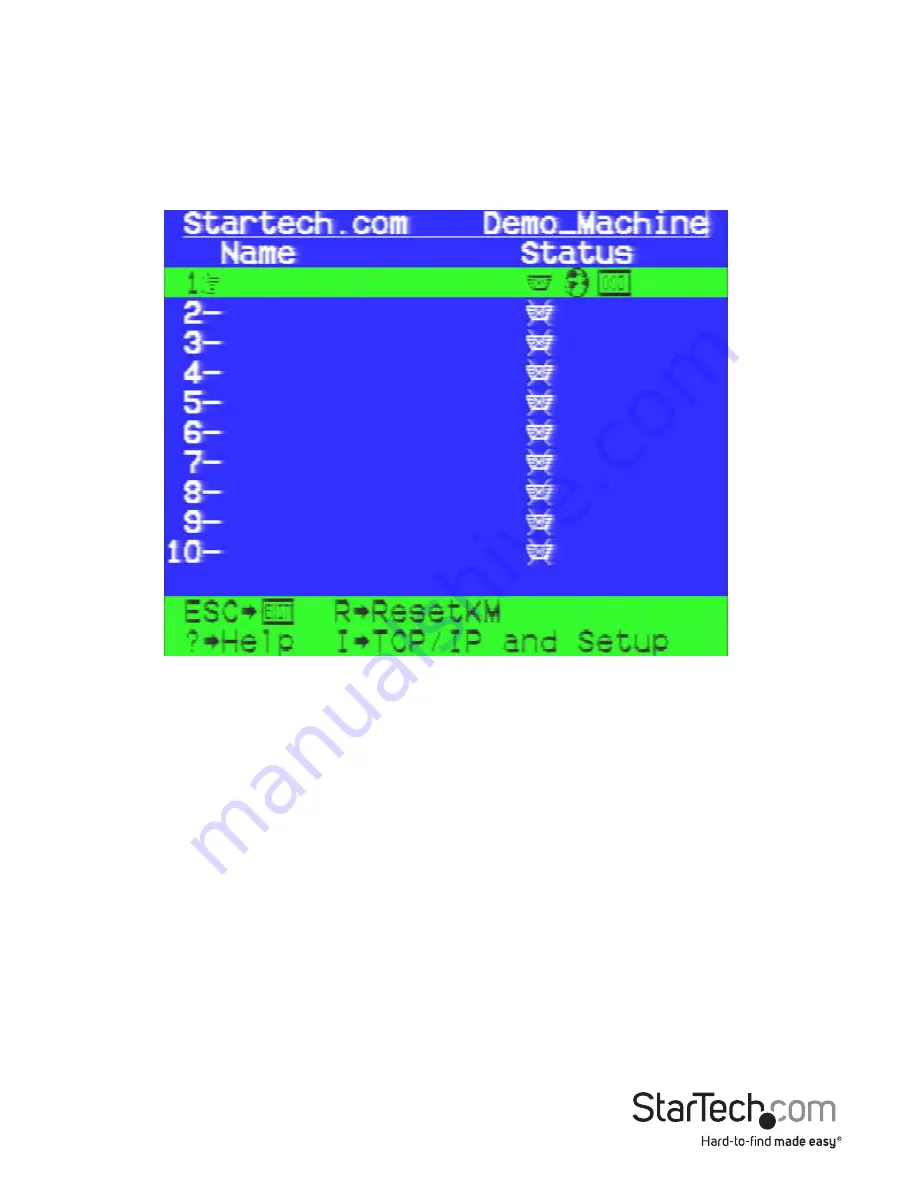
Start the OSD (On-Screen Display) by pressing the left <CTRL> or <ScrLk> key twice 

within one second.

• 

The entry for the currently selected   computer is highlighted in green in  

 the OSD

• 

Use the <UP> and <DOWN> arrow keys to highlight a computer and  

 the <ENTER> key to select it.

• 

Press <ESCAPE> to exit the OSD menu and remove the OSD menu  

 from the screen.

Summary of Contents for ENTERPRISE CLASS SV1653DXI

Page 1: ...sanleitung de startech com FR Guide de l utilisateur fr startech com ES Gu a del usuario es startech com IT Guida per l uso it startech com NL Gebruiksaanwijzing nl startech com PT Guia do usu rio pt...

Page 2: ...eceiving antenna Increase the separation between the equipment and receiver Connect the equipment into an outlet on a circuit different from that to which the receiver is connected Consult the dealer...

Page 3: ...ng DHCP 7 Web Configuration Using Static IP 8 Connecting the Host Computer to the Unit 10 Disabling Mouse Acceleration on the Host Computer 10 Connecting the SV5CONS Remote User Station Optional 11 Us...

Page 4: ...l Upload 29 Purchase Options 29 Info Functions 30 Status 30 Port Numbers 31 Help Menu 32 Site map Menu 32 Copyright Menu 32 The VNC Interface 32 Native VNC Client 33 Using the VNC Menu 34 Bribar Featu...

Page 5: ...dem feature 48 Connecting a Modem 49 Modem configuration 50 Configuring the Remote Connection 51 Accessing the Web Interface 52 Modem Troubleshooting Guide 53 About Security Certificate Warnings 53 Bu...

Page 6: ...egrated multi user CAT5 switch with non blocking access to 16 32 servers by up to 3 users Platform independent can be managed using any Java enabled Web browser and connected to virtually any host ser...

Page 7: ...e note that the corresponding StarTech com part numbers are listed in brackets All applications For connection to a LAN 1 x Straight through Ethernet patch cable M45PATCHxxxx DB9F to RJ45F Adapter GC9...

Page 8: ...he Local Keyboard port on the rear panel of the SVxx53DXI 3 Connect a standard PS 2 or USB mouse to the Local Mouse port on the rear panel of the SVxx53DXI 4 Connect an XGA compliant or higher monitor...

Page 9: ...Instruction Manual 4...

Page 10: ...both admin You will be given the opportunity to change the password recommended once the configuration is complete The DHCP assigned IP Address will be visible at this time at the bottom of the screen...

Page 11: ...veral basic setup options If static IP addresses are assigned you will likely need to change the Net Mask IP Address and other details prior to connecting via your Web browser If this is the case conn...

Page 12: ...g DHCP Before you can begin the configuration process you will need to access the DHCP log from your file server or another device that acts as the DHCP server on the network You may need to contact y...

Page 13: ...he WAN and LAN ports to the same network segment Web Configuration Using Static IP The DHCP access method described above would not apply to networks that rely on static IP addresses every device has...

Page 14: ...using the same IP address as the SVxx53DXI before connecting it to the network Should an IP address conflict occur with another device on the network power off the conflicting device or assign it ano...

Page 15: ...SBM to the KVM with a straight through CAT5 cable 5 Power on the host computer Disabling Mouse Acceleration on the Host Computer Many operating systems offer a feature called mouse acceleration allowi...

Page 16: ...is centered and Acceleration is set to None Windows XP and Windows Server 2003 Go to Pointer Options and turn off Enhance Pointer Precision Ensure that the pointer speed bar is centered Linux UNIX and...

Page 17: ...he Web interface offers the most intuitive way to configure the SVxx53DXI as it provides a Java based VNC client that can be used to control the host computer from a remote location as well as support...

Page 18: ...Secure Socket Layer encrypted link that encrypts all data from the session including the actual video pictures Because Java is considered a safe programming language the JavaVNC client has some limit...

Page 19: ...lid security certificate This does not affect the security of your data in any way Whenever you are prompted about a certificate security problem by your browser or the Java VNC client always choose t...

Page 20: ...the mouse pointer over each individual listing in the Main Menu to update this message according to the function performed by each listing Main Menu At the left most side of each page the Main Menu is...

Page 21: ...g to the functionality of SVxx53DXI on a per user basis Here you will be able to customize settings to optimize overall performance e g Encryption options VNC options display and bandwidth options etc...

Page 22: ...epending on configuration it will appear to the host as a floppy drive 1 44MB an 8MB RAM Disk or a CD ROM The host computer does not require any special drivers or other configuration You can transfer...

Page 23: ...t constantly as data is needed Floppy mode Choose the Format as floppy button to switch to floppy mode Under Windows the drive will be identified as a high density floppy and will typically be assigne...

Page 24: ...de available on a web server that can be accessed by SVxx53DXI To switch to this mode type in a URL pointing to the ISO image and click on Commit The system will connect to the web server and test the...

Page 25: ...ou will need an ISO image from a disk that contains special bits to enable booting El Torito standard Nothing special is needed when reading the ISO from a working bootable CD ROM To create a bootable...

Page 26: ...ation of the SVxx53DXI Network Configuration DHCP Dynamic Host Configuration Protocol Automatic network configuration using DHCP is Enabled Disabled This feature applies only to the LAN port on the re...

Page 27: ...DNS servers and the default DNS domain suffix in use on the network If DHCP is enabled some of these values may be supplied automatically Clicking the Commit button applies any changes made on this pa...

Page 28: ...se the 802 1d STP algorithm must finish before the DHCP broadcast can go out To change this setting select either Enabled or Disabled from the drop down menu then click Commit and Apply User Accounts...

Page 29: ...y best to leave all empty except in the this user s default line Important note The Hardwired user account If you create a user account with the name hardwired it can be used only at the local VGA por...

Page 30: ...on of this system Contact Name This string is sent as the system sysContact value over SNMP It should describe who to contact regarding this machine Typically it includes an email address Network Addr...

Page 31: ...ing these features could make the unit inaccessible through Web configuration i e due to firewall filtering Note that any password changes you make will have to be entered in duplicate to prevent the...

Page 32: ...ret is used to encrypt communications and corresponds to a shared password for the RADIUS server and the client machine Two additional servers may be defined for backup purposes Each server will be tr...

Page 33: ...le modem connections PPP via serial port modem Time Date Date and time are stored without consideration for time zone If you are controlling multiple sites in different time zones we recommend you use...

Page 34: ...rmware upgrade Do NOT turn off power to the unit before this operation completes successfully The unit will sometimes reboot as part of the upgrade procedure depending on which system component is upg...

Page 35: ...res opened by the code will be enabled immediately but you may need to reboot the unit to begin using certain features Info Functions Status The Status screen displays a system security log various sy...

Page 36: ...ues You may wish to enhance security by disabling services that you will not use with the unit To disable a service change its port number to 0 For flexibility both the LAN and WAN ports can be config...

Page 37: ...emote control Cleartext VNC There are several third party software programs that use the standard VNC protocol available in open source and commercial VNC clients By pointing any VNC client at the def...

Page 38: ...SSH Tunnel with Native VNC client If you are using openssh here is the appropriate Unix command to use based on the default settings on a machine at 10 0 0 34 ssh f l admin L 15900 127 0 0 1 5900 10...

Page 39: ...ick anywhere inside the window to clear it or wait ten seconds Bribar Feature Along the bottom of the VNC screen is a dark blue bar with various buttons known as the bribar Its purpose is to show a nu...

Page 40: ...the picture quality can be adjusted Keys Shows the VirtKeys menu which allows you to simulate pressing special keys such as the Windows key or complex multi key sequences 1 A S These flags show the s...

Page 41: ...orresponding number as appropriate Or directly select any system by pressing 1 through 9 A for 10 through W for 32 Similarly click on the Up and Down arrows to select the previous or next available sy...

Page 42: ...This is the only way to get into the menu system if the Bribar is disabled Shown below is the main menu for a typical system The main menu window may be moved by clicking and dragging on the title ba...

Page 43: ...or Max The different modes indicate more time spent on compression versus more bandwidth There is no visual difference between the modes but there can be a noticeable difference in speed and smoothne...

Page 44: ...to a different sized image from half size to one sixteenth Logout End the VNC login session and disconnect Video Tuning Sub menu with video adjustments to be used when automatic picture adjustment do...

Page 45: ...ey at the same time Alternatively you may move the mouse outside this window press the regular key and then choose RESET to release all depressed keys The VirtKeys menu can be left open while using th...

Page 46: ...number will be zero shown as nil Moving the mouse for example will cause the number to jump to about 2 or 3 You may use this number to judge the picture quality as you adjust the controls on this men...

Page 47: ...ning menu While the vast majority of users will not need to adjust these settings it offers added control of the video settings of your VNC sessions Sampling Phase Does not normally need to be used si...

Page 48: ...so be digitized and sent over the network Quality video cards in our experience offer better performance simply because they don t add analog noise Some external KVM switches generate video noise as w...

Page 49: ...a large amount In the case of phase this is four units and for all others ten units The and buttons decrease or increase the parameter by one unit The middle button sets the parameter to the middle v...

Page 50: ...ime USB Replug Disconnects and reconnects the USB disk Can be used to re insert the USB disk to force the operating system to recognize it Insert The current computer system takes control of the USB d...

Page 51: ...ssing the left CTRL or ScrLk key twice within one second The entry for the currently selected computer is highlighted in green in the OSD Use the UP and DOWN arrow keys to highlight a computer and the...

Page 52: ...t Page Up Down Scroll up and down the OSD list Home End View the first and last channel of the KVM Please Note Channel names can only be changed through the web interface Changing Your Configuration A...

Page 53: ...ntially private as it bypasses the public Internet completely Please note that this feature requires both an external modem most standard connection protocols are supported and a dedicated phone line...

Page 54: ...ant to note that modems that offer 56K or 56 000 bps connections often achieve connection speeds that are far lower than their maximum capabilities Given the limitations of telecom infrastructure many...

Page 55: ...xx53DXI s serial port and the modem and does not affect the connection speed between the local and remote modems as they will negotiate their own connection speed when a connection is made It is highl...

Page 56: ...ate a new connection under Network Tasks 4 The New Connection Wizard window will open Click Next 5 Select Connect to the Internet then click Next 6 Select Set up my connection manually then click Next...

Page 57: ...color is automatically re enabled Some areas of the screen may not be updated as frequently as others and animations or other auto updating areas of the screen may appear out of focus or blocky as a...

Page 58: ...string or verify the cabling and modem status Modem init okay The modem has responded appropriately to the init string Saw PPP startup from client A PPP authentication has occurred and a session has s...

Page 59: ...ignore the warning for future visits the browser will no longer generate a warning if that option is selected Second if you install the certificate from the SVxx53DXI onto the host computer see below...

Page 60: ...rial ports Please note Only one user can use the terminal emulator at a time How to find the Built in Terminal Emulator The emulator can be found at the end of the OSD menu 33rd system on a 32 port 17...

Page 61: ...o choose the appropriate setting for your serially attached device If you choose SSH or Telnet the following screen will ask you for the Host Name or IP address of your remote connection 4 Enter the s...

Page 62: ...ing SSH you will be asked to provide the remote username 6 Next you will be asked to declare any alternative SSH options 7 Last you will be asked to provide a meaningful name for this newly created co...

Page 63: ...d and press enter You will be prompted for the admin password Highlight the connection you wish to remove and press enter Please Note Anyone can create a connection but only the Admin has the right to...

Page 64: ...cept the mouse acceleration configuration and always has the mouse accelerated regardless of your configuration Therefore on this screen it is best to avoid using the mouse After resync the mouse poin...

Page 65: ...signed by our own signing authority Mouse performance is erratic when using the GNOME or KDE desktop in a Linux X Window environment The mouse controls in GNOME and KDE environments offer both an acc...

Page 66: ...Serial Interface Pinout RJ45 DB9 male Signal 1 6 DSR input 2 1 DCD input 3 4 DTR output 4 5 GND 5 2 RxD input 6 3 TxD output 7 8 CTS input 8 7 RTS output N A 9 RI not used The DB9 side is wired as DC...

Page 67: ...nterface Front Panel Indicators 1 x Remote user connected 1 x Power flashes during boot 2 x USB connected Rear Panel Indicators 2 x Ethernet ports link on activity blink 1 x Serial port always on 1 x...

Page 68: ...d wire in the line cord or the rear panel binding post must be connected for safety AC Power Source This product is intended to operate from an AC power source that will not apply more than 250 V AC R...

Page 69: ...returned for repair or replacement with equivalent products at our discretion The warranty covers parts and labor costs only StarTech com does not warrant its products from defects or damages arising...

Page 70: ...ts and we quickly deliver them wherever they need to go Just talk to one of our tech advisors or visit our website You ll be connected to the products you need in no time Visit www startech com for co...

Reviews: