11
3rd BUTTON FUNCTIONS
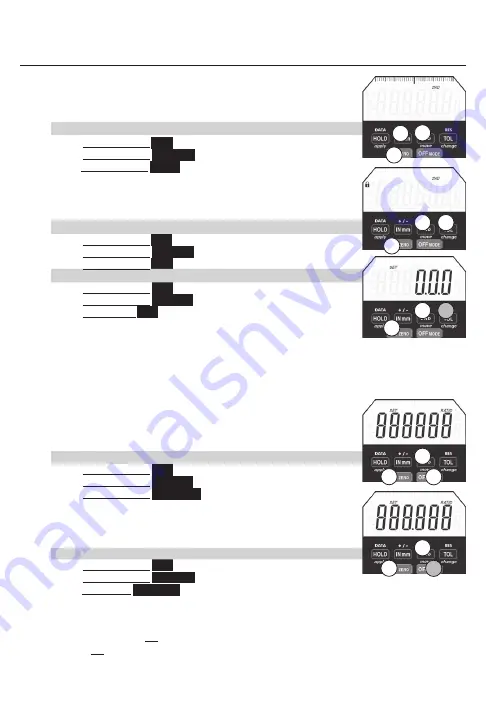
Analog Display
Allows for ticks or graduation scale view at top of LCD
Graduation distance matches the selected resolution of the numeric
display
a. To Disable / Enable Analog Display
1.
Press & Release
2ND
2.
Press & Release
ON ZERO
3.Press & Release
INmm
Lock
Locks Buttons/Functions/Settings. 3 Button Push can disable /
enable Lock. 3 Digit Lock Combination can be entered for
additional security.
a. To Enable / Disable Lock
1.
Press & Release
2ND
2.
Press & Release
ON ZERO
3.
Press & Release
TOL
A Lock Icon appears on LCD
b. To Program Lock Combination
1.
Press & Release
2ND
2.
Press & Release
ON ZERO
3.
Press & Hold
TOL
until 000 appears & SET is flashing
Use the
move
(2ND ),
change
(TOL), &
apply
(HOLD)
to program
3 digit combination.
move
scrolls flashing icon from left to right.
change
toggles the value of the
flashing icon.
apply
enters 3 digit combination.
Enable functions you want to use before locking indicator. Example: Using MAX
HOLD, Turn the MAX Hold on (MAX appear on LCD) before you lock.
Lock function will lock out all functions that are not turned on.
Functions that can’t be locked include OFF, ON, ZERO.
NOTE: Master Combination 285 (if combination is lost)
Ratio
Program a Ratio
a. To Enable / Disable Ratio:
1.
Press & Release
2ND
2.
Press & Release
ON ZERO
3.
Press & Release
OFF MODE
RATIO
will appear on LCD.
b. To Program RATIO : Enable Ratio (step a.).
Use the move
(2ND),
change
(TOL), &
apply
(HOLD)
to program/enter RATIO value.
move
scrolls the flashing icon from left to right .
change
toggles the
value of the flashing icon.
apply
stores/enters the PRESET value.
c. To Change Ratio if Already Programmed
1.
Press & Release
2ND
2.
Press & Release
ON ZERO
3.
Press & Hold
OFF MODE
until first icon is flashing. Use
move, change, apply
to reprogram
(see step b. above)
Note: OFF can be used to exit programming functions (Ratio, Tolerance, Presets, Lock)
Using OFF to exit will not apply changes. After 60 seconds of inaction, programming will exit
and will not apply changes.
3
3
2
2
1
1
3
3
3
2
2
2
1
1
1
Press & Release
❍
Press & Hold
●
Summary of Contents for AD
Page 1: ...Electronic Dial Indicator Instructions IQ 2nd Generation AD ...
Page 13: ...13 CALC Software ...
Page 19: ...19 Notes ...
Page 20: ...Notes ...


