background image

Beijing Star Instrument Technology Co., Ltd 

Web: 

www.star-itech.com

  Email: 

[email protected]


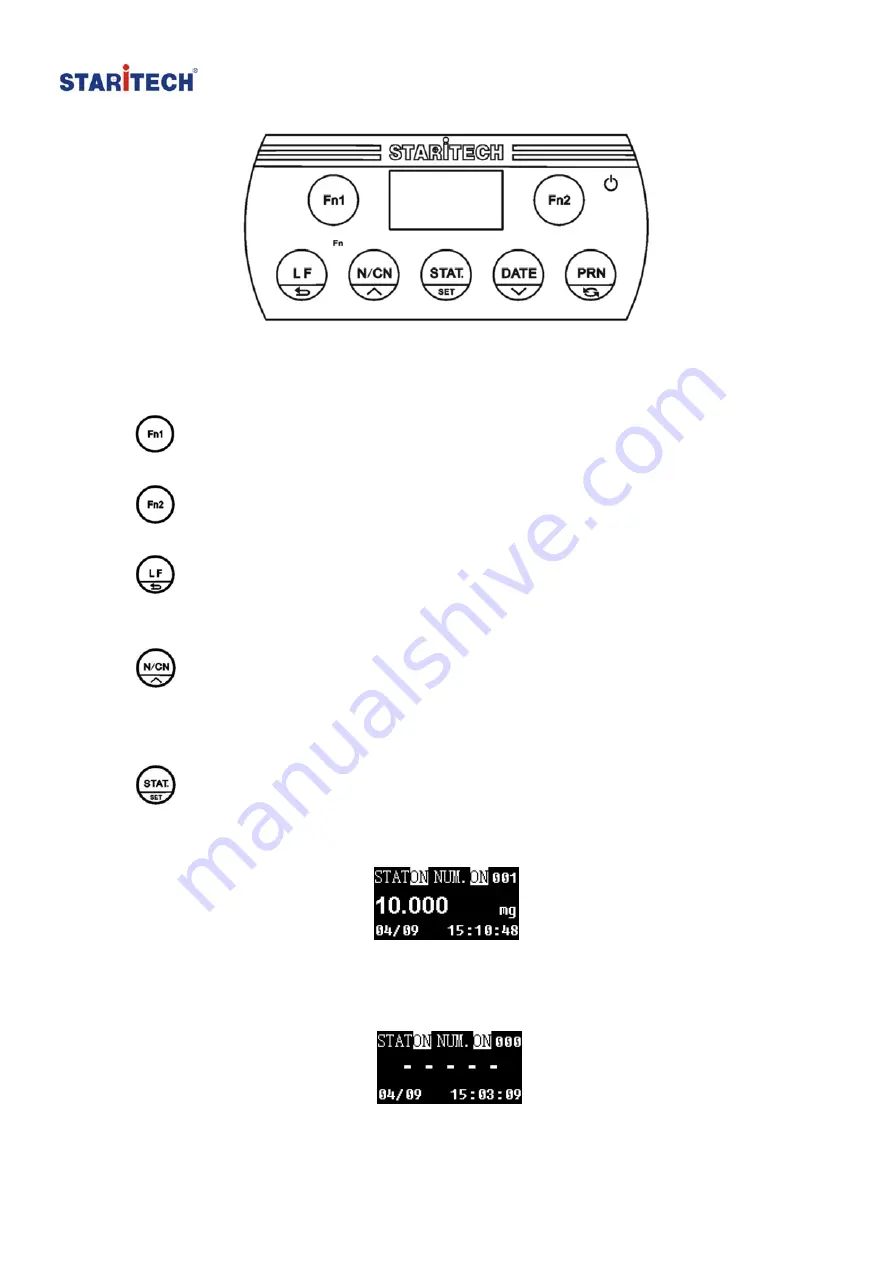
: Soft key 1, usually it is for inserting the sample name. In setting mode, it 

changes the cursor position to the left side.   

: Soft key 2, usually it is for inserting the Lot No. In setting mode, it 

changes the cursor position to the right side. 

: Press the key once to feed the printer by one line, press the key and 

hold to continuously feed until released. In the setting mode, press the key to 
go back to previous menu. 

: Numbering Function key. Press this key to toggle the switch ON and 

OFF. Press the key and hold for about 2 seconds then the numbering of the 
samples will start from the beginning (001) again. In the setting mode, press 
the key to go back to previous menu item or increase parameter settings. 

: Statistical Evaluation of the Data: If statistics function is activated 

(display screen shows “STAT ON”), the weighing data will be written into the 
statistic memory and will be shown on the screen. Refer to the figure below. 


Press this key to print the statistics reports according to the settings and the 
statistics memory will be cleared. The displayer will show “-----“. Refer to the 
figure below. 


Page 5 of 24 

Summary of Contents for TX-1 Series

Page 1: ...ridge 7 3 5 Replacing Ink Ribbon Cartridge 8 3 6 Installing the Printer Paper 8 4 9 4 1 Select Language 9 4 2 Setting Date and Time 10 4 3 Settings 11 5 14 5 1 Installing the software on PC 14 5 2 Driver Installation using Window XP as example 14 5 3 TX 1XX Label Sample name Editor 17 5 4 Editing Sample Name 17 5 5 Editing Label 18 6 18 6 1 Print sample name 18 6 2 Print Lot number 19 6 3 Lot Numb...

Page 2: ...ents of this manual is correct without any shortcomings so we are not liable for losses which may be caused to users due to the manual Meanwhile there will be continuous upgrade of the products as well as the manual so we had the rights to modify the manual without any notice None of the electronic products can achieve absolute reliability so we do not suggest the customers to apply this in such a...

Page 3: ...ng needs to the variety of applications the TX 1XX series balance printer provides users with a flexible choice TX 100 Basic Edition TX 110 Standard Edition Specifications Printing method Impact dot Inking Ink ribbon EPSON ERC 22 or ERC 09 Printing format 24 digits line 5 7 dot matrix Printing speed 2 7 lines sec approx Character size 1 7mm W 2 6mm H ASCII Paper Regular paper 57 5mm width Printer ...

Page 4: ...of GLP GMP Built in clock print Weighing Data with Time Date User defined identifier 128x64 OLED display Statistical Evaluation Numbering Function Sample Name insertion and printing Lot Number insertion and printing Lot Number Auto Increment Weighing Data Recorder Weighing Data Curve 2 2 Overview 3 3 1 Introduction to Operation Page 4 of 24 ...

Page 5: ...vious menu Numbering Function key Press this key to toggle the switch ON and OFF Press the key and hold for about 2 seconds then the numbering of the samples will start from the beginning 001 again In the setting mode press the key to go back to previous menu item or increase parameter settings Statistical Evaluation of the Data If statistics function is activated display screen shows STAT ON the ...

Page 6: ...d for about 2 seconds to set the time date In the setting mode press this key to go to next menu item or decrease parameter settings Print key Press this key to request weighing data from the balance Press this key and hold for about 2 seconds to enter the setting mode in the setting mode press this key to switch between uppercase and lowercase letters 3 2 Installation of the Rechargeable Batterie...

Page 7: ...wards you first put the Ink ribbon cartridge on the gear shaft on the left side of the mechanism uplift the right side slightly if the left side of the Ink ribbon cartridge does not reach the bottom press the knob of the ink ribbon cartridge and rotate it slowly towards the direction shown by the arrow Once the left side reaches the bottom then press the right side hard to reach the bottom too Che...

Page 8: ...cartridge by pressing at the right end marked with Push as shown in the figure below Then insert the new cartridge from straight above Tips To avoid the problem of not printing the letters we suggest you to install the Ink ribbon cartridge first before installing the printing paper 3 6 Installing the Printer Paper 1 Lift the paper cover 2 Insert the printer paper shaft into the center of the paper...

Page 9: ...paper slot The front end of the paper must be at the bottom and facing towards you Please refer to the figure below 4 Press the key to feed the paper into the ink ribbon cassette as shown in the figure below 4 4 1 Select Language 1 Turn off the printer 2 Turn on the printer when the figure below appears on the display then Page 9 of 24 ...

Page 10: ...without power supply it is required to reset the time and date Press the key and hold for at least 2 seconds then the display will show as in the figure below Press the key and the key to change the cursor position Press the key or the key to decrease or increase the value Press the key to confirm After setting is complete press the key to return to the previous step Tips while setting time date t...

Page 11: ... Print standard deviation ON ON OFF Print variation coefficient ON ON OFF Print mean deviation in STAT OFF ON OFF Print mean deviation coefficient OFF ON OFF Print sum value in STAT report ON ON OFF Print minimum in STAT report ON ON OFF Print minimum deviations OFF ON OFF Print maximum in STAT report ON ON OFF Print maximum deviations OFF ON OFF Print difference in STAT report ON ON OFF Print dat...

Page 12: ...een save time 5 minutes 1 120 minutes Screen brightness 100 level 0 255 level Password 888888 6 digits from 0 9 Used to setting time date Time Synchronize Balance First Balance First Printer First If the balance have a built in real clock this item used to determine whether printer or balance real time will be printed out Device ID Max 16 characters Item Factory setting Setting options memo Auto b...

Page 13: ...ith the balance modify carefully Stop bits Depends on the model of printer 1STOP 2STOP Must match with the balance modify carefully Handshake Depends on the model of printer None DTR CTS DTR DSR Xon Xoff Must match with the balance modify carefully Terminate char Depends on the model of printer CR LF CR LF XO N Must match with the balance modify carefully Disable HEX mode ON ON OFF ON Normally OFF...

Page 14: ...ich can be downloaded from www star itech com 5 2 Driver Installation using Window XP as example 1 Connect the printer USB port to computer with USB cable Warning do not connect the power adaptor with the printer 2 The Found new hardware wizard windows will be displayed on computer screen choose Install from a list or location Advanced then click Next Please refer to the figure below 3 Check Searc...

Page 15: ...itech com below 4 Installation of TX 1XX printer drive will begin The figure as shown below will be displayed on the computer screen 5 During the installation a XP compatibility warning will be displayed click Continue Anyway Please see the figure below for your reference Page 15 of 24 ...

Page 16: ...ument Technology Co Ltd Web www star itech com Email support star itech com 6 When Completing the Found new hardware wizard appears click Finish to complete the installation Please refer to the figure below Page 16 of 24 ...

Page 17: ... re check the connection and make sure the driver has been installed successfully 5 4 Editing Sample Name 1 Choose the Sample name tab input the sample name and the code accordingly then click the ADD button The sample name should be less than 16 characters and the code must be 6 digit numbers from 0 9 without same code repeating Clicking Delete button will remove the item from the list Tips Becau...

Page 18: ...will be cleared As the sample names stored in printer cannot be obtained directly on the printer so we suggest you click Export to file button to save all the items on the list You can click Import from file to recover later 5 5 Editing Label 1 Choose the Label tab input the text as necessary to print out after printer power is on in Label after printer start edit then click Write to Printer butto...

Page 19: ...ple code By inputting sample code the sample name will be printed out accordingly Please refer to related section above for how to input the sample code Sample name and code can be edited with the TX 1XX Label Sample name Editor software The printer will save the input content and status even after the printer reboots 6 2 Print Lot number Press the key then the display screen will show Please refe...

Page 20: ...irmware Update Firmware is updated only when it is necessary or new features are obtained 1 Connect the printer s USB port to computer with USB cable Warning do not connect the power adaptor with the printer 2 Open the firmware package folders double click the following exe file then click the Update button and wait for completion Please refer to the figure below Note when the connection is wrong ...

Page 21: ...D Sub 9pin assignments Pin No Signal Direction Description 1 NC No connection 2 RXD Input Receive data 3 TXD Output Transmit data 4 DTR Output Data terminal ready 5 SG Signal ground 6 DSR Input Data set ready 7 RTS Output Request to send Connect to pin4 internal 8 CTS Input Clear to send 9 NC No connection Note The pin7 RTS is connected to pin4 DTR internally Handshake protocol None Printer and ba...

Page 22: ...ve data set the DTR to logic low2 and vice versa When the voltage of DSR printer side exceeds 2 5V it prevents further transmission of data the data will be stored in the transmit buffer until the voltage less than 1V Note 1 XON 0x11 Hex XOFF 0x13 Hex 2 The transmit buffer size of the printer is 32 bytes 3 Logic low 5 15V RS 232C 0 1V TTL logic high 5 15V RS 232C 3 5V TTL 4 DTR DSR can be used SHI...

Page 23: ... show up in printing A The first reason may be due to that the GLP GMP PRINTOUT are not enabled please refer the manual of the balance The second reason may be the balance did not support these features Q It sounds like the printer is working so does the line feed but no letters on the paper printed out A The ink ribbon cartridge may be not installed correctly or it cannot be used anymore Q Time a...

Page 24: ...to wipe the printer after cleaning 5 The power consumption is quite low so it can standby for a long time 6 Keep it in a dry environment if not used for a long time pack it into the factory packaging 7 To avoid damage to the printer we suggest you to buy the ink ribbon cartridge from the original supplier 8 If the paper is stuck press the key then cut the parts you did not need DO NOT ever pull th...

Reviews: