21
correct potential problems before they can do harm. It is a great idea to start this
routine when the batteries are first received.
Inspection Guideline
•
Examine the outside appearance of the battery.
•
Look for cracks in the container.
•
The top of the battery, posts, and connections should be clean, free
of dirt, fluids, and corrosion.
•
Repair or replace any damaged batteries.
•
Any fluids on or around the battery may be an indication that electrolyte
spilling, leaching, or leaking out.
•
Leaking batteries must be repaired or replaced.
•
Check all battery cables and their connections.
•
Look closely for loose or damaged parts.
•
Battery cables should be intact; broken or frayed cables can be ex-
tremely hazardous.
•
Replace any cable that looks suspicious.
•
Tighten all wiring connections to the proper specification. Make certain
there is good contact with the terminals.
WARNING:
Do not smoke near batteries. Do not over-tighten terminals. Doing so
can cause post breakage, post meltdown, or fire.
Battery Cleaning
• CAUTION:
To prevent battery damage, be sure that all battery caps (if
equipped) are tightly installed.
•
To reduce the possibility of damage to vehicle or floor, neutralize acid be-
fore rinsing battery.
•
To reduce the possibility of damage to electrical components while clean-
ing, do not use a pressure washer.
•
Cleaning should take place per the Periodic Service Schedule.
•
When cleaning the outside of batteries and terminals, first spray with a
solution of sodium bicarbonate (baking soda) and water to neutralize any
acid deposits before rinsing with clear water.
•
Use of a water hose without first neutralizing any acid will move acid from
the top of batteries to another area of the vehicle or storage facility where
it will attack the metal structure or the concrete/asphalt floor. Additional-
ly, conductive residue will remain on the batteries and contribute to their
discharge.
• WARNING:
To reduce the possibility of battery explosion that could result
Summary of Contents for BN72-08-AC-Autodrive-M
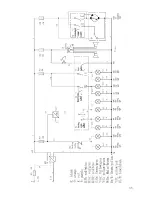
Page 34: ...34 6 Electrical Diagrams...
Page 35: ...35...

