Stardom SOHORAID SR4-SB3PLUS User Manual Download Page 7

SR4-SB3+ User Manual

5

5. Description of Front Panel Operation and LCD Information

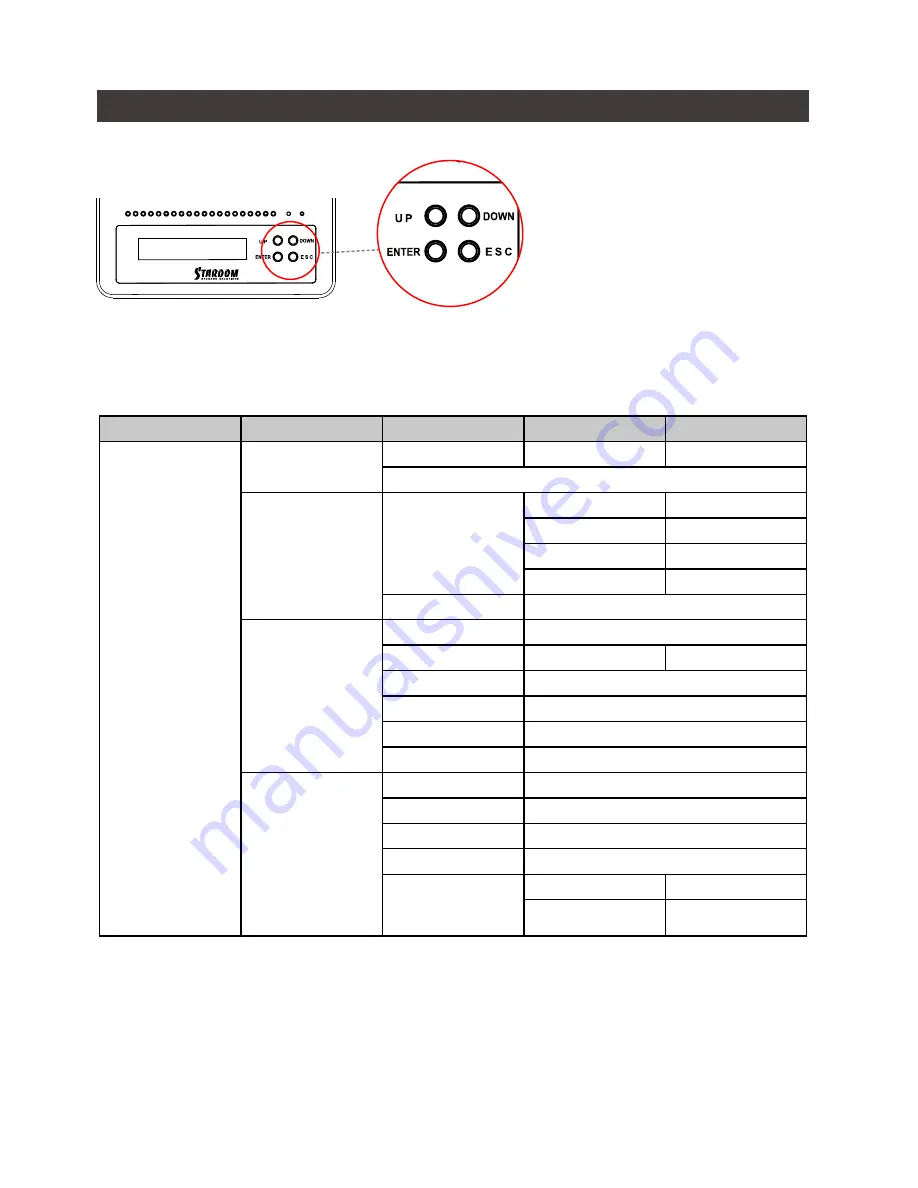
Front Panel Operation:

Enter: Enter: Enter to next level or Confirm

Esc: Back to next level or Cancel

Up / Down: Select Items

Users can set the RAID mode using the LCD and buttons on the front. The default is JBOD mode. 

Using “Quick Setup” function, users can change the RAID mode to RAID 0 or RAID 5 quickly.

Please refer to LCD Information as below for other setting:

Level 0

Level 1

Level 2

Level 3

Level 4

External 4BAY

HARDWARE 

RAID

Quick Setup

Create One RAID

RAID 0/ RAID 5

Select Disk

Delete All RAID

Disk Manager

Identify Disk

Disk 1

Check Disk LED

Disk 2

Check Disk LED

Disk 3

Check Disk LED

Disk 4

Check Disk LED

Show Disk Info

< Disk Info >

RAID Manager

Identify RAID

Select RAID

Create RAID

RAID 0 / RAID 5

Select Disk

Delete RAID

Select RAID

RAID Info

― ―

Change RAID Pwd

< Password >


for RAID Setup

Rebuilding Priority

Highest/High/Medium/Low/Lowest

System Manager

System Info

Firmware Version

Changhe Password

< Password >


for System Info

Logout From Menu

< Y or N >

Alarm Control

Mute the Buzzer

Hardware Monitor

Temp. Monitor

< Temp. >

Fan Monitor

< Fan Speed / 

Fan Level >

Summary of Contents for SOHORAID SR4-SB3PLUS

Page 1: ...SOHORAID User Manual SR4 SB3...

Page 2: ...nd Precautions 3 4 Hardware Installation Procedure 4 5 Description of Front Panel Operation and LCD Information 5 6 Replacement of Malfunctioning Drive and Data Rebuild Instructions 6 7 System Tempera...

Page 3: ...pping Latest product specifications and updates can be found at www STARDOM com tw No separate notifications will be provided by our company If you would like to receive the latest STARDOM product inf...

Page 4: ...ive position 4 A HDD access light B HDD enclosure handle C HDD tray key lock D LCM display E System status light F Power status light G UP button H DOWN button I ENTER button J ESC button K Fan L Mute...

Page 5: ...failure is taking place go to Section 6 Replacement of Malfunctioning Drive and Data Rebuild Instructions and follow the steps accordingly 7 Whenever turning off or unplugging the SR4 SB3 from your c...

Page 6: ...leted insert the hard drive tray into the system horizontally and secure the latch into place Connect the AC power cable to the SR4 SB3 and then plug the AC power to the wall socket Boot up the unit S...

Page 7: ...evel 3 Level 4 External 4BAY HARDWARE RAID Quick Setup Create One RAID RAID 0 RAID 5 Select Disk Delete All RAID Disk Manager Identify Disk Disk 1 Check Disk LED Disk 2 Check Disk LED Disk 3 Check Dis...

Page 8: ...ndicator of the replacement drive will interchangeably blink red and purple to inform that the data is being rebuilt to the replacement drive During data rebuild you may operate the SR4 SB3 as normal...

Page 9: ...B3 0 x1 eSATA x1 AC x1 x1 x 1 SafeTANK SR4 SB3 STARDOM STARDOM SR8 TB3 STARDOM SR8 TB3 www STARDOM com tw STARDOM STARDOM www STARDOM com tw 1 0 40 o C 32 104 o F 20 47 o C 4 116 o F 5 95 100 240V AC...

Page 10: ...SR4 SB3 User Manual 8 R 1 3 2 4 A B C D LCM E F G UP H DOWN I ENTER J ESC K L M USB3 0 N eSATA O P Q R...

Page 11: ...SR4 SB3 User Manual 9 RAID JBOD RAID JBOD YES YES YES 3 1 2 RAID 5 RAID 0 20GB 3 SR4 SB3 4 5 RAID 6 6 7 SR4 SB3 8 RAID 5 RAID 0 9 Auto 50 10 C 10 SR4 SB3 SR4 SB3 STARDOM...

Page 12: ...SR4 SB3 User Manual 10 4 1 2 3 AC Power SR4 SB3 AC Power LCD LCD PC SR4 SB3 RAID RAID 4 5 6 7 8...

Page 13: ...eck Disk LED Disk 3 Check Disk LED Disk 4 Check Disk LED Show Disk Info Disk Info RAID Manager Identify RAID Select RAID Create RAID RAID 0 RAID 5 Select Disk Delete RAID Select RAID RAID Info Change...

Page 14: ...00 XP Vista 7 8 10 NTFS 2 Mac OS X HFS Mac OS Extended 3 PC Mac FAT32 4GB Q2 SR4 SB3 eSATA 200MB s A 1 PCI E SATA PCI E 1X 135MB s 2 SR4 SB3 RAID 0 RAID 5 6 7 8 1 2 SR4 SB3 3 RAID 5 SR4 SB3 RAID 0 SR4...

Page 15: ...SR4 SB3 User Manual 13 http www stardom com tw...

Reviews: