Stardom SOHORAID SR4-SB3PLUS User Manual Download Page 12

SR4-SB3+ User Manual

10

4. 

硬體安裝

請參照以下步驟完成硬體安裝


將系統擺放於穩固平台,並確認散熱風扇口沒有被其它物體擋住,系統四周有適當的散熱空間。


(

擺放環境請避免接近潮濕或其它亦對產品造成損傷的環境

)

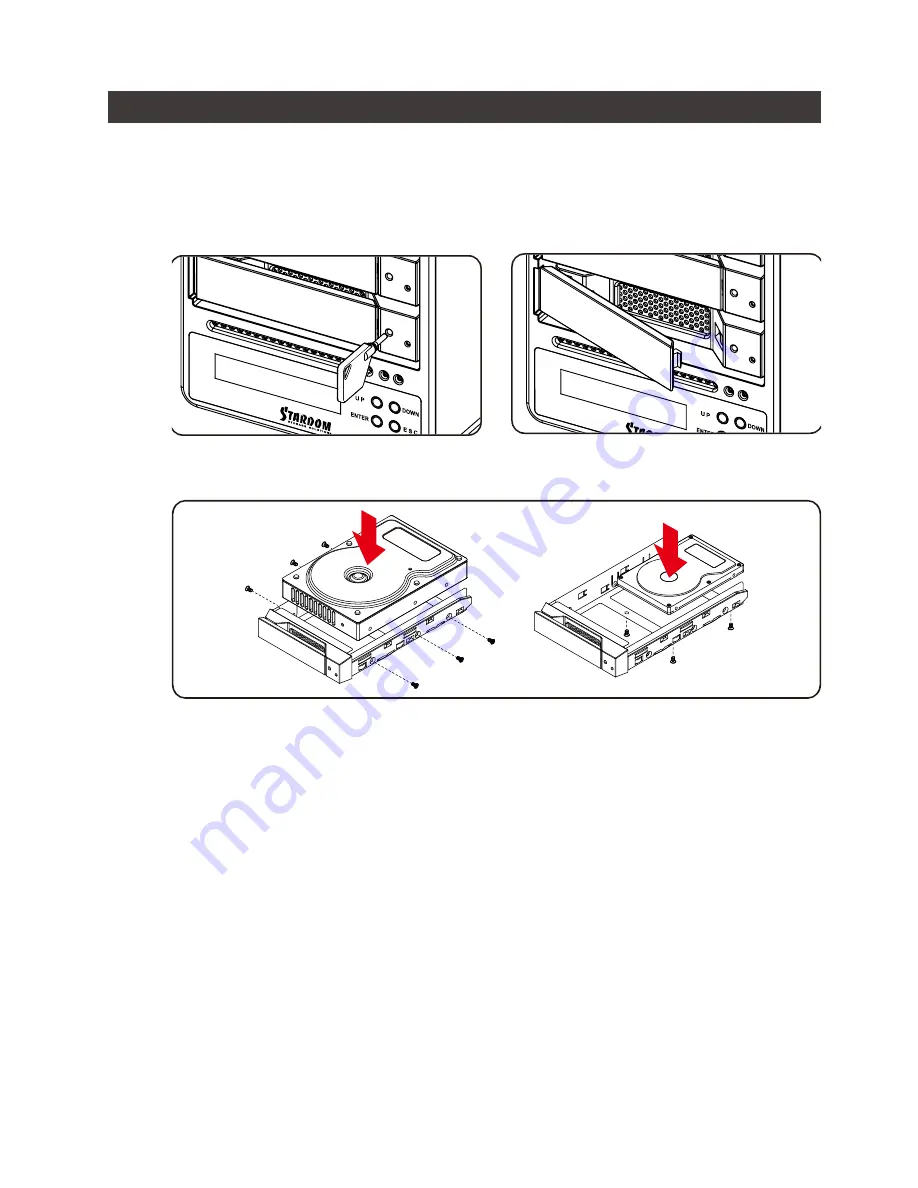
請使用用零件包內附的頂針插入鑰匙孔後,抽取盒門門閂將會輕彈開啟,即可將硬碟抽取


盒取出。

步驟

 1

步驟

 2

將硬碟安裝到抽取盒上,並以零件包內附的螺絲加以固定,以避免不必要的移動對硬碟造成傷

害。

步驟

 3

硬碟安裝完成後,請將抽取盒平移放入主機內,並關上把手。

AC Power

電源線與

SR4-SB3+

連接,再將

AC Power

電源線與電源插座連接,執行


開機。

透過前方的

LCD

與按鍵來設定您所需求的儲存模式。

(

請參考

"

前面板操作及

LCD

訊息說明

")

將附件中的連接線分別接到

PC

SR4-SB3+

的相關連接埠。

開機後,您的作業系統將會自動辨識到

RAID

容量;待辨識成功後,請依據您所需的儲存格式,

將系統內的硬碟依照作業系統的指示完成格式化。待格式化完成後,便可直接執行

RAID

系統。

步驟

 4

步驟

 5

步驟

 6

步驟

 7

步驟

 8

Summary of Contents for SOHORAID SR4-SB3PLUS

Page 1: ...SOHORAID User Manual SR4 SB3...

Page 2: ...nd Precautions 3 4 Hardware Installation Procedure 4 5 Description of Front Panel Operation and LCD Information 5 6 Replacement of Malfunctioning Drive and Data Rebuild Instructions 6 7 System Tempera...

Page 3: ...pping Latest product specifications and updates can be found at www STARDOM com tw No separate notifications will be provided by our company If you would like to receive the latest STARDOM product inf...

Page 4: ...ive position 4 A HDD access light B HDD enclosure handle C HDD tray key lock D LCM display E System status light F Power status light G UP button H DOWN button I ENTER button J ESC button K Fan L Mute...

Page 5: ...failure is taking place go to Section 6 Replacement of Malfunctioning Drive and Data Rebuild Instructions and follow the steps accordingly 7 Whenever turning off or unplugging the SR4 SB3 from your c...

Page 6: ...leted insert the hard drive tray into the system horizontally and secure the latch into place Connect the AC power cable to the SR4 SB3 and then plug the AC power to the wall socket Boot up the unit S...

Page 7: ...evel 3 Level 4 External 4BAY HARDWARE RAID Quick Setup Create One RAID RAID 0 RAID 5 Select Disk Delete All RAID Disk Manager Identify Disk Disk 1 Check Disk LED Disk 2 Check Disk LED Disk 3 Check Dis...

Page 8: ...ndicator of the replacement drive will interchangeably blink red and purple to inform that the data is being rebuilt to the replacement drive During data rebuild you may operate the SR4 SB3 as normal...

Page 9: ...B3 0 x1 eSATA x1 AC x1 x1 x 1 SafeTANK SR4 SB3 STARDOM STARDOM SR8 TB3 STARDOM SR8 TB3 www STARDOM com tw STARDOM STARDOM www STARDOM com tw 1 0 40 o C 32 104 o F 20 47 o C 4 116 o F 5 95 100 240V AC...

Page 10: ...SR4 SB3 User Manual 8 R 1 3 2 4 A B C D LCM E F G UP H DOWN I ENTER J ESC K L M USB3 0 N eSATA O P Q R...

Page 11: ...SR4 SB3 User Manual 9 RAID JBOD RAID JBOD YES YES YES 3 1 2 RAID 5 RAID 0 20GB 3 SR4 SB3 4 5 RAID 6 6 7 SR4 SB3 8 RAID 5 RAID 0 9 Auto 50 10 C 10 SR4 SB3 SR4 SB3 STARDOM...

Page 12: ...SR4 SB3 User Manual 10 4 1 2 3 AC Power SR4 SB3 AC Power LCD LCD PC SR4 SB3 RAID RAID 4 5 6 7 8...

Page 13: ...eck Disk LED Disk 3 Check Disk LED Disk 4 Check Disk LED Show Disk Info Disk Info RAID Manager Identify RAID Select RAID Create RAID RAID 0 RAID 5 Select Disk Delete RAID Select RAID RAID Info Change...

Page 14: ...00 XP Vista 7 8 10 NTFS 2 Mac OS X HFS Mac OS Extended 3 PC Mac FAT32 4GB Q2 SR4 SB3 eSATA 200MB s A 1 PCI E SATA PCI E 1X 135MB s 2 SR4 SB3 RAID 0 RAID 5 6 7 8 1 2 SR4 SB3 3 RAID 5 SR4 SB3 RAID 0 SR4...

Page 15: ...SR4 SB3 User Manual 13 http www stardom com tw...

Reviews: