background image

M.201 CONTENTS 


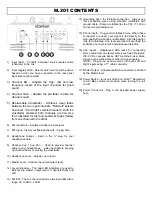
1)  Input fader - Controls individual source levels/volume 

(channels) in the mix. 

 
2)  Input toggle switch - Selects which source will be active 

based on what you have connected to the rear panel 
input section (phono/line). 


3) Channel EQ - Adjusts the high, mid and low 

frequency levels of the input channels for good 
sound. 


4)  Channel Gain – Adjusts the pre-fader volume for 

cleaner sound. 


5)  Replaceable Crossfader - Achieves clean fades 

between the two input channels. "Hard left" selects 
Channel 1. "Hard right" selects Channel 2. With the 
crossfader centered, both channels are live. Use 
the crossfader for fast and seamless fades (fades) 
from one channel to the other. 

 
6)  Mic Input Gain – Adjusts microphone input level. 
 
7)  Mic Input – Insert your Microphone with ¼” plug here. 
 
8)  Headphone Output – Insert in the ¼” plug for your 

headphones here. 

 
9)  Channel Cue / Cue Pan  - Used to preview channel 

audio to your headphones.    Listen here before bringing 
up channel faders or moving the crossfader. 


10) 

Headphone Level – Adjusts cue volume.


11) Master Level - Controls the overall output level. 
 
12) Level Indicators – The dual LED indicators are used to 

indicate the master output level of channels Right and 
Left. 

 
13) Mic EQ – The mic channel include a two-band EQ with a 

range of +10dB to –10dB. 


14) Grounding post - for turntable connection.    Always use 

this connection when using standard turntables with 
ground cable. (Some turntables like the T.80 / T.120 do 
not require grounding wire) 

 
15)  Phono Inputs – Plug your turntables in here. When these 

connectors are used, your signal is fed directly to the 
high-quality RIAA phono pre-amplifiers. Use this position 
only for turntables. Line level sources will overload


the


sensitive phono pre-amps and will cause distortion. 

 
16) Line Inputs - Unbalanced RCA jacks for connecting 

stereo audio from line level sources such as CD players, 
HiFi VCRs, cassette decks, DAT machines, laser discs, 
tuners, even synthesizers or other mixing consoles. 

NOTE:  Plug mono audio sources into both Left and 
Right inputs using a "Y" cable connector.


17) Master Output - Unbalanced RCA connectors controlled 

by the Master level. 


18) 

Power Switch – turns unit off and on. Note*** Remember 
to turn 

ALL

 volume levels down when turning the unit 

on/off.


19) Power Connector - Plug in the included power supply 

here. 


19

17

16 15 14

18

Summary of Contents for DJLab.2

Page 1: ...S TANT O N MAG NE T IC S INC 1 954 689 8833 w w w s t a n t o n d j c o m information stantondj com DJLab 2 OWNER S MANUAL ...

Page 2: ...over 13 Unplug this apparatus during lightning storms or when unused for long periods of time 14 Refer all servicing to qualified Stanton service center Servicing is required when the apparatus has been damaged in any way such as power supply cord or plug is damaged liquid has been spilled or objects have fallen into the apparatus the apparatus has been exposed to rain or moisture does not operate...

Page 3: ... 3 4 5 6 7 8 11 10 12 9 115V 230V 1 The desired voltage of your turntable may be set with the VOLTAGE SELECTOR switch on the rear panel of the main unit using a screwdriver 2 Do not twist the VOLTAGE SELECTOR switch with excessive force as this may cause damage 3 If the VOLTAGE SELECTOR switch does not move smoothly contact a qualified serviceman ...

Page 4: ...all output level 12 Level Indicators The dual LED indicators are used to indicate the master output level of channels Right and Left 13 Mic EQ The mic channel include a two band EQ with a range of 10dB to 10dB 14 Grounding post for turntable connection Always use this connection when using standard turntables with ground cable Some turntables like the T 80 T 120 do not require grounding wire 15 Ph...

Page 5: ...s and or audio receivers such as tape decks Plug your mixer into AC power Now you are ready to switch everything on IMPORTANT Always switch on your audio input sources such as turntables or CD players first then your mixer and finally any amplifiers When turning off always reverse this operation by turning off amplifiers then your mixer and then input devices TURNTABLE TURNTABLE SOUND SYSTEM TAPE ...

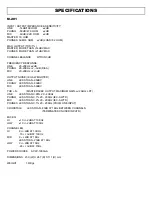
Page 6: ...LINE LESS THAN 90dBV PHONO LESS THAN 80dBV MIC LESS THAN 50dBV THD N MASTER 0dBV OUTPUT MAXIMUM GAIN w 20kHz LPF LINE LESS THAN 0 05 20 20KHz PHONO LESS THAN 0 1 20 20KHz IEC A WTD MIC LESS THAN 0 2 20 20KHz IEC A WTD PHONES LESS THAN 0 1 20 20KHz FROM LINE INPUT CROSSTALK LESS THAN 80dB AT 1KHz BETWEEN CHANNELS TERMINATED UNUSED INPUTS MIC EQ HI 10 2dB AT 10KHz LOW 10 2dB AT 100Hz CHANNEL EQ HI 9...

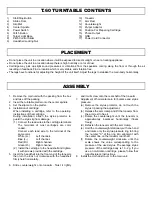
Page 7: ...dshell 6 Operating instructions 7 RCA cables with ground wire 8 Target light 9 AC cord 10 Cloth dust cover Notes 1 Do not connect the AC power plug before assembly has been completed 2 Read this manual carefully before using the unit and be sure to store the manual in a safe place for future reference T 60 TURNTABLE CONTENTS 5 2 4 3 1 7 12 11 10 8 9 13 14 6 15 17 16 P W E R O ...

Page 8: ...nect the lead wires to the cartridge terminals The terminals of most cartridges are color coded Connect each lead wire to the terminal of the same color White L Left channel Blue L Left channel Red R Right channel Green R Right channel 2 Install the cartridge to the headshell and tighten it with screws provided with the cartridge 5 Insert the headshell into the front end of the tonearm then turn t...

Page 9: ...platter will start to rotate 6 Move the tonearm over the desired groove 7 When play is finished move the tonearm to the arm rest secure the tonearm with the arm clamp 8 Press the Start Stop button to stop the platter rotating rotate the power dial to turn off the power MAINTENANCE For best results proper care of your equipment use Stanton Vinyl Cleaner VC 1 for your records and Stylus Cleaner Kit ...

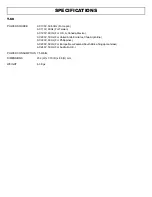
Page 10: ...0V 60Hz For U S A Canada Mexico AC 220V 50Hz For United Arab Emirates Chile Argentina AC 220V 60Hz For Philippines AC 230V 50Hz For Europe New Zealand South Africa Singapore Israel AC 240V 50Hz For Australia U K POWER CONSUMPTION 7 5 Watts DIMENSIONS 452 W x 370 D x 86 H mm WEIGHT 6 3 Kgs ...

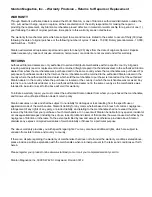
Page 11: ...ntry where the purchaser is located or the country in which the merchandise was received Any returns to a non authorized dealer or to an authorized Stanton dealer not in the same country as the merchandise was intended to be sold or as set forth above will void this warranty To initiate a warranty repair you must contact the authorized Stanton dealer from whom you purchased the merchandise and fol...

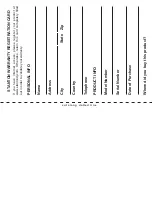
Page 12: ... Country Telephone Model Number Serial Number Date of Purchase Where did you buy this product If you have internet access please register your product at www stantondj com Otherwise return this card completely filled out in order to validate your warranty c u t a l o n g d o t t e d l i n e ...

Page 13: ...PLACE STAMP HERE Stanton Magnetics Inc 3000 SW 42nd Street Hollywood FL 33312 U S A ...

Reviews: