


6
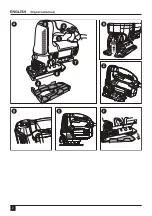
Fitting the saw blade (Fig. B)
• Hold the saw blade with the teeth facing forward.
• Push and hold the blade clamp (3) upward.
• Insert the shank of the saw blade into the blade holder as
far as it will go.
• Release the blade clamp (3).
Use
Adjusting the shoe plate for bevel cuts (Fig. C)
Warning!
Never use the tool when the shoe
plate is loose or removed.
The shoe plate (6) can be set to a left or right bevel angle of
up to 45°.
• Pull the shoe plate locking lever (7) outwards to unlock the
shoe plate (6) from the 0 deg position.
• Pull the shoe plate (6) forward and set the required bevel
15°, 30° and 45° indicated in the bevel angle window.
• Push the shoe plate locking lever (7) back towards the
saw to lock the shoe plate (6).
To reset the shoe plate (6) for straight cuts:
• Pull the shoe plate locking lever (7) outwards to unlock the
shoe plate (6).
• Set the shoe plate (6) to an angle of 0º and push the shoe
plate backwards.
• Push the shoe plate locking lever (7) back towards the
saw to lock the shoe plate (6).
Fitting and removing the shoe sleeve (fig. F)
The non scratch shoe sleeve (5) should be used when
cutting surfaces that scratch easily, such as laminate,
veneer, or paint. It can also be used to protect the shoe
surface during transportation and storage.
To attach shoe sleeve:
• Place the front of the shoe plate (6) into the front of the
shoe sleeve (5).
• Lower the tool into the shoe sleeve (5). The shoe sleeve
will click securely onto the rear of the shoe.
To remove shoe sleeve:
• Grasp the shoe sleeve from the bottom at the two rear
tabs and pull down and away from the shoe plate (6).
Cutting action (fig. E)
This jig saw is equipped with four cutting actions, three
orbital and one straight. Orbital action has a more
aggressive blade motion and is designed for cutting in soft
materials like wood or plastic. Orbital action provides a
faster cut, but with a less smooth cut across the material. In
orbital action, the blade moves forward during the cutting
stroke in addition to the up and down motion..
Warning!
Metal or hardwoods should never be
cut in orbital action.
• Move the cutting action lever (9) between the four cutting
positions: 0, 1, 2, and 3..
• Position 0 is straight cutting.
• Positions 1, 2, and 3 are orbital cutting.
• The aggressiveness of the cut increases as the lever is
adjusted from one to three, with three being the most
aggressive cut.
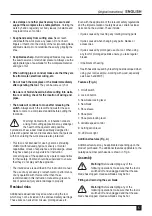
Variable speed control (fig. D)
The variable speed on/off switch offers a choice of speeds
for greatly improved cutting rates in various materials.
• To set the speed, turn the variable speed control (8) to the
required setting.
Switching on and off
• To switch the tool on, press the on/off switch (1).
• To switch the tool off, release the on/off switch (1).
• For continuos operation, press the lock-on button (2) and
release the on/off switch (1).
• To switch the tool off when in continuous operation, press
the on/off switch (1) and release it.
Sawing
Hold the tool firmly with both hands while cutting. The shoe
plate (6) should be held firmly against the material being cut.
This will help prevent the saw from jumping, reduce vibration
and minimise blade breakage.


