Stanley SDS plus STHR202 Instruction Manual Download Page 16

16 • ENGLISH

Overload coupling device

If the drill bit his caught or hooked, the driving force 

transmitted to the drill shaft will be cut off. This would 

generate a strong recoil, so it would be necessary to hold 

the tool tightly with both hands to remain in a stable position.

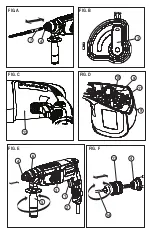
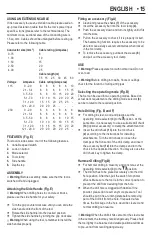
Setting the drilling depth (Fig. E)

The depth stop is a convenient feature to ensure 

uniformity in drilling depth. Loosen the side handle to 

adjust the depth gauge according to the required depth. 

After that, tighten the side handle.


f

Slacken the side handle (5) by turning the grip  


counter clockwise.


f

Set the depth stop (6) to the desired position. The  


maximum drilling depth is equal to the distance  


between the tip of the drill bit and the front end of the  


depth stop.


f

Tighten the side handle by turning the grip clockwise.

Switching on and off

 Warning! Before plugging in to the power source, make 

sure the switch can be flipped freely, and can return to its 

original position once released.


f

To switch the tool on, press the variable speed switch  


(1). The tool speed depends on how far you press the  

 switch.


f

As a general rule, use low speeds for large diameter  


drill bits and high speeds for smaller diameter drill bits.


f

For continuous operation, press the lock-on button  


(2) and release the variable speed switch. 


f

To switch the tool off, release the variable speed  


switch. To switch the tool off when in continuous  


operation, press the variable speed switch once  


more and release it.

MAINTENANCE

Your STANLEY corded/cordless appliance/tool has 

been designed to operate over a long period of time with 

a minimum of maintenance. Continuous satisfactory 

operation depends upon proper tool care and regular 

cleaning.

 Warning! Before performing any maintenance on 

corded/ cordless power tools:


f

Switch off and unplug the appliance/tool.


f

Or switch off and remove the battery from the  


appliance/ tool if the appliance/tool has a separate  


battery pack.


f

Or run the battery down completely if it is integral and  


then switch off.


f

Unplug the charger before cleaning it. Your charger  


does not require any maintenance apart from regular  

 cleaning. 


f

Regularly clean the ventilation slots in your appliance/ 


tool/charger using a soft brush or dry cloth.


f

Regularly clean the motor housing using a damp  


cloth. Do not use any abrasive or solvent-based  

 cleaner.


f

Regularly open the chuck and tap it to remove any  


dust from the interior (when fitted).

Replace the carbon brush (Fig. D)

Lubrication


f

Regularly replace and inspect the carbon brush. Once  


completely worn out by continuous wear and tear, it  


will have to be replaced. Must keep carbon brush  


clean and sliding freely within the brush holder. Both  


carbon brushes have to be replaced at the same time.


f

Remove the fixed screws (9) on the carbon brush to  


remove the carbon brush (10) and brush holder.


f

Remove the coil spring supporting the carbon brush  


(11) in the brush holder, and insert a new carbon  


brush that meets the specifications.


f

Set up the brush holder again and return the  


supporting coil s pring to its original position.

CLEANING

 Warning! Blow dirt and dust out of the main housing 

with dry air as often as dirt is seen collecting in and around 

the air vents. Wear approved eye protection and approved 

dust mask when performing this procedure.

 Warning! Never use solvents or other harsh chemicals 

for cleaning the non-metallic parts of the tool. These 

chemicals may weaken the material of the parts. Use only 

mild soap and damp cloth to clean the tool. Never let any 

liquid get inside the tool; never immerse any part of the 

tool into liquid.

ACCESSORIES

Recommended accessories for use with your product 

are available from your local dealer or authorized service 

center.

PROTECTING THE ENVIRONMENT

Separate collection. This product must not be 

disposed of with normal household waste.

Should you find one day that your STANLEY 

product needs replacement, or if it is of no further 

use to you, do not dispose of it with household 

waste. Make this product available for separate 

collection.

Separate collection of used products and packaging 

allows materials to be recycled and used again. 

Re-use of recycled materials helps prevent 

environmental pollution and reduces the demand 

for raw materials. Local regulations may provide for 

separate collection of electrical products from the 

household, at municipal waste sites or by the 

retailer when you purchase a new product.

Summary of Contents for SDS plus STHR202

Page 1: ...R202 MANUAL DE INSTRUCCIONES MANUAL DE INSTRUÇÕES INSTRUCTION MANUAL ADVERTENCIA LEASE ESTE INSTRUCTIVO ANTES DE USAR EL PRODUCTO ADVERTÊNCIA LEIA ESTAS INSTRUÇÕES ANTES DE USAR O PRODUTO WARNING READ INSTRUCTION MANUAL BEFORE USING PRODUCT Español 3 Português 8 English 13 ...

Page 2: ...FIG A FIG B FIG C FIG D FIG E FIG F 2 10 9 11 9 3 4 4 4 13 14 6 1 3 12 7 5 ...

Page 3: ... tiene contacto con tierra c No exponga las herramientas eléctricas a la lluvia y evite que penetren líquidos en su interior Existe el peligro de recibir una descarga eléctrica si penetran ciertos líquidos en la herramienta eléctrica d Cuide el cable eléctrico No utilice el cable eléctrico para transportar o colgar la herramienta eléctrica ni tire de él para sacar el enchufe de la toma de corrient...

Page 4: ...as con un mantenimiento deficiente f Mantenga las herramientas de corte limpias y afiladas Las herramientas de corte mantenidas correctamente se dejan guiar y controlar mejor g Utilice la herramienta eléctrica los accesorios los útiles de la herramienta etc de acuerdo con estas instrucciones y tenga en cuenta las condiciones de trabajo y la tarea a realizar El uso de herramientas eléctricas para t...

Page 5: ...io f f Lesiones causadas por el uso prolongado de una herramienta Al utilizar cualquier herramienta durante periodos prolongados asegúrese de tomar descansos regulares f f Deterioro de la audición f f Riesgos para la salud causados por respirar el polvo desarrollado al usar la herramienta por ejemplo al trabajar con madera especialmente roble haya y MDF USO DE UN CABLE DE EXTENSIÓN Si es necesario...

Page 6: ...o f f Cuando el agujero se llene de residuos o polvo fino no ejerza más presión La herramienta debe ser puesta en estado de marcha libre antes de retirar parte de la broca del agujero Si esto se repite un par de veces el bloqueo en el agujero se liberará y se puede reanudar la perforación normal Advertencia Si la broca golpea cemento o la barra de refuerzo de acero en el cemento la herramienta pod...

Page 7: ...que encuentre suciedad acumulada en y alrededor de los orificios de ventilación Use protección ocular y una máscara antipolvo aprobadas al realizar este procedimiento Advertencia Nunca utilice solventes u otros productos químicos abrasivos para limpiar las piezas no metálicas de la herramienta Estos productos químicos pueden debilitar el material de las piezas Use sólo jabón neutro y un trapo húme...

Page 8: ...ndurar a ferramenta nem para puxar o plug da tomada Mantenha o cabo afastado de calor óleo pontas afiadas ou partes móveis Cabos danificados ou torcidos aumentam o risco de choques elétricos e Quando trabalhar com uma ferramenta elétrica ao ar livre utilize um cabo de extensão apropriado para esse fim A utilização de um cabo apropriado para áreas ao ar livre reduz o risco de choques elétricos f Se...

Page 9: ...ão Advertência Se o cabo de força estiver danificado deverá ser substituído pelo fabricante pelo Centro de Serviço Autorizado da STANLEY ou uma pessoa igualmente qualificada para evitar acidentes Se o cabo for reparado ou substituído por uma pessoa qualificada mas não autorizada pela STANLEY a garantia será perdida 7 Rótulos da ferramenta A etiqueta da ferramenta pode conter os seguintes símbolos ...

Page 10: ...s de serem enrolados de novo Por favor consulte a seguinte tabela Tamanho do condutor Capacidade do fio mm2 ampères 0 75 6 1 00 10 1 50 15 2 50 20 4 00 25 Comprimento do fio m 7 5 15 25 30 45 60 Tensão Ampères Capacidade do fio ampères 115 0 2 0 6 6 6 6 6 10 2 1 3 4 6 6 6 6 15 15 3 5 5 0 6 6 10 15 20 20 5 1 7 0 10 10 15 20 20 25 7 1 12 0 15 15 20 25 25 12 1 20 0 20 20 25 230 0 2 0 6 6 6 6 6 6 2 1 ...

Page 11: ...rio segurar a ferramenta de maneira firme com as duas mãos para permanecer numa posição estável Ajuste da profundidade da perfuração Fig E O limite de profundidade é uma caraterística muito conveniente para garantir a uniformidade na profundidade da perfuração Afrouxe o cabo lateral para ajustar o medidor de profundidade de acordo com a profundidade requerida Depois disso aperte o cabo lateral f f...

Page 12: ...rial das peças Use somente sabão neutro e um pano úmido para limpar a ferramenta Nunca deixe nenhum líquido entrar na ferramenta nunca submirja nenhuma parte da ferramenta em líquidos ACESSÓRIOS Há uma variedade de acessórios encontrados em centros de serviço autorizados recomendados para o uso com sua ferramenta Cuidado O uso de qualquer acessório não recomendado para esta ferramenta pode ser per...

Page 13: ...rd suitable for outdoor use reduces the risk of electric shock f If operating a power tool in a damp location is unavoidable use a residual current device RCD protected supply Use of an RCD reduces the risk of electric shock Note The term Residual Curent Device RCD can be replaced by Ground Fault Circuit Interrupter GFCI or by Earth Leakage Circuit Breaker ELCB 3 Personal Safety a Stay alert watch...

Page 14: ...d metal parts of the power tool live and shock the operator f f Never use a chisel accessory in rotary mode The accessory will bind in the material and rotate the drill f f Use clamps or another practical way to secure and support the workpiece to a stable platform Holding the work by hand or against your body leaves it unstable and may lead to loss of control f f Before drilling into walls floors...

Page 15: ...es the accessory to be able to move axially several centimetres when locked in the tool clamp f f To remove the accessory pull back the sleeve 8 and pull out the accessory tool clamp USE Warning Please operate tool with normal load Do not over load Warning Before drilling into walls floors or ceilings check for the location of wiring and pipes Selecting the operating mode Fig B The tool can be use...

Page 16: ...rom regular cleaning f f Regularly clean the ventilation slots in your appliance tool charger using a soft brush or dry cloth f f Regularly clean the motor housing using a damp cloth Do not use any abrasive or solvent based cleaner f f Regularly open the chuck and tap it to remove any dust from the interior when fitted Replace the carbon brush Fig D Lubrication f f Regularly replace and inspect th...

Page 17: ...ce For more information about our authorized service centers and if you need technical advice repair or genuine factory replacement parts contact the STANLEY location nearest you SPECIFICATIONS STHR202 Power input 620W Voltage AR 220V 50Hz B2C 220V 50 60Hz B3 120V 60Hz B2 220V 60Hz BR 127V 60Hz No load speed 0 1250 min rpm Impact rate 0 3900 gpm bpm Impact energy 1 34J Modes 2 Max capacity Concret...

Page 18: ...e Colombia Importado por Black Decker de Colombia S A Carrera 85D 51 65 Bodega 23 Complejo Logístico San Cayetano Bogotá Colombia Tel 744 7100 Solamente para propósito de Chile Importado por Black Decker de Chile S A Av Pdte Eduardo Frei M 6001 67 Conchalí Santiago de Chile Tel 56 2 2687 1700 Impreso en China Impresso em China Printed in China N412141 09 10 2014 Solamente para propósito de México ...

Reviews: