background image

PBD1202 User

 Manual ◄ 9

OPERATION

INTELED SYSTEM

The InteLED light ring shows you the status of the crimp in real-time.

White

 - The tool is crimping. InteLED will stay lit for 30 seconds after the crimp is complete.

Green

 - The tool has developed full hydraulic pressure during the crimp. The crimp is good.

Red

 - The tool did not develop full pressure during the crimp. Crimp again.

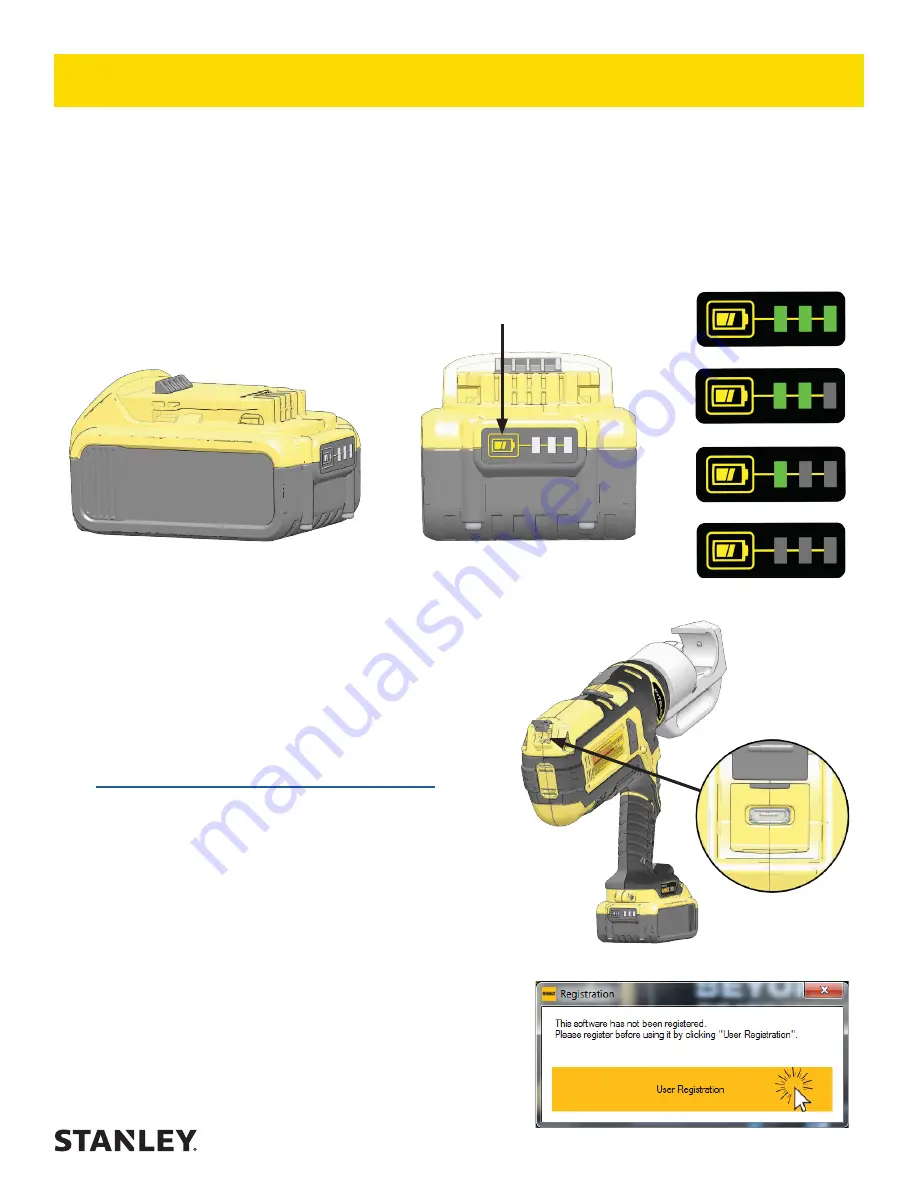
CHECKING BATTERY CHARGE

75 - 100% Charged

51 - 74% Charged

Less than 50% Charged

Charge Battery

Battery Charge Button

STANLEY CRIMP SOFTWARE

STANLEY Crimp software provides valuable data about 

each crimp. It is also required to update the tool firmware.

INSTALLATION

1. 

Download  the  STANLEY  Crimp  software  from  the 

STANLEY Infrastructure website.

www.stanleyinfrastructure.com/products/cordless-td

Note: STANLEY Crimp software requires a minimum 

of  Windows  XP  SP3  running  with  administrator 

rights.

2. 

Follow  the  prompts  on  screen  to  complete 

installation.

3. 

Connect PBD1202 to a PC using a micro USB cable.

Note: InteLED will shine blue when connected.

FIRST RUN

1. 

Run  the  software  using  the  STANLEY  Crimp 

software icon on your Windows desktop.

2. 

You will be prompted to register your software. Left 

click the “User Registration” button.

3.  Fill out the registration form and click “Register”.

USB Connection

Summary of Contents for PBD1202

Page 1: ... 2017 STANLEY Black Decker Inc New Britain CT 06053 U S A 81154 1 2018 Ver 1 USER MANUAL Safety Operation and Maintenance PBD1202 CRIMPING TOOL ...

Page 2: ......

Page 3: ... routine maintenance must be performed by an authorized and certified dealer Please read the following warning To fill out a product warranty validation form and for information on your warranty visit www stanleyinfrastructure com and select the Company tab Warranty Note The warranty validation record must be submitted to validate the warranty SERIOUS INJURY OR DEATH COULD RESULT FROM THE IMPROPER...

Page 4: ...y messages that follow this symbol to avoid possible injury or death This safety alert and signal word indicates an imminently hazardous situation which if not avoided will result in death or serious injury This safety alert and signal word indicates a potentially hazardous situation which if not avoided could result in death or serious injury This safety alert and signal word indicates a potentia...

Page 5: ...f flammable materials or gases Do not use the tool or charge the tool battery in an explosive atmosphere Cutting or severing of body parts is possible if proper procedures are not followed Do not use the tool battery or battery charger for purposes other than what is described in this manual Always keep critical tool markings such as labels and warning stickers legible Contact STANLEY for replacem...

Page 6: ... PBD1202 CRIMPING TOOL The PBD1202 is a battery powered 12 Ton cable crimping tool with a Kearney style head The PBD1202 accepts Kearney style WH2 and WH3 style dies It is capable of crimping copper and aluminum connectors to 750 MCM Tool Identification Warning Decal Crimping Head Trigger Lock Battery Trigger Pressure Release USB Port InteLED ...

Page 7: ...Max 5 amp hour Estimated Crimps per Battery Charge 100 Tool Cycle Time 7 Seconds Tool Weight 15 85 Lbs Tool Length 16 5 Inches Maintenance Interval 15 000 Cycles ACCESSORIES 5 Amp hour DEWALT 20V Max Battery DC205 5 Amp hour DEWALT 20V Max Battery 2 pack DCB205 2 120V AC Charger DCB115 12V DC Charger DCB119 Note Only use battery chargers recommended by STANLEY Bucket Bag BB01 SPECIFICATIONS ACCESS...

Page 8: ...ock 2 Insert battery 3 Insert the die into the crimping head 4 Insert the cable ends into the die 5 Release the trigger lock Press and hold the trigger until the die is crimped Press and hold the pressure release to open the crimping head Note Release the trigger to immediately stop the tool Press the pressure release at any time to open the jaws USING THE PBD1202 1 2 3 5 4 Pressure Release ...

Page 9: ... provides valuable data about each crimp It is also required to update the tool firmware INSTALLATION 1 Download the STANLEY Crimp software from the STANLEY Infrastructure website www stanleyinfrastructure com products cordless td Note STANLEY Crimp software requires a minimum of Windows XP SP3 running with administrator rights 2 Follow the prompts on screen to complete installation 3 Connect PBD1...

Page 10: ...formation and click Create 3 Select a user and click OK TOOL INFORMATION 1 2 The Tool Information tab displays important data about the PBD1202 1 Displays the product type serial number and firmware version of the tool 2 Basic data relating to the life and service interval of the tool OPERATION ...

Page 11: ...pleted and incomplete cycles 1 The data log shows each cycle up to 250 000 cycles Each entry into the log includes Date and time of each crimp If the cycle completed successfully Amperage and Voltage of the tool during each crimp Tool temperature at the end of each crimp 2 Data log sorting filters Allows you to sort the crimp data in the data log WORKSITE REPORTS 1 OPERATION ...

Page 12: ...u are reporting 3 Select the crimp cycles you want to include in the report 4 Select a user and a worksite Note If this is the first time using the software press the Worksites button to create a worksite 5 Enter notes about the job in the Remarks field 6 Click OK when finished 7 Select a report from the reports list 8 Click Print Report to PDF to export the Worksite Report 7 OPERATION ...

Page 13: ...l firmware and update STANLEY Crimp software 1 Tool Firmware Update button When clicked this will begin to tool firmware update process Do not unplug the tool during this process 2 Software Update button When clicked this will update the STANLEY Crimp software if an update is available 1 2 OPERATION ...

Page 14: ... as soon as possible The tool repeatedly give me bad crimps The InteLED flashes red after every crimp Ensure the battery is fully charged Ensure the dies are inserted properly into the crimping head If problem persists have the tool serviced as soon as possible The tool is leaking hydraulic oil Have the tool serviced immediately The tool is not saving data or will not connect to STANLEY Crimp soft...

Page 15: ...PBD1202 User Manual 15 PBD1202 PARTS ILLUSTRATION 31 50 37 38 41 37 43 263 136 48 270 264 265 137 151 46 89 87 152 150 44 87 47 42 135 49 99 64 93 94 98 250 253 252 102 105 104 101 105 103 43 ...

Page 16: ...ew 93 VAV05HC025 2 Screw 94 VAV05HC040 2 Screw 98 VAV3 5TC014ZN 13 Screw 99 91350 1 Protection Cover 101 91633 1 Stanley Label 102 91641 1 PBD1202 Label 103 91634 1 Powered By DEWALT Label Right 104 91635 1 Powered By DEWALT Label Left 105 91636 2 InteLED Label 135 ACKR0204 1 Grooved Pin 136 91465 1 Strap Ring 137 85029DUB 1 Key 150 71341 02 1 Crimping Head Unit 151 VAV06TT010 1 Screw 250 91856 1 ...

Page 17: ... Pin 71 BILL4 76 2 Ball 74 J0640190 2 O Ring 75 91576 1 Metal Clamp 78 JAE0700150 2 Anti extrusion Ring 80 J0420250 1 O Ring 81 ZBINA420 1 Magnet Pin 85 VAR04W 1 Washer 86 91232 1 Release Trigger 90 VAE04 1 Washer 97 VAV08BP008 2 Screw 254 92884 15 1 Overload Valve 262 77851C 1 Bodies Connector Unit 263 77852 DEW 1 Release Lever Unit 13 2 75 7 90 85 68 86 25 97 71 97 71 81 80 74 78 78 74 262 263 2...

Page 18: ...g 77 JAE0500100 1 Anti extrusion Ring 82 JSR1927205 1 Wiper Ring 83 R1B12 30 08Z 1 Ball Bearing 95 VIV08TT008 2 Screw 96 VAV06TT008 1 Screw 65 83 256 82 28 6 5 67 69 63 95 96 73 77 257 118 119 267 21 260 256 258 125 259 76 ITEM P N QTY DESCRIPTION 118 77030 1 Spring 119 77016 1 Sliding Part 125 BILL03 175 1 Ball 256 77803 1 Release Device 257 77805 01 2 Deliver Valve Unit 258 77806 01 2 Succion Va...

Page 19: ......

Page 20: ...STANLEY Infrastructure 6430 SE Lake Road Portland Oregon 97222 USA 503 659 5660 Fax 503 652 1780 www stanleyinfrastructure com ...

Reviews: