


6
ENGLISH
(Original instructions)
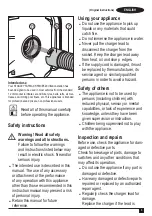
12. High volume pump inflator connection
13. 230V AC cord
14. 12V DC vehicle adapter
15. Inflator needle valve
16. Brass coupler adapter
17. Standard tapered nozzle
Use
Warning! Let the tool work at its own pace.
Do not overload.
Charging the battery (Fig. A)
The battery needs to be charged before first use and
whenever it fails to produce sufficient power on jobs that were
easily done before.
The battery may become warm while charging; this is normal
and does not indicate a problem.
Warning! Do not charge the battery at ambient temperatures
below 10 °C or above 40 °C. Recommended charging
temperature: approx. 24 °C.
Note: The charger will not charge a battery if the cell
temperature is below approximately 10 °C or above 40 °C.
The battery should be left in the charger and the
charger will begin to charge automatically when the cell
temperature warms up or cools down.
Note: To ensure maximum performance and life of lithium-ion
battery packs, charge the battery pack fully before first
use.
u
Plug the charger (25) into an appropriate outlet before
inserting battery pack (21).
u
The green charging light (25a) will blink continuously
indicating that the charging process has started.
u
The completion of charge will be indicated by the green
charging light (25a) remaining ON continuously. The
battery pack (21) is fully charged and may be removed
and used at this time or left in the charger (25).
u
Charge discharged batteries within 1 week. Battery life will
be greatly diminished if stored in a discharged state.
Charger LED Modes
Charging:
Green LED Intermittent
Fully Charged:
Green LED Solid
Hot/Cold Pack Delay:
Green LED Intermittent
Red LED Solid
Note: The compatible charger(s) will not charge a faulty
battery pack. The charger will indicate a faulty battery pack by
refusing to light.
Note: This could also mean a problem with a charger. If the
charger indicates a problem, take the charger and battery
pack to be tested at an authorized service centre.
Leaving the battery in the charger
The charger and battery pack can be left connected with the
LED glowing indefinitely. The charger will keep the battery
pack fresh and fully charged.
Hot/Cold Pack Delay
When the charger detects a battery that is too hot or too cold,
it automatically starts a Hot/Cold Pack Delay, the green LED
(25a) will flash intermittently, while the red LED (25b) will
remain on continuously, suspending charging until the battery
has reached an appropriate temperature. The charger then
automatically switches to the pack charging mode. This
feature ensures maximum battery life.
Battery state of charge indicator (Fig. B)
The battery includes a state of charge indicator to quickly
determine the extent of battery life as shown in figure B. By
pressing the state of charge button (21a) you can easily view
the charge remaining in the battery as illustrated in figure B.
Installing and Removing the Battery Pack from the
tool
Warning! Make certain the lock-off button is engaged to
prevent switch actuation before removing or installing battery.
To install battery pack (Fig. C)
NOTE: For best results, make sure your battery pack is
fully charged.
To install the battery pack (21) into the inflator, align the
battery pack with the rails inside inflator’s battery port (22)
and slide it into the port until the battery pack is firmly
seated and ensure that it does not disengage.
To remove the battery pack from the tool, press the release
button (23) and firmly pull the battery pack out of the tool.
Insert it into the charger as described in the charger
section of this manual.


