background image

DL07 User Manual ◄ 13

TROUBLESHOOTING

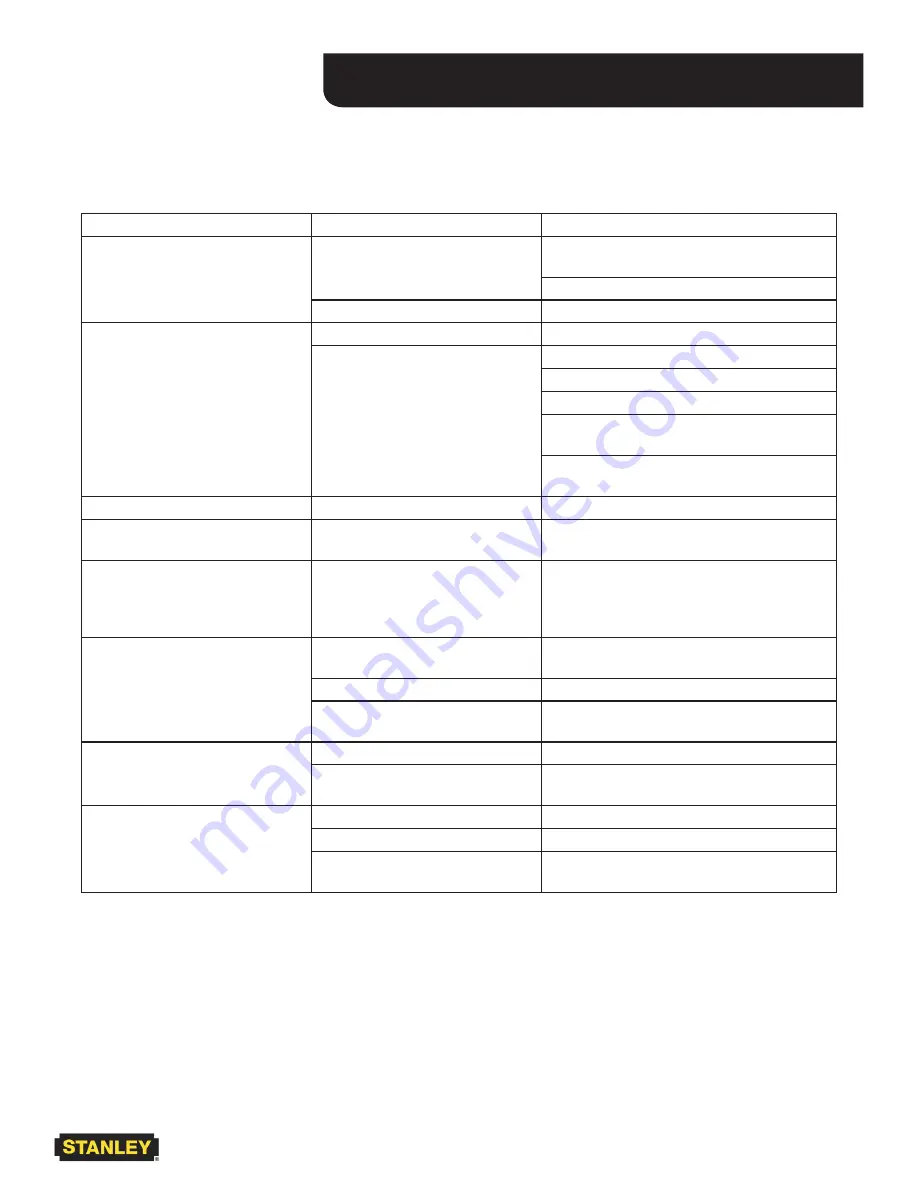
If symptoms of poor performance develop, the following chart can be used as a guide to correct the problem. When 

diagnosing faults in operation of the wrench, always check that the hydraulic power source is supplying the correct 

hydraulic flow and pressure to the tool as listed in the following table. Use a flow meter known to be accurate. Check 

the flow with the hydraulic fluid temperature at least 80 °F/27 °C.

PROBLEM

CAUSE

SOLUTION

Tool will not start.

Power not being supplied.

Check to make certain that both hoses are 

connected.
Turn hydraulic circuit control valve ON.

Defective quick disconnects.

Check each quick disconnect.

Low drilling torque.

Relief valve set too low.

Set relief valve at 2100 psi/145 bar.

Fluid restriction in hose or valve. 

Excess flow and pressure loss.

Locate and remove restriction.

Use correct fluid.

Fluid not warmed up. Preheat system.
Hoses too long for hose ID. Use shorter 

hose.
Hose ID too small for hose length. Use 

larger ID hose.

Low tool speed.

Fluid flow rate is too low.

Check circuit flow rate.

High tool speed.

Fluid flow rate is excessive.

Check  circuit  flow  rate.  Add  proper  flow 

control valve or reduce the pump RPM.

Oil leaks around gear housing.

Hydraulic pressure and return 

hoses reversed.

Correct hose connections. Pressure should 

be to the handle port away from the trigger, 

return is near the trigger, then replace the 

main shaft oil seal.

Oil gets hot, power unit working 

hard.

Open-center tool on a closed-

center circuit or vice-versa.

Use tools to match circuit.

Circuit relief set too low.

Adjust relief valve to 2100 psi/145 bar.

Too much oil going through tool.

Adjust flow for 12 gpm/45 lpm maximum or 

less.

Oil leaks at reversing spool.

Damaged O-rings.

Replace as required.

Wrong hydraulic fluid. Circuit too 

hot.

Refer to Operation section for correct fluid/

circuit specifications.

Oil leak at motor cap face.

Fasteners loose.

Refer to Service Manual.

Face O-ring worn or missing.

Replace as required.

Motor cap/main housing dam-

aged.

Replace as required.

Summary of Contents for DL07

Page 1: ... 2010 Stanley Black Decker Inc New Britain CT 06053 U S A 49234 12 2012 Ver 7 Safety Operation and Maintenance USER MANUAL DL07 HYDRAULIC DRILL ...

Page 2: ...nnummer des Geräts Numéro de série de l équipement Numero de serie del equipo Matricola dell attrezzatura All Has been manufactured in conformity with Wurde hergestellt in Übereinstimmung mit Est fabriqué conformément Ha sido fabricado de acuerdo con E stata costruita in conformitá con Directive Standards Richtlinie Standards Directives Normes Directriz Los Normas Direttiva Norme No Nr Numéro No n...

Page 3: ... servicing of hydraulic tools other than routine maintenance must be performed by an authorized and certified dealer Please read the following warning For the nearest authorized and certified dealer call Stanley Hydraulic Tools at the number listed on the back of this manual and ask for a Customer Service Representative WARNING SERIOUS INJURY OR DEATH COULD RESULT FROM THE IMPROPER REPAIR OR SERVI...

Page 4: ...s that follow this symbol to avoid possible injury or death DANGER This safety alert and signal word indicate an imminently hazardous situation which if not avoided will result in death or serious injury WARNING This safety alert and signal word indicate a potentially hazardous situation which if not avoided could result in death or serious injury CAUTION This safety alert and signal word indicate...

Page 5: ...lers be fore energizing the hydraulic power source Be sure all hose connections are tight and are in good condi tion Do not operate the tool at oil temperatures above 140 F 60 C Operation at higher temperatures can cause higher than normal temperatures at the tool which can result in operator discomfort Do not operate a damaged improperly adjusted or incompletely assembled drill Never wear loose c...

Page 6: ...LECTRIC LINES BE SURE THE HOSE IS MAINTAINED AS NON CONDUCTIVE THE HOSE SHOULD BE REGULARLY TESTED FOR ELECTRIC CURRENT LEAKAGE IN ACCORDANCE WITH YOUR SAFETY DEPART MENT INSTRUCTIONS 2 A HYDRAULIC LEAK OR BURST MAY CAUSE OIL INJECTION INTO THE BODY OR CAUSE OTHER SEVERE PERSONAL INJURY A DO NOT EXCEED SPECIFIED FLOW AND PRESSURE FOR THIS TOOL EXCESS FLOW OR PRESSURE MAY CAUSE A LEAK OR BURST B DO...

Page 7: ...CLEAN DRY ABSORBENT CLOTH TO REMOVE DIRT AND MOISTURE AND TEST HOSE FOR MAXIMUM ALLOWABLE CURRENT LEAKAGE IN ACCORDANCE WITH SAFETY DEPARTMENT INSTRUCTIONS SEE OTHER SIDE SIDE 2 D O N O T R E M O V E T H I S T A G 3 DO NOT EXCEED HOSE WORKING PRESSURE OR ABUSE HOSE IMPROPER USE OR HANDLING OF HOSE COULD RESULT IN BURST OR OTHER HOSE FAILURE KEEP HOSE AS FAR AWAY AS POSSIBLE FROM BODY AND DO NOT PE...

Page 8: ...ressure 2500 175 1 25 4 Return 2500 175 13 16 49 60 up to 25 up to 8 5 8 16 Pressure 2500 175 3 4 19 Return 2500 175 13 16 49 60 26 100 8 30 3 4 19 Pressure 2500 175 1 25 4 Return 2500 175 Figure 1 Typical Hose Connections Tool to Hydraulic Circuit Hose Recommendations The chart to the right shows recommended minimum hose diameters for various hose lengths based on gallons per minute gpm liters pe...

Page 9: ...7 9 gpm 9 10 5 gpm 11 13 gpm 15 23 lpm 26 34 lpm 34 40 lpm 42 49 lpm 1500 psi 1500 psi 1500 psi 1500 psi 103 bar 103 bar 103 bar 103 bar 2100 2250 psi 2100 2250 psi 2200 2300 psi 2100 2250 psi 145 155 bar 145 155 bar 152 159 bar 145 155 bar 250 psi 250 psi 250 psi 250 psi 17 bar 17 bar 17 bar 17 bar 400 ssu 400 ssu 400 ssu 400 ssu 82 centistokes 82 centistokes 82 centistokes 82 centistokes 140 F 1...

Page 10: ...ION Using a 3 16 in hex reach through the hole in the spring cap and turn the selector screw counter clockwise until meeting resistance from the retaining ring Turn the se lector clockwise and then counter clockwise to be sure the selector is being stopped by the retaining ring Do not force the selector screw Open center operation is now selected FOR CLOSED CENTER OPERATION Using a 3 16 in hex rea...

Page 11: ...ll drill holes Drill bits are incrementally selected to enlarge the hole until the desired hole size is obtained Each bit selected must always be too large to thread and jam into an existing hole otherwise the bit may break and endanger the operator COLD WEATHER OPERATION If the wrench is to be used during cold weather preheat the hydraulic fluid at low engine speed When using the normally recomme...

Page 12: ...is can cause damage to internal seals Always replace hoses couplings and other parts with replacement parts recommended by Stanley Hydraulic Tools Supply hoses must have a mini mum working pressure rating of 2500 psi 172 bar NOTICE In addition to the Safety Precautions found in this manual observe the following for equipment protection and care Do not exceed the rated flow see Specifications in th...

Page 13: ...ong for hose ID Use shorter hose Hose ID too small for hose length Use larger ID hose Low tool speed Fluid flow rate is too low Check circuit flow rate High tool speed Fluid flow rate is excessive Check circuit flow rate Add proper flow control valve or reduce the pump RPM Oil leaks around gear housing Hydraulic pressure and return hoses reversed Correct hose connections Pressure should be to the ...

Page 14: ...1500 psi 1 9 Nm 105 bar 6 gpm 23 lpm 750 rpm 19 ft lbs 2000 psi 2 6 Nm 140 bar 8 gpm 30 lpm 10 gpm 38 lpm 1000 rpm 1250 rpm SOUND AND VIBRATION DECLARATION Test conducted on DL0755001 operated at standard 5 gpm input Measured A weighted sound power level Lwa ref 1pW in decibels 87 6 dBA Uncertainty Kwa in decibels 3 dBA Measured A weighted sound pressure level Lpa ref 20 µPa at operator s position...

Page 15: ...r Bit 12 inch OAL 27854 9 16 inch dia 12 inch Carbide Tipped Auger Bit 16 inch OAL 27855 11 16 inch dia 12 inch Carbide Tipped Auger Bit 16 inch OAL 27856 13 16 inch dia 12 inch Carbide Tipped Auger Bit 16 inch OAL 27857 15 16 inch dia 12 inch Carbide Tipped Auger Bit 16 inch OAL 27858 1 1 16 inch dia 12 inch Carbide Tipped Auger Bit 16 inch OAL 27859 9 16 inch dia 18 inch Carbide Tipped Auger Bit...

Page 16: ...ON 55 53 58 33 35 30 57 27 5 29 26 14 23 36 24 25 28 4 71 69 32 31 38 20 80 34 22 37 74 54 3 41 56 75 52 6 81 66 79 40 60 1 18 59 68 72 2 17 10 64 73 63 65 67 62 49 12 48 11 77 16 44 39 4 42 7 13 19 70 21 78 61 32 8 76 15 50 1 47 43 45 9 46 15 ...

Page 17: ...R 47436 AEROQUIP FOR DL07552S 552SUP 572S ITEM P N QTY DESCRIPTION 49 03973 1 3 8 NPT FLUSHFACE COUPLER NOSE PART OF SET 03971 PARKER OR 47437 AEROQUIP FOR DL07552S 552SUP 572S 50 24271 1 MAIN SHAFT 51 25610 1 RAILROAD HELP DESK STICKER DL07552S 552SUP 572S ONLY 52 28323 2 CE STICKER DL0755001 ONLY 53 60807 1 DL07 MODEL NUMBER STICKER 54 28788 2 MANUAL STICKER 55 29148 1 RPM STICKER DL0755001 ONLY...

Page 18: ...03 659 5660 Fax 503 652 1780 www stanleyhydraulic com IMPORTANT To fill out a Product Warranty Recording form and for information on your warranty visit Stanleyhydraulic com and select the Warranty tab NOTE The warranty recording form must be submitted to validate the warranty ...

Reviews: