background image

5

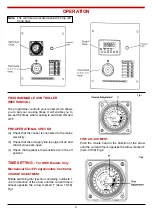
Fig.3

1.

Press interval time button (first button on the 

left)  display shows “0.00” 

and the bell 

symbol is displayed 2.

Press plus button until

the desired setting is displayed.

3.

On releasing the button, run down of interval 

time starts after the 4 - seconds time window.

Time - of - Day  re-appears in the display with

the cooking pot symbol illuminated steadily. 

4.

The interval time having elapsed.  The acoustic

signal sounds with two beeps, pause, two 

beeps etc....

OPERATION PERIOD

Note:  

When setting the operation period, the

programmer automatically sets a stop which is

equal to the operation period added to the current

time.  If you do not want the cooker to start

immediately, you will have to adjust the 

STOP

time

accordingly.

1.

Press operation period button (second button 

from left), display shows “0.00” and the cooking

pot symbol is displayed  steadily.

2.

Press plus button until the desired operation 

period is displayed.

3.

Releasing the button starts the run down of 

time.

4.

The operation period having elapsed, the 

acoustic signal sounds with four beeps, pause,

four beeps etc..  The cooking pot symbol 

disappears, letters “AUTO” flash until the 

manual button is pressed. The cooking pot 

symbol is illuminated steadily.   

STOP 

(Time at which you want cooker to switch off)

1.

Press operation stop button (third button from 

left), display shows “0.00” and the cooking pot

symbol is displayed.

2.

Press plus button until the desired operation 

STOP is displayed (Time at which you want 

oven to switch off).

3.

Releasing the buttons start run down of time, 

Time - Of - Day  reappears.  Letters “Auto” and

the cooking pot symbol is illuminated steadily.

Operation Period starts at once.

4.

The operation period having elapsed, the 

acoustic signal sounds with four beeps, pause,

four beeps etc..   The cooking pot symbol 

disappears, letters “AUTO” flash until the 

SETTING THE SWITCHING TIMES

To operate the appliance using the automatic

switching set the large slider to position marked

On the outer ring there are 96 small sliders, each

slider represents a time period of fifteen minutes.

The cooker switches “ON” or “OFF” depending on

the position of these sliders.  When the slider is

nearest the centre of the clock it is in the “OFF”

mode, and when the slider is moved away from the

centre of the clock it is in the “ON” mode.

Switching example:

ON - Function from 18 - 22 h

OFF - Function from 22 - 18 h 

POWER FAILURE

In the event of power failure, the programmer will

need to be reset, but switching times will not be

altered.  If appliance does not operate normally

please refer to Fault Finding.

TIME SETTING FOR DRY MODELS ONLY

DIGITAL CLOCK PROGRAMMABLE

CONTROLLER 

TO SET TIME

(

NOTE:

Cooker cannot be operated

until the time is set).

1.

When Power is applied, display flashes 

“AUTO” and “0.00” alternatively.

2.

Press buttons 1 & 2 from left, “0.00” is 

displayed steadily .  Letters “AUTO” flash.

3.

Press plus or minus button until the actual Time

- Of - Day is displayed.

4.

When releasing the buttons Time - of - Day 

starts precisely to the second --.--.  The cooking

INTERVAL TIME

Note:

Interval Time does not control the cooker, it

sets off an alarm after the preset period of time.

“ is illuminated steadily.

pot symbol “

Summary of Contents for BRANDON

Page 1: ...BRANDON DRY DHW GAS MODELS OPERATION INSTRUCTIONS THIS MANUAL IS TO BE LEFT WITH THE END USER ...

Page 2: ...s 5 Operating the Appliance 6 5 Ovens 6 The Main Oven 6 The Lower Oven 6 The Hotplate 6 Reset Button High Limit Stat 7 Burner Control Box Lock out Reset Button 7 Hot Water Output Reduction DHW Only 7 Burner Does Not Ignite 7 Hotplate Insulating Covers 8 Cooking Utensils 8 6 Opening Cooker Door 8 7 Cleaning 9 Chimney Cleaning 9 Servicing 9 Mild Steel 9 Ovens 9 Hot Plate 9 8 Cooking Guidance 10 Gene...

Page 3: ...f Substances Harmful to Health It is the Users Installers responsibility to ensure that the necessary personal protective clothing is worn when handling materials that could be interpreted as being injurious to health and safety When handling Firebricks Fire Cement or Fuels use disposable gloves Exercise caution and use disposable masks and gloves when handling glues and sealants When working with...

Page 4: ...kW 5 800Btu s hr COOKER WEIGHT 356 Kgs 783 lbs MAINS GAS PIPE Installation of gas pipe to be carried out in accordance with BS 6891 ADDITIONAL TECHNICAL DATA FOR DHW MODELS MANIFOLD PRESSURE N G 6 4 mbar 2 56 wg L P G 4 1 mbar 1 65 wg MAX DHW BOILER WORKING PRESSURE 28 p s i TEST PRESSURE IN DHW BOILER 40 p s i OPERATING TEMPERATURE LIMIT IN DHW BOILER 96 o C 194 o F DHW BOILER CAPACITY 10 Litres ...

Page 5: ...icity b Check that the oil supply line is purged of air and that all valves are open c Check that appliance thermostats are in the off position TIME SETTING For DHW Models Only Mechanical Clock Programmable Controller COARSE ADJUSTMENT Rotate switching dial section containing numbers 1 24 in direction of the arrow until the current time is almost opposite the arrow marked F here 19 45 Fig 1 Fig 1 ...

Page 6: ...en to switch off 3 Releasing the buttons start run down of time Time Of Day reappears Letters Auto and the cooking pot symbol is illuminated steadily Operation Period starts at once 4 The operation period having elapsed the acoustic signal sounds with four beeps pause four beeps etc The cooking pot symbol disappears letters AUTO flash until the SETTING THE SWITCHING TIMES T o operate the appliance...

Page 7: ...oker is turned on before the solenoid valve is opened OVENS THE MAIN OVEN This oven is your simmering oven your baking oven and your roasting oven It is a generous size of 390 x 310 x 406 mm 15 1 4 x 12 1 4 x 16 inches big enough to take a large turkey It is of a cast iron construction which gives a perfect roast sealing in all the juices and flavours The oven is fitted with a thermometer which gi...

Page 8: ...is gentle heat dissolving gelatin melting fats and chocolate steaming vegetables and cooking soups and stocks RESET BUTTON HIGH LIMIT STAT A high limit thermostat is located behind plinth on bottom of cooker Remove plinth by sliding approx 10mm to the left The thermostat button will pop out if the temperature selected is exceeded T o reset simply unscrew the protective cap and press the plastic bu...

Page 9: ...in doubt contact your local Stanley Gas Engineer HOT PLATE INSULATING COVERS The insulating covers retain most of the heat that would otherwise be radiated into the kitchen They also retain the heat in the hot plates so that rapid heating of cooking utensils will occur when one or both of them are lifted for cooking purposes IMPORTANT WHEN HOTPLATE IS NOT IN USE ENSURE THAT HOTPLATE COVERS ARE IN ...

Page 10: ...ed For stubborn deposits a soap impregnated pad can be carefully used on the vitreous enamel 5 Use only products recommended by the Vitreous Enamel Association these products carry the Vitramel label 6 In the oven spills and fat splashes are carbonised at high temperatures occasionally brush out with a stiff brush The shelves can be soaked and cleaned with a cream cleanser 7 Both insulating covers...

Page 11: ...ats are drawn out into the roasting tin Certain foods with little fat benefit from pan frying dry frying on the hotplate using a ribbed frying or griddle pan The foods cooked this way look attractive with the bar markings from the pan THE CARE OF YOUR COOKER The vitreous enamel finish on your cooker is tough and hard wearing but should be treated with care Acidic spills on the hob should be wiped ...

Page 12: ...od contact with the hotplate All timings in the cooking chart are guidelines only as there are no set rules for roasting meat each cut lends itself to several different ways of preparation and cooking and each family will have a preference When meat is roasted quickly the juices are sealed in preserving the full flavour but there will sometimes be shrinkage Some people prefer to slow roast at a lo...

Page 13: ... WELL DONE 30 mins 30 mins over VEAL BONED AND ROLLED 180 o C MED 20 mins 20 mins over TOPSIDE WELL DONE 25 mins 25 mins over SHOULDER FILLET VENISON ON THE BONE 180 o C RARE 12 mins 12 mins over HAUNCH LEG MED 15 mins 15 mins over SADDLE WELL DONE 20 mins 20 mins over RABBIT HARE 180 o C Up to 1 kg 2 lb 45 60 mins Up to 2 kg 4 1 2 lb 60 90 mins CHICKEN 190 o C 20 mins 20 mins over TURKEY 160 o C ...

Page 14: ...he finely chopped onion and a little butter or oil in a heatproof bowl on or near the hotplate to soften I use this method often because it is so much easier than having to wash up a frying pan Many different types of vegetables can be prepared this way before adding to a recipe 8 Cooking T o make breadcrumbs simply place the bread on a baking sheet in the lower oven and allow to dry out Crush and...

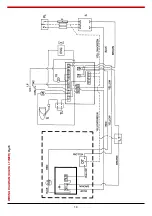
Page 15: ...WIRING DIAGRAM DIGITAL TIMER Fig 15 14 ...

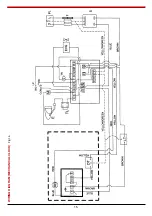
Page 16: ...WIRING DIAGRAM MECHANICAL CLOCK Fig 16 15 ...

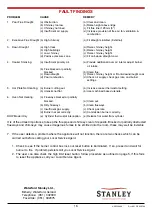
Page 17: ...ned based utensils 6 Oven Not Heating a Flueways blocked or partially blocked a Clean out b Dirty flueways b Clean flueways c Insufficient gas supply c Check gas rate d Burner not set correctly d Commission burner correctly DHW Model Only e Cylinder thermostat interruption e Release hot water from cylinder It is of the utmost importance to keep the flue pipe and chimney clear of deposits Blocked o...

Reviews: