background image

ASSEMBLY INSTRUCTIONS

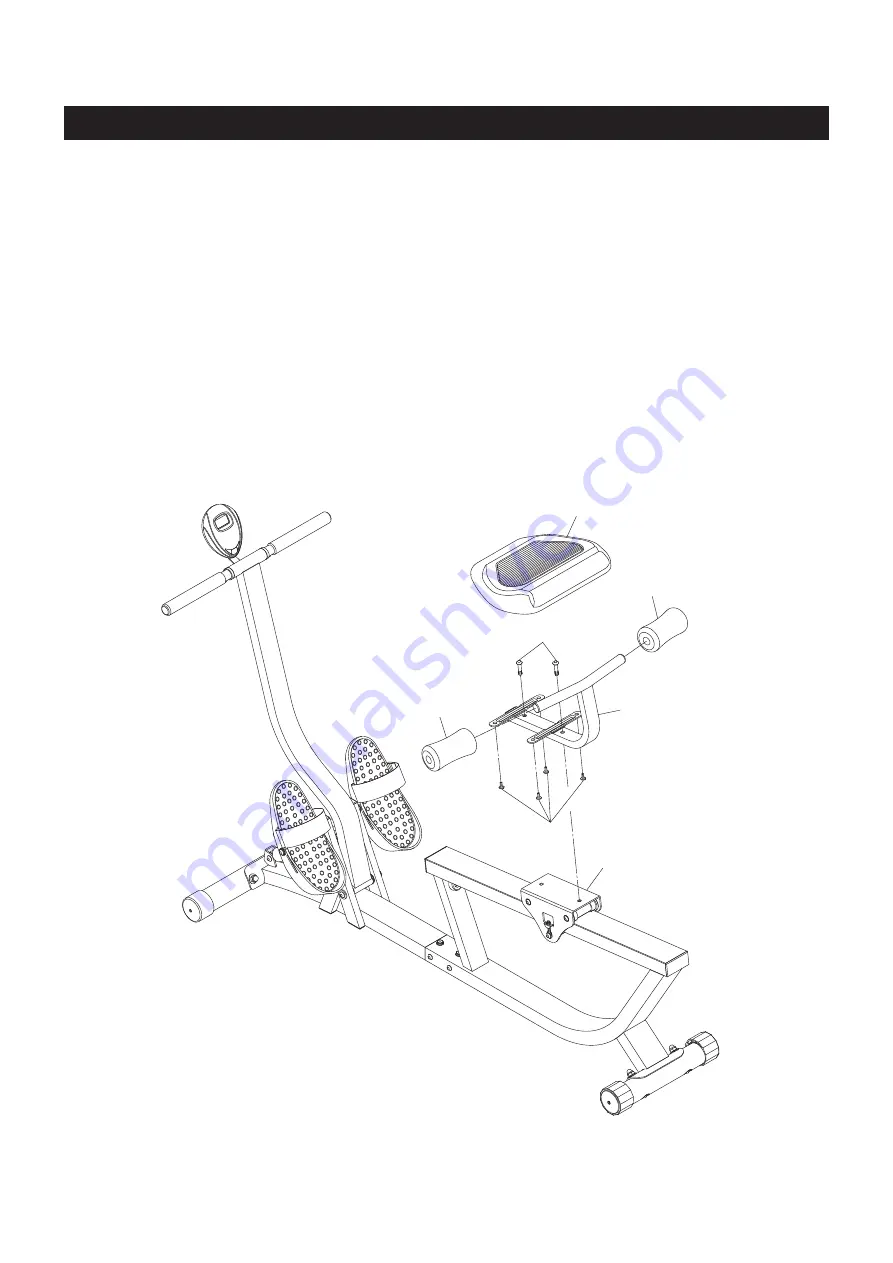
STEP 9

Attach the 

SEAT FRAME(41)

 to the 

SEAT CARRIAGE(42)

 with 

BUTTON HEAD BOLTS(M8x1.25x30mm)

(43).

STEP 10

Attach the 

SEAT(46)

 to the 

SEAT FRAME(41)

 with 

BUTTON HEAD BOLTS(M6x1x13mm)(3).

 Press the 

FOAM PADS(44)

 onto both sides of the 

SEAT FRAME(41).

11

46

44

43

41

3

44

42

Summary of Contents for 35-1315

Page 1: ...correctly Serious bodily injury can also occur if all instructions are not followed Keep others and pets away from equipment when in use Always make sure all bolts and nuts are securely tightened pri...

Page 2: ...EasyRow...

Page 3: ...limits and train within them Always use common sense when exercising 13 Do not wear loose or dangling clothing while using the Stamina Active Aging EasyRow 14 Never exercise in bare feet or socks alwa...

Page 4: ...and to help us better serve you please go onlineand register your new product register staminaproducts com ONLINE customer care staminaproducts com www staminaproducts com TELEPHONE 1 800 375 7520 FA...

Page 5: ...oduct and write the serial number on the cover of the manual in the space provided See page 6 for an image of the serial decal Model number and serial number are required when calling for assistance R...

Page 6: ...ease take a moment to familiarize yourself with all of the warning caution and notice labels EQUIPMENT WARNING CAUTION NOTICE LABELS CAUTION LABEL 54 To best serve you our Customer Care Representative...

Page 7: ...d screws are measured from the top of the head to the end of the bolt or screw After unpacking the unit open the hardware bag and make sure that you have all the following fasteners Some fasteners may...

Page 8: ...he box in a cleared area and position them on the floor in front of you Remove all packing materials from your area and place them back into the box Do not dispose of the packing materials until assem...

Page 9: ...VOTING ARM 10 into the FRONT FRAME 19 and secure with BUTTON HEAD BOLT M10x1 5x135mm 26 WASHERS M10 27 and NYLOCK NUT M10 30 STEP 5 Refer to illustration A Attach the SHOCK 12 to the U bracket on the...

Page 10: ...es to tighten the BUTTON HEAD BOLTS M8x1 25x16mm 9 at both ends of the PEDAL SHAFT 21 at the same time STEP 7 Insert the HANDLEBAR CONNECTOR 8 through the hole on the top of the PIVOTING ARM 10 Attach...

Page 11: ...EAT FRAME 41 to the SEAT CARRIAGE 42 with BUTTON HEAD BOLTS M8x1 25x30mm 43 STEP 10 Attach the SEAT 46 to the SEAT FRAME 41 with BUTTON HEAD BOLTS M6x1x13mm 3 Press the FOAM PADS 44 onto both sides of...

Page 12: ...ng on the HANDLEBARS 5 to start the workout Time 1 00 to 99 00 Count 10 to 9999 rows Calories 1 0 to 999 Kcal NOTE 1 You may preset values for several functions The preset function values will start t...

Page 13: ...an alkaline battery with another type of battery 3 Rechargeable batteries are not recommended 4 Ultimate disposal of battery should be handled according to all state and federal laws and regulations...

Page 14: ...CE STORAGE 1 Pull on the HANDLEBARS 5 and verify that the SHOCK 12 provides tension and the seat travel is smooth and stable 2 Clean the roller track on the rail in the REAR FRAME 32 with an absorbent...

Page 15: ...ty of your maximum heart rate zone Start at the lower intensity and build up to higher intensity as you become more aerobically fit If you feel dizzy or lightheaded you should slow down or stop exerci...

Page 16: ...our cool down should include the stretches listed above and should be completed after each strength training session Lower Body Stretch Place feet shoulder width apart and lean forward Keep this posit...

Page 17: ...RRANTY INCLUDING MERCHANTABILITY AND FITNESS FOR A PARTICULAR PURPOSE MAY BE COMMENCED MORE THAN ONE 1 YEAR AFTER DELIVERY OF THE PRODUCT TO THE PURCHASER These warranties are not transferable IF ANY...

Page 18: ...0 19 23 22 24 9 25 26 27 28 29 28 27 30 21 23 24 9 25 35 36 12 34 33 24 35 31 31 32 37 38 46 44 7 45 43 41 3 44 7 53 42 47 35 51 52 51 48 49 50 17 17 18 18 39 40 40 15 35 36 11 11 13 55 22 51 52 51 35...

Page 19: ...1 Pedal Shaft 1 22 Pedal 2 23 Pedal Strap 2 24 Washer M8 4 25 Bolt Button Head M10 x 1 5 x 120mm 2 26 Bolt Button Head M10 x 1 5 x 135mm 1 27 Washer M10 2 28 Pivoting Bushing 2 29 Frame Bushing 2 30 N...

Page 20: ...t M6 x 1 X 55MM 2 49 Tension Bracket 2 50 Nylock Nut M6 x 1 2 51 Ball Bearing 608ZZ 6 52 Roller 3 53 Bolt Button Head M8 x 1 25 x 110mm 2 54 Caution Label 1 55 Serial Decal 1 56 Allen Wrench 6mm 2 57...

Page 21: ...NOTES 21...

Page 22: ...nvenience Stamina s customer care representatives can be reached by email at customer care staminaproducts com or by phone at 1 800 375 7520 in the U S Our customer care representatives are available...

Reviews: