background image

221457 / 9475621310

2019-01-18·BA00·III·en·02

Mounting and Installation  

21

EN
EN
EN
EN
EN
EN
EN
EN
EN
EN
EN
EN
EN
EN
EN
EN
EN
EN
EN
EN
EN
EN
EN
EN
EN

Digital Output Module 4

-

Channel Version 

for Zone 1

Series 9475/32-04-.2

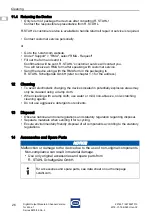
8.2.2 Dismounting / Replacement of the Module

Hot swap / hot plug

Dismounting

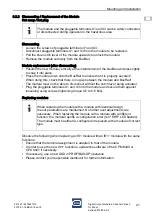
• Loosen the screws of pluggable terminals X1 and X3.

• Disconnect pluggable terminals X1 and X3 from the module to be replaced.

• Pull the blue notch lever of the module upwards to unlock the module.

• Remove the module vertically from the BusRail.

Module replacement (after dismounting)

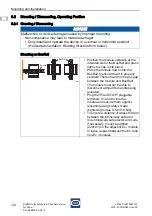
• Position the new module vertically at the intended slot of the BusRail and press lightly 

to snap it into place.

• Press the module down onto the BusRail to ensure that it is properly secured!  

When doing this, check that there is no gap between the module and BusRail!  

The module must not be able to disconnect without the notch lever being actuated.

• Plug the pluggable terminals X1 and X3 into the module and secure them against  

loosening using screws (tightening torque 0.5 to 0.6 Nm).

Replacing modules

Observe the following when replacing an IS1 module with an IS1+ module with the same 

functions:

• Ensure that the terminal assignment is adapted to that of the module.

• In order to use the new IS1+ functions, update the software of the CPM 9440 or  

CPU 9441 if necessary.

• If necessary, use a new GSD in PROFIBUS-DP operation.

• Please contact your responsible distributor for further information.

The module and the pluggable terminals X1 and X3 can be safely connected 

or disconnected during operation in the hazardous area.

When replacing the module with a module with identical design,  

the set parameters are maintained. No further user adjustments are  

necessary. When replacing the module with a module with a different  

function, the module reports a configuration error (red "ERR" LED flashes). 

The module must be either re-configured or replaced with a module of correct 

type.

Summary of Contents for is1+ 9475/32-04 2 Series

Page 1: ...DE DE DE DE DE DE DE DE DE DE DE DE DE DE DE DE DE DE DE DE DE DE DE DE DE Betriebsanleitung Additional languages r stahl com DE Digital Output Modul 4 Kanal Ausf hrung f r Zone 1 Reihe 9475 32 04 2...

Page 2: ...2 Qualifikation des Personals 5 3 3 Sichere Verwendung 5 3 4 Umbauten und nderungen 6 4 Funktion und Ger teaufbau 7 4 1 Funktion 7 4 2 Ger teaufbau 8 5 Technische Daten 9 6 Projektierung 17 6 1 Ansch...

Page 3: ...Diese ist rechtsverbindlich in allen juristischen Angelegenheiten 1 3 Weitere Dokumente Kopplungsbeschreibung IS1 Download unter r stahl com Anleitung Erdung und Schirmung Download unter r stahl com...

Page 4: ...n oder t dlichen Verletzungen bei Personen WARNUNG Gefahren f r Personen Nichtbeachtung der Anweisung kann zu schweren oder t dlichen Verletzungen bei Personen f hren VORSICHT Gefahren f r Personen Ni...

Page 5: ...tierung Auswahl und Errichtung elektrischer Anlagen IEC EN 60079 17 Pr fung und Instandhaltung elektrischer Anlagen IEC EN 60079 19 Ger tereparatur berholung und Regenerierung 3 3 Sichere Verwendung V...

Page 6: ...trieben werden Hierbei sind 50 mm Abstand zwischen den Klemmen mit eigensicheren zu denen mit nicht eigensicheren Feldstromkreisen einzuhalten z B Trennwand 220101 oder Leerplatz Die sicherheitstechni...

Page 7: ...von bis zu 4 eigensicheren Magnetventilen Anzeige oder Signalelementen an das IS1 Remote I O System Der zus tzliche Ex i Steuereingang Anlagen AUS dient zum sicheren Abschalten aller Ausg nge Alle Ka...

Page 8: ...eriennummer Hardware Revisionsnummer Software Revisionsnummer Herstelldatum z B 123456DE9999 Rev A 01 01 0508 3 LED LEDs rot zur Fehleranzeige Drahtbruch Kurzschluss je Kanal LEDs gelb zur Statusanzei...

Page 9: ...IC Europa ATEX Gas und Staub DEKRA 12 ATEX0232X E II 2 1 G Ex ia ia Ga IIC T4 Gb E II 1 D Ex ia Da IIIC Bescheinigungen und Zertifikate Bescheinigungen ATEX IECEx Brasilien INMETRO Indien PESO Kanada...

Page 10: ...anschlie bare Induktivit t Lo Kapazit t Co IIC IIB IIIC Ausgang ib Max Strom Io 53 8 mA Max Leistung Po 617 mW Max anschlie bare Induktivit t Lo Kapazit t Co IIC IIB IIIC Max innere Kapazit t Ci 11 nF...

Page 11: ...bare Induktivit t Lo Kapazit t Co IIC IIB IIIC Ausgang ib Max Strom Io 49 5 mA Max Leistung Po 648 mW Max anschlie bare Induktivit t Lo Kapazit t Co IIC IIB IIIC Max innere Kapazit t Ci 7 2 nF in den...

Page 12: ...galvanischer Trennung parallel schaltbar Z ndschutzart Ex ia Ex ia Max Spannung Uo 5 1 V Max Strom Io 0 44 mA Max Leistung Po 0 5 mW Max anschlie bare Induktivit t Lo Kapazit t Co IIC LO mH 100 10 2 1...

Page 13: ...87 Nennbetrieb U 11 3 V 12 3 V I 40 mA 40 mA Ausgangs kennlinie 15285E00 15286E00 Ex i Steuereingang X3 Funktion Anlagen AUS zum Abschalten aller Ausg nge Eignung Abschaltung bis SIL 2 low demand IEC...

Page 14: ...Zwischen I O Kan len System komponenten 500 V AC Zwischen I O Kan len Erde PA 500 V AC Zwischen I O Kan len Anlagen AUS X3 3 4 500 V AC Zwischen Anlagen AUS X3 3 4 Erde PA 500 V AC Elektromagnetische...

Page 15: ...nstellungen Modul Diagnose Meldungen EIN AUS Signal Leitungsfehler berwachung EIN EIN ohne Pr fstrom AUS Pr fstrom 0 2 0 28 mA Verhalten im Fehlerfall EIN AUS letzten Wert halten Umgebungsbedingungen...

Page 16: ...ochohmig Funktionsanzeige Abrufbare Parameter Hersteller Typ HW Revision SW Revision Seriennummer Fehleranzeige Modulstatus und alarme Fehler interner Bus prim r redundant Keine Antwort vom IOM Konfig...

Page 17: ...zu denen mit nicht eigensicheren Feldstromkreisen einzuhalten z B Trennwand 220101 oder Leerplatz 6 1 Anschlussbelegung steckbare Klemmen X1 und X3 F r das Modul ist eine steckbare Klemme X1 Schraubk...

Page 18: ...an passive Betriebsmittel wie Kontakte oder Optokoppler m glich Anlagen AUS muss von anderen eigensicheren und nicht eigensicheren Stromkreisen und von der Masse galvanisch getrennt sein und darf nic...

Page 19: ...n im Bereich der Frequenzmessbereiche k nnen die Frequenz Z hlerfunktion st ren Wenn in der Anlage starke elektromagnetische St rquellen vorhanden sind oder die Leitungen l nger als 30 m sind wird emp...

Page 20: ...l senkrecht auf vorgesehenen Steckplatz der BusRail aufsetzen und durch leichtes Dr cken einrasten Um sicherzustellen dass das Modul richtig eingerastet ist nochmals links und rechts das Modul auf die...

Page 21: ...sen lassen Steckbare Klemmen X1 und X3 auf Modul stecken und mit Schrauben gegen Lockern sichern Anzugsdrehmoment 0 5 0 6 Nm Austausch von Modulen Bei Ersatz eines IS1 Moduls durch ein funktionsgleic...

Page 22: ...nachbarte Ex i Modul einrasten Steckbare Klemmen X1 und X3 auf Modul stecken und mit Schrauben gegen Lockern sichern Anzugsdrehmoment 0 5 0 6 Nm Gegebenenfalls Stromkreis Anlagen AUS an steckbarer Kle...

Page 23: ...leistungslosem Zustand Zyklischen Datenverkehr mit dem Master in Betrieb setzen Master Busverbindung und CPM pr fen LED RUN erloschen Keine Versorgungsspannung am I O Modul vorhanden I O Modul defekt...

Page 24: ...mgebungstemperatur verringern durch z B Beschattung oder K hlung Hinweis Ohne Behebung wird das Modul dauerhaft gesch digt LED M S leuchtet Modul gesch digt durch bertemperatur oder Ende der Lebensdau...

Page 25: ...itungen Rissbildung und andere sichtbare Sch den am Ger tegeh use und oder Schutzgeh use Einhaltung der zul ssigen Umgebungstemperaturen bestimmungsgem e Funktion 11 2 Wartung Das Ger t ben tigt keine...

Page 26: ...em RMA Schein in der Verpackung an die R STAHL Schaltger te GmbH senden Adresse siehe Kapitel 1 1 12 Reinigung Zur Vermeidung elektrostatischer Aufladung d rfen die Ger te in explosionsgef hrdeten Ber...

Page 27: ...EN EN EN EN EN EN EN EN EN EN EN EN EN EN EN EN EN EN EN EN EN EN EN EN Operating instructions Additional languages r stahl com EN Digital Output Module 4 Channel Version for Zone 1 Series 9475 32 04...

Page 28: ...e 5 3 2 Personnel Qualification 5 3 3 Safe Use 5 3 4 Modifications and Alterations 6 4 Function and Device Design 7 4 1 Function 7 4 2 Device Design 8 5 Technical Data 9 6 Engineering 17 6 1 Terminal...

Page 29: ...lish edition They are legally binding in all legal affairs 1 3 Further Documents IS1 coupling description download from r stahl com Earthing and shielding instructions download from r stahl com Data s...

Page 30: ...on results in severe or fatal injuries to persons WARNING Danger to persons Non compliance with the instruction can result in severe or fatal injuries to persons CAUTION Danger to persons Non complian...

Page 31: ...al installations design selection and construction IEC EN 60079 17 Inspection and maintenance of electrical installations IEC EN 60079 19 Equipment repair overhaul and reclamation 3 3 Safe Use Before...

Page 32: ...ed simultaneously on one BusRail In this case a distance of 50 mm must be maintained between the terminals with intrinsically safe and those with non intrinsically safe field circuits e g partition 22...

Page 33: ...safe magnetic valves display or signal elements to the IS1 Remote I O system The additional Ex i Plant STOP control input safely switches off all outputs All channels are individually monitored for w...

Page 34: ...vision number software revision number date of manufacture e g 123456DE9999 Rev A 01 01 0508 3 LED LEDs red for error indication wire breakage short circuit for each channel LEDs yellow for status ind...

Page 35: ...ia Da IIIC Europe ATEX Gas and dust DEKRA 12 ATEX0232X E II 2 1 G Ex ia ia Ga IIC T4 Gb E II 1 D Ex ia Da IIIC Certifications and certificates Certificates ATEX IECEx Brazil INMETRO India PESO Canada...

Page 36: ...connectable inductance Lo capacity Co IIC IIB IIIC Output ib Max current Io 53 8 mA Max power Po 617 mW Max connectable inductance Lo capacity Co IIC IIB IIIC Max internal capacity Ci 11 nF in the abo...

Page 37: ...onnectable inductance Lo capacity Co IIC IIB IIIC Output ib Max current Io 49 5 mA Max power Po 648 mW Max connectable inductance Lo capacity Co IIC IIB IIIC Max internal capacity Ci 7 2 nF in the abo...

Page 38: ...2 X3 3 4 with galvanic separation switchable in parallel Type of protection Ex ia Ex ia Max voltage Uo 5 1 V Max current Io 0 44 mA Max power Po 0 5 mW Max connectable inductance Lo capacity Co IIC LO...

Page 39: ...operation U 11 3 V 12 3 V I 40 mA 40 mA Output characteristic 15285E00 15286E00 Ex i control input X3 Function Plant STOP to switch off all outputs Suitability Disconnection up to SIL 2 low demand IE...

Page 40: ...C Between I O channels system components 500 V AC Between I O channels ground PA 500 V AC Between I O channels Plant STOP X3 3 4 500 V AC Between Plant STOP X3 3 4 earth equipotential bonding 500 V AC...

Page 41: ...Diagnosis messages ON OFF Signal Line fault monitoring ON ON without test current OFF Test current 0 2 to 0 28 mA Behaviour in case of error ON OFF hold last value Ambient conditions Ambient temperatu...

Page 42: ...Retrievable parameters Manufacturer Type hardware revision software revision serial number Error indication Module status and alarms Internal bus error primer redundant No response from IOM Configurat...

Page 43: ...h intrinsically safe field circuits and those with non intrinsically safe field circuits e g partition 220101 or empty space 6 1 Terminal Assignment of the pluggable Terminals X1 and X3 For the module...

Page 44: ...be done when connecting to the passive equipment such as contacts or optocouplers Plant STOP must be galvanically separated from other intrinsically safe and non intrinsically safe circuits and from...

Page 45: ...requency measuring ranges can interfere with the frequency counter function If the installation has strong electromagnetic sources of interference or the electrical lines are more than 30 m long use o...

Page 46: ...low 05683E00 Position the module vertically at the intended slot of the BusRail and press lightly to snap it into place Press the module down onto the BusRail to ensure that it is properly secured The...

Page 47: ...disconnect without the notch lever being actuated Plug the pluggable terminals X1 and X3 into the module and secure them against loosening using screws tightening torque 0 5 to 0 6 Nm Replacing modul...

Page 48: ...e on the adjacent Ex i module Plug the pluggable terminals X1 and X3 into the module and secure them against loosening using screws tightening torque 0 5 to 0 6 Nm If necessary connect the System OFF...

Page 49: ...puts are inactive Activate the cyclic data transfer with the master Check master bus connection and CPM RUN LED is off No supply voltage present at the I O module I O module defective Check the system...

Page 50: ...ient temperature e g by shading or cooling Note Module will be permanently damaged if not rectified M S LED is lit Module is damaged due to excessive temperature or end of service life reached Fault i...

Page 51: ...the device enclosure and or protective enclosure have cracks or other visible signs of damage whether the permissible ambient temperatures are observed whether the device is used according to its des...

Page 52: ...th the RMA form in the packaging to R STAHL Schaltger te GmbH refer to chapter 1 1 for the address 12 Cleaning To avoid electrostatic charging the devices located in potentially explosive areas may on...

Page 53: ......
Page 54: ...ion 1 Groups A G or Class I Zone 0 Group IIC IIB hazardous locations listed below Entity parameters for wiring configuration to the left are as follows CL I II III DIV 1 Group A G or CL I Zone 0 Group...

Page 55: ...La mH Ca nF La mH Ca nF 2 44 2 2 1 0 0 5 0 38 0 2 0 05 39 55 71 79 94 94 16 0 10 0 2 0 1 0 0 5 0 2 0 1 335 335 345 395 475 625 765 Type 9475 32 04 2 Plant stop I Capacitance and Inductance values CL I...

Reviews: