background image

12

FILTER ASSEMBLY

1. Replace plugs or close valves in Tank Drain and Auxiliary Drain ports.

2. Push clean air bleed filter all the way down on tube. If tube has been re-

moved, push it into socket seat in base until it bottoms.

3. Set filter element on base.

NOTICE: 

Be sure blue end marked “TOP” is on top and orange end is on

bottom. Do not reverse element.

4. Push filter element into base between two circular ribs until it bottoms.

5. BE SURE “O” Ring sealing area of tank body is clean. Clean “O” Ring and

check for damage. Replace if necessary.

6. Lubricate “O” Ring with approved lubricant (see chart) and place  in seat.

NOTICE: 

Top and bottom clamps and “O” Rings are not interchangeable;

DO NOT mix them up.

Do not remove or damage safety and instruction labels during

cleaning. Replace any decals which may have been damaged.

7. If bottom clamp was removed, BE SURE bottom of tank body is clean; set

tank body evenly on base and “O” Ring.

8. Install clamp(s) and knob assembly(s); tighten knob(s). To assist sealing,

tap clamp(s) around tank with hammer while tightening knob(s).

9. Clean pump strainer basket.

10. Open system valves as needed.

11. Proceed to “Startup”, Page 9.

STA-RITE APPROVED O-RING LUBRICANTS

Parker Super-O-Lube*

Semi-Permanent Lubrication

Aqua-Lube by Allube**

Semi-Permanent Lubrication

5% or less Mild Soap Solution

Assembly Lubrication

* Parker Seal Group, Lexington, KY

** Allube Div. of Far Best Corp., Los Angeles, CA

FILTER CLEANING PROCEDURE

NOTICE: 

Keep track of filter operating pressure. When pressure reaches 5-7

PSI (35-48kPa) above initial operating pressure, clean filter element.

NOTICE: 

If filter is used with a spa, soak element (see Step 2, “Special

Cleaning”) at each regular cleaning.

NOTICE:  

When sanitizing your pool using PHMB (polyhexamethylene bi-

quanide based) cleaners, use 

only

PHMB cleaners to clean the module. When

using PHMB sanitizers, the filter module MUST be cleaned more thoroughly
and frequently than for a pool using chlorine. Follow manufacturer’s instruc-
tions carefully. Use of any other type of cleansers with PHMB pool sanitizers
will void the filter’s warranty.

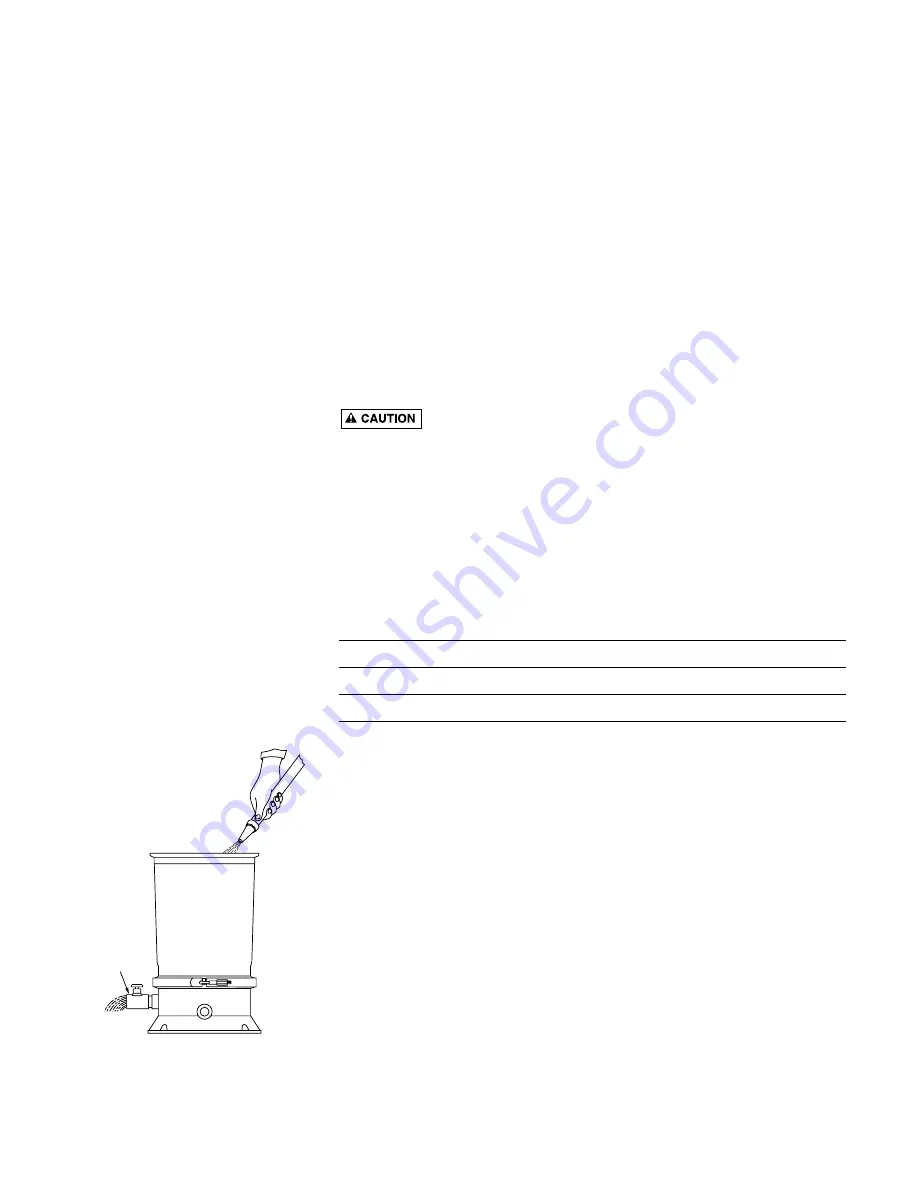
With hose, wash foreign material from inside of base. Try to avoid washing
debris into outlet port (see Figure 8).

NOTICE: 

Be sure inside surface of base is clean.

Tank Drain

Port

815 0394

FIGURE 8

Summary of Contents for PTM50JWAD-03

Page 1: ...Rite Pool Spa Group 293 Wright Street Delavan WI 53115 North America 800 752 0183 FAX 800 582 2217 International 262 728 5551 FAX 262 728 4461 TELEX ITT 4970245 www sta ritepool com Union City TN Dela...

Page 2: ...mes 3 Risk of electrical shock Connect only to a grounding type receptacle protected by a ground fault circuit interrupter GFCI Contact a qualified electri cian if you cannot verify that the receptacl...

Page 3: ...BE SURE all air is out of system before operating or testing equipment Before pressure testing make the following safety checks Check all clamps bolts lids and system accessories before testing BE SUR...

Page 4: ...swimming pools only NOTICE Some pool disinfectants may clog filter media To maximize media life and filter cycle time closely follow disinfectant manufacturer s instructions when cleaning pool or fil...

Page 5: ...p suction inlet below pool water level at all times this al lows pump to prime Have adequate ventilation to prevent motor overheating Be protected from excess moisture such as water puddles or rain ru...

Page 6: ...ps must be kept securely hand tight to prevent leaks and prevent tank blowup when filter is under pres sure If it is necessary to work on filter or do anything to clamps do this 1 Stop pump 2 Close is...

Page 7: ...provided Use as follows for leak free connections 1 O Ring and sealing surfaces must be clean 2 Assemble handtight only NO WRENCHES 3 NO pipe compound or Teflon tape on unions On 03 systems use hoses...

Page 8: ...physical damage to avoid serious or fatal electrical shock hazard Plug the System into a GFCI receptacle on a 115 Volt 60 Hertz grounded cir cuit only Electrically isolate circuit so that no other lig...

Page 9: ...pen system valves and make sure pump is filled with water 3 Start pump circulating water NOTICE To prevent pump from running dry be sure water level never drops below bottom of skimmer inlet Add water...

Page 10: ...ized replacement parts when servicing system GENERAL No lubrication or regular mechanical maintenance are needed Wash outside of filter with a mild detergent and water Rinse off with hose NOTICE DO NO...

Page 11: ...t to damage O Ring Place tank head in clean area NOTICE If heavy dirt deposits have collected around bottom of filter ele ment and base wash out base before removing element 9 Remove O Ring from tank...

Page 12: ...ile tightening knob s 9 Clean pump strainer basket 10 Open system valves as needed 11 Proceed to Startup Page 9 STA RITE APPROVED O RING LUBRICANTS Parker Super O Lube Semi Permanent Lubrication Aqua...

Page 13: ...roceed as follows 1 Follow Regular Cleaning Procedure 2 If deposits remain soak element at least one hour with one of the follow ing solutions A Commercial filter cleaner see chart follow manufacturer...

Page 14: ...t be clean and free of dirt grease dust etc Wet rub ber cup gasket of ceramic seat with small amount of liquid detergent press into cavity firmly and squarely with finger pressure Figure 15 2 If ceram...

Page 15: ...h retain water with non toxic propylene glycol antifreeze RV antifreeze 4 Drain all water from pump and piping when expecting freezing tempera tures or when storing pump for a long time see instructio...

Page 16: ...vice on Page 14 4 Consult with dealer installer or service representative C EXCESSIVE AIR IN SYSTEM PUMP LOSES PRIME 1 Make sure water level in pool is at least 2 51mm above bottom of skimmer throat w...

Page 17: ...de as recom mended by pool manufacturer Continue until algae is controlled B Low flow 1 Element is plugged see Special Cleaning Instructions Page 13 2 Pipe blocked downstream from filter remove obstru...

Page 18: ...ed properly in filter base follow instructions under Filter Disassembly Reassembly Pages 11 and 12 and reposition properly 4 Filter is plumbed backwards and element cloth is ruptured replumb properly...

Page 19: ...Pump 1 HP 1 JWPA5E7L 2A2 JWPA5E7L 2A2 JWPA5E7L 2A1 5 Capscrew 4 37337 0084 37337 0084 37337 0084 6 Flat Washer 4 U43 60SS U43 60SS U43 60SS 7 Pump Spacer 2 25010 0006 25010 0006 25010 0006 8 Platform...

Page 20: ...Plug 2 WC78 38T WC78 38T 10 Nut Clamp 1 WC36 1 WC36 1 11 Clamp 1 25010 9100 25010 9100 12 Air Bleed Tube 1 25010 0007 25010 0007 13 Filter Air Bleed Tube 1 WC8 35 WC8 35 14 Clamp 1 25010 9101 25010 9...

Page 21: ...U178 920P U178 920P 14 Washer Flat 5 16 4 U43 41SS U43 41SS 15 Capscrew 5 16 18x1 1 4 4 U30 64SS U30 64SS 16 Washer Lock 5 16 4 U43 11SS U43 11SS 17 Gasket 1 C20 123 C20 123 18 Drain Plug 2 WC78 40T...

Page 22: ...22...

Page 23: ...pur chaser Purchaser only Sta Rite shall have the option to re pair or replace the defective product at its sole discre tion Purchasers must pay all labor and shipping charges nec essary to replace t...

Page 24: ...24...

Reviews: