background image

 ST 500 "Piranha" Operation Manual: Supplement #1 - Functions of the Controls


79 


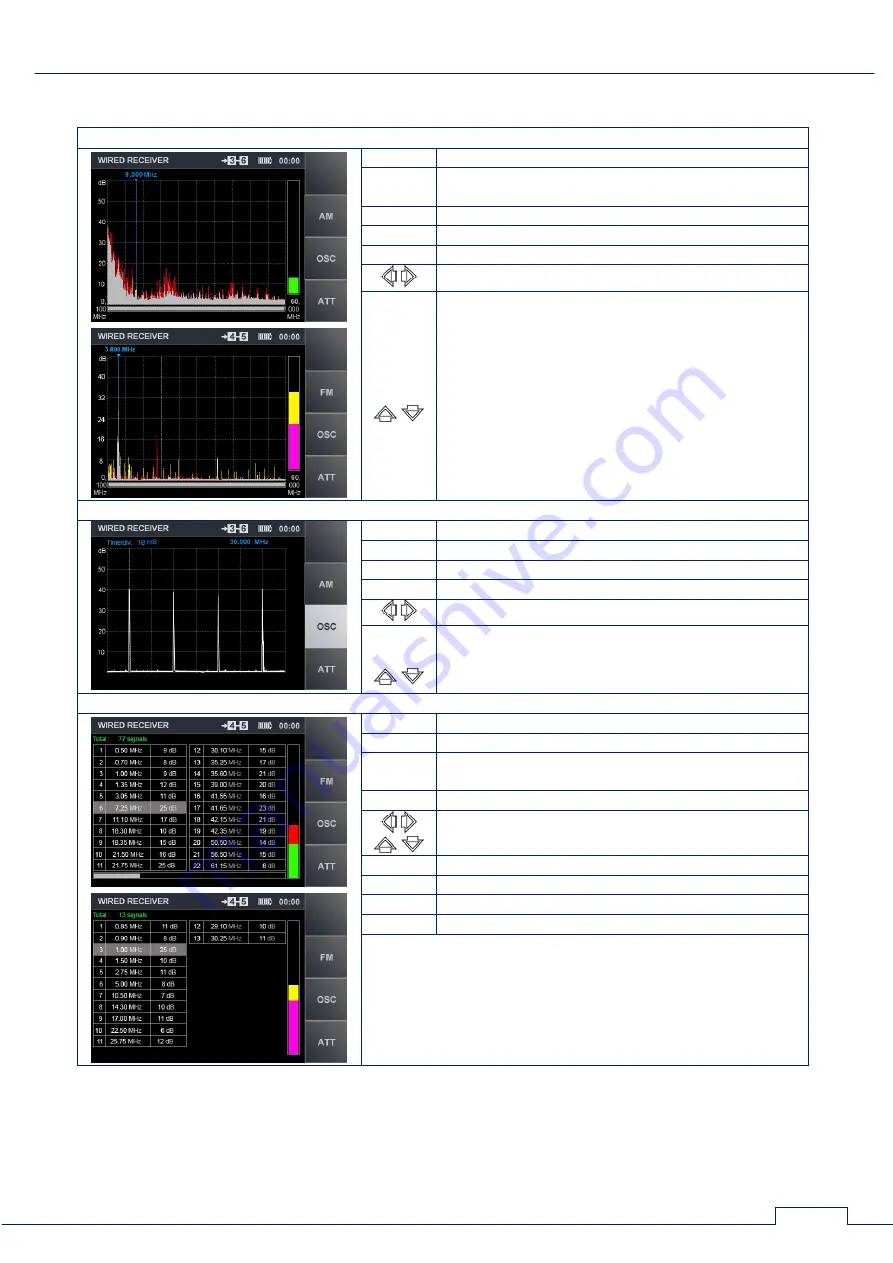
"PANORAMA" (DIFFERENTIAL mode). "FIXED-FREQUENCY ANALYSIS" function 


MODE 

go to main menu of device 

ESC 

ENTER 

turn off 

"FIXED-FREQUENCY ANALYSIS" 

function 

F2 

toggle modulation 

(FM/AM)


F3 

turn on 

OSCILLOSCOPE


F4 

turn on/off

 Attenuator


cursor positioning (frequency tuning) 

F1 

FUNC 


disabled 

OSCILLOSCOPE  (when activated from the "PANORAMA" mode) 


MODE 

go to main menu of device 

F3, ESC 

turn off 

OSCILLOSCOPE


F2 

toggle modulation 

(FM/AM)


F4 

turn on/off 

Attenuator


time-axis zoom 

F1 

FUNC 


disabled 

AUTOMATED mode 


MODE 

go to main menu of device 

ESC 

return to the previous mode

1


FUNC 

sort the table (by ascending frequency or signal 
level) 

ENTER 

turn on 

"FREQUENCY TUNING" 

function 


table row selection 

F1 

go to 

"ELECTRONIC SWITCH CONTROL"


F2 

toggle modulation 

(FM/AM)


F3 

turn on

 OSCILLOSCOPE


F4 

turn on/off 

Attenuator


1

 – returns to the DIFFERENTIAL mode, if the AUTOMATED 

mode was activated from the DIFFERENTIAL mode 


Summary of Contents for PIRANHA ST 500

Page 1: ...ST 500 PIRANHA MULTIFUNCTIONAL DETECTION DEVICE USER MANUAL ST Group Ltd St Petersburg Russia 7 812 412 33 21 info smersh pro www spymarket com...

Page 2: ...ICATION Mode 21 3 4 1 MOBILE DEVICES MONITORING Function 21 3 4 2 BASE STATIONS MONITORING Function 22 3 4 3 USER LIST Function 23 3 4 4 ANALYZING DETECTED SIGNALS Function 23 4 INFRARED DETECTOR Chan...

Page 3: ...4 9 2 1 Selection of False Signals 64 9 3 Guidelines for Use of the WIRED RECEIVER Channel 65 9 3 1 Electric Mains Testing 65 9 3 2 Low Current Circuit Testing 67 9 4 Guidelines for Use of LOW FREQUEN...

Page 4: ...rom eavesdropping devices that transmit information via electric mains and low current lines in the frequency range 100 kHz 180 MHz LOW FREQUENCY AMPLIFIER is intended for the detection of LF signals...

Page 5: ...rent sockets 1 pcs 5 Cable for connecting the main unit to a PC s USB 1 pcs 6 Telescopic antenna 1 pcs 7 Charger 1 pcs 8 Headphones 1 pcs 9 Test sound source 1 pcs 10 Charger cable for the test sound...

Page 6: ...panel In the placement scheme above the numbers assigned to items in the ST 500 bundle are the same as in 1 2 1 1 3 DESCRIPTION OF SPECIFICATION ITEMS 1 3 1 MAIN UNIT WITH ELECTRONIC SWITCH Main unit...

Page 7: ...is shown in fig 2 Fig 2 Number in fig 2 Marking on the device Element description 1 Display 2 Keyboard F1 F4 Hotkeys ESC Cancellation return key FUNC Key to enable additional functions ENTER Confirmat...

Page 8: ...ting the main unit to electric mains equipped with European standard sockets fig 1 2 A LED indicator in the plug shows if the line is powered The adapter cable is equipped with an RJ45 connector with...

Page 9: ...ed for connecting the main unit to a PC s USB port 1 3 9 SPLITTERS ADAPTERS AND CONNECTOR CABLES A set of splitters and connecting cables is supplied with ST 500 that are used for testing various type...

Page 10: ...mic range dB 50 impedance Ohm 100 demodulation type AM FM input filter passband kHz 180 maximum voltage on the circuit V 250 AC 60 DC Low Frequency Amplifier frequency range Hz 20 25000 impedance kOhm...

Page 11: ...on number Fig 3 Press any key to go to the main menu of device 2 2 MAIN MENU One of the four operation channels or the service mode SETTINGS can be selected from the main menu The main menu screen is...

Page 12: ...harge sign 5 current time hh mm 2 4 SETTINGS SERVICE MODE This SETTINGS mode is intended for setting the date time and interface language Russian or English To enter the settings mode using the keys a...

Page 13: ...ode without saving changes press ESC 2 4 2 SETTING THE TIME In order to set the time use or to select TIME in the SETTINGS menu and press ENTER The following screen fig 8 will appear with time in the...

Page 14: ...of the device fig 2 6 The channel is activated from the main menu The detected signals are analyzed based on graphic information spectrogram oscillogram table of signals acoustic information via head...

Page 15: ...g the width of the set viewing bar relative to the maximum possible 10 upper bound of the set frequency range viewing band 11 gain value Controls Key Action ESC MODE switching to main menu of device E...

Page 16: ...registered during previous scanning cycles in the PANORAMA mode are set as 0 and only signals in excess of 0 will be shown on the screen differential spectrum The DIFFERENTIAL mode can be used for iso...

Page 17: ...de activating the WIRELESS COMMUNICATION mode analyzing the signal at a set frequency setting the gain adjusting the band limits zoom Switching off the DIFFERENTIAL mode return to the PANORAMA mode is...

Page 18: ...SCOPE F4 turning on off gain setting FUNC disabled To turn off FIXED FREQUENCY MONITORING function press ENTER or ESC The device will switch back to the mode from which the function was activated PANO...

Page 19: ...cillogram of a demodulated signal at the selected frequency 5 on indication of the inclusion of the OSCILLOSCOPE Functionality determining the time parameters of a demodulated signal setting the divis...

Page 20: ...bile telecommunication networks THREAT signals of mobile digital communication devices UNKNOWN all the remaining signals With the help of ST 500 ST 500 software 8 6 1 bands can be assigned THREAT or N...

Page 21: ...g on off SET 0 function F2 passband selection 1 MHz or 20 MHz F3 turning on OSCILLOSCOPE F4 activating gain adjustment ENTER turning on FREQUENCY TUNING function ESC returning to PANORAMA or DIFFERENT...

Page 22: ...fault The constitution and parameters of these bands can be adjusted using ST 500 software The USER LIST function allows monitoring pre defined frequency bands that are the most likely to be utilized...

Page 23: ...isabled 3 4 2 BASE STATIONS MONITORING FUNCTION This allows identifying and analyzing the signals from base stations of mobile communications networks in real time The screen looks as shown in fig 17...

Page 24: ...revious mode MODE switching to the main menu of device 3 4 4 ANALYZING DETECTED SIGNALS FUNCTION The MOBILE DEVICES MONITORING BASE STATIONS MONITORING and USER LIST functions make it possible to dete...

Page 25: ...level bar fig 19 13 OSCILLOSCOPE fig 19 3 SPECTRUM ANALYZER fig 19 6 The signal level bar shows signal level at the current frequency fig 19 7 as determined by the position of the SPECTRUM ANALYZER ma...

Page 26: ...TRUM ANALYZER controls Key Action MODE switching to the main menu of device ESC switching to the previous mode ENTER turning on off SET 0 function horizontal zoom OSCILLOSCOPE cursor positioning SPECT...

Page 27: ...fig 2 5 Analysis of the detected signals is carried out using graphic information oscillogram and signal level bar acoustic information headphones or built in speaker The channel is activated from the...

Page 28: ...ps locate the source of a detected IR signal Upon activation the detected signal level will be set as 0 and the signal level bar will be showing the difference in excess of it To activate the DIFFEREN...

Page 29: ...is connected to the INPUT socket of the main unit fig 2 7 A LED on the adapter will indicate if there is voltage on the circuit lit if present 5 2 CONNECTING TO LAN CONNECTING TO LAN CABLES EQUIPPED...

Page 30: ...ction scheme is shown in fig 24 2D Fig 24 5 3 CONNECTING TO TELEPHONE LINES Telephone lines can be equipped with RJ11 plugs or RJ11 sockets CONNECTING TO TELEPHONE LINE EQUIPPED WITH AN RJ11 PLUG If t...

Page 31: ...fitted with a singular RJ11 socket An RJ11 splitter fig 1 14 and cable fig 1 3 are to be used in this case for connecting the main unit The 3E option is used when telephone line is fitted with a doubl...

Page 32: ...o determine tested line type electric mains or low current frequency range 0 1 60 MHz or 0 1 180 MHz 6 1 CIRCUIT TYPE SELECTION Upon channel activation use the keys and to select the circuit type MAIN...

Page 33: ...INS is chosen from the menu fig 28 PANORAMA mode turns on and all the signal activity in the circuit within the selected frequency band is displayed on the screen fig 30 Functionality analyzing the si...

Page 34: ...the signals received in the range selected for viewing The constant and pulse components of signals registered during the latest cycle are shown green and red respectively Maximum signal levels regist...

Page 35: ...evels in excess of 0 will be displayed The DIFFERENTIAL mode is activated from PANORAMA by pressing F3 the key field will become lighter The screen will look as shown in fig 31 To deactivate the DIFFE...

Page 36: ...r studying signals detected in the PANORAMA or DIFFERENTIAL mode It allows listening to a demodulated AM FM signal and researching it with the OSCILLOSCOPE The inclusion of the function is carried out...

Page 37: ...ctivating the attenuator 20 dB ENTER ESC turning on FIXED FREQUENCY ANALYSIS function MODE switching to the main menu of device 6 4 2 OSCILLOSCOPE The OSCILLOSCOPE helps study a signal at a fixed freq...

Page 38: ...to main menu of device 6 5 AUTOMATED MODE In the AUTOMATED mode the signals are registered whose amplitude exceeds the adaptive detection threshold Inclusion is made from the PANORAMA mode or from the...

Page 39: ...g to the previous mode MODE switching to main menu of device 6 5 1 FREQUENCY TUNING FUNCTION For tuning to a frequency select the corresponding table row and press ENTER Frequency tuning window fig 35...

Page 40: ...earching for eavesdropping devices that may be connected to low current circuits one should test all the possible paired combinations of wires FUNCTIONAL SCHEME OF THE WIRED RECEIVER CHANNEL LOW CURRE...

Page 41: ...ed pair electronic switch setup Controls Key Action table row selection selecting a pair of wires to be tested ENTER activating PANORAMA mode ESC MODE switching to the main menu of device FUNC activat...

Page 42: ...entral pins engaged RJ standard description is given in Supplement 2 If the tested cable is not equipped with connectors or the connectors are non standard a manual setup of the electronic switch is p...

Page 43: ...switch to ELECTRONIC SWITCH CONTROL mode press FUNC or ESC If any pins have been disengaged in the setting up stage upon switching back to ELECTRONIC SWITCH CONTROL mode the table will look different...

Page 44: ...band setting zoom cursor positioning F1 switching to ELECTRONIC SWITCH CONTROL mode F2 activating the AUTOMATED mode F3 activating the DIFFERENTIAL mode F4 activating deactivating the attenuator 20 dB...

Page 45: ...NALITY electronic switch setup connecting pairs of wires in the manual mode automatic sequential selection of all paired wire combinations with a possibility to analyze signals on each combination aco...

Page 46: ...e selected 5 wire pairs 6 measured values of direct voltage 7 measured values of alternating voltage The measured values of direct and alternating voltage are shown for the pair of wires that is curre...

Page 47: ...is what the screen looks like upon setting the electronic switch to the 6P4C scheme fig 42 Pins 1 2 7 8 are disabled highlighted grey The four central pins 3 4 5 6 are enabled highlighted white Fig 4...

Page 48: ...TING THE BIAS VOLTAGE In order to apply a bias voltage to a connected pair of wires do the following 1 Press F3 The Bias field will become brighter 2 Using the keys select the bias voltage 30 V or 30...

Page 49: ...the connected pair exceeds 50 V the inscription 50 appears in the corresponding cell Fig 45 In this case to apply a bias voltage de energize the cable 7 5 AUTOMATED MODE The AUTOMATED mode is intende...

Page 50: ...these parameters can be adjusted without exiting the OSCILLOSCOPE The adjustment procedure is described in 7 3 1 and 7 3 2 Controls Key Action vertical zoom of the OSCILLOSCOPE horizontal zoom of the...

Page 51: ...3 frequency value at cursor position 4 connected pair of wires SPECTRUM ANALYZER Controls Key Action cursor positioning F1 ESC switching to ELECTRONIC SWITCH CONTROL mode F2 activating deactivating Ga...

Page 52: ...ry changes then upload the corrected data to the device and or save it as a file on the HDD Files on the HDD are saved in the xxx dat format xxxx is the file name assigned by the user when saved Only...

Page 53: ...states 1 USB Connected the Main Unit is on and connected to the computer 2 Request to connect to ST500 the PC sends a request to connect the main unit the driver is installed the main unit is turned o...

Page 54: ...ous radio devices in legitimate use on site THREAT frequency bands are highlighted red NON THREAT bands are highlighted green Once information on THREAT and NON THREAT bands is loaded into ST 500 sign...

Page 55: ...HTING MODE 1 Go to RANGES HIGHLIGHTING tab 2 Load data by one of the below methods from the PC by clicking Load from File and selecting the file all the data including range customizations will be loa...

Page 56: ...line will be deleted from the list Finishing Before completing the work save the changes in any of the following methods download to the PC HDD by clicking the Save to File and specifying the path for...

Page 57: ...tters can be used 7 band deletion 8 accepting or canceling changes made 9 download factory settings list of mobile communication device ranges used in Russia USING THE MODE MOBILE BANDS 1 Go to tab Mo...

Page 58: ...ands list rows is 11 2 The band should not exceed 600 MHz If this condition is violated a warning appear on the screen The band should be no more than 600 MHz 3 The value of the initial frequency must...

Page 59: ...mode is intended for creating and editing a list of frequency bands that are of a specific interest to the user These data loaded to ST 500 memory are used by the SELECTIVE HF DETECTOR channel WIRELES...

Page 60: ...T500_vx_xx bin x_xx is version number 2 Start ST 500 software 3 Connect ST 500 to PC 4 Select tab Firmware update 5 Click Browse 6 In the opened window select the path to the file with latest firmware...

Page 61: ...ch algorithms are typical and can be adjusted depending on the features of the object being checked and the tasks set 9 1 1 SEARCH IN THE AUTOMATED MODE The AUTOMATED mode is used at small loading of...

Page 62: ...main unit of ST 500 and turn it on put on the headphones 3 Turn on SELECTIVE HF DETECTOR channel PANORAMA Mode 4 Depending on the activity in the frequency range set the optimal gain making sure that...

Page 63: ...MHz CDMA450 463 468 GSM900 935 960 GSM1800 1805 1880 3G 2110 2170 3G low 2010 2025 DECT 1880 1900 USER LIST Frequency range MHz 88 108 430 450 Using the ST 500 software bands can be added to or remov...

Page 64: ...phones but the oscilloscope picture of the demodulated signal changes with the test sound there is a radical decrease in the level of the detected signal when ST 500 is brought outside the room 9 1 4...

Page 65: ...earch algorithm 1 Turn on the test sound source in the checked room 2 Turn on ST 500 and activate IR DETECTOR 3 Direct the IR sensor at the suspected location of the IR receiver Important The detectio...

Page 66: ...ch for HF signals in electric mains and low current circuits the PANORAMA DIFFERENTIAL and the AUTOMATED modes are used For the analysis of the detected signal the FIXED FREQUENCY ANALYSIS function an...

Page 67: ...to sort the table by level 11 Turn on the test sound source and adjust the sound volume 12 Connect headphones PHONE socket and adjust the sound volume 13 Analyze the demodulated signal alternating AM...

Page 68: ...above procedure The analysis is complete when the circuit has been tested with all the consumer devices connected consecutively The consumer devices whose connection lead to the appearance of THREAT...

Page 69: ...e line If this signal disappears then its source is in the telephone If the signal is not lost when the telephone is disconnected then its source is connected to the telephone line 9 4 GUIDELINES FOR...

Page 70: ...tabular cursor moves through the table stopping for a few seconds on the tested combination of wire pairs At this time the operator can listen to the received signal After going through all the possib...

Page 71: ...is being tested in the meantime the operator can listen to the received signal If the sound from the test sound source can be heard in the headphones it means an electret microphone is detected and i...

Page 72: ...hat are close to the cabling but not connected to it in the proximity of the antenna will yield responses on the 2nd and 3rd harmonics this will be registered by the non linear locator operator but no...

Page 73: ...LOW FREQUENCY AMPLIFIER channel navigate ENTER confirmation of action entering the SETTINGS mode place the cursor on the corresponding menu item and press ENTER SETTINGS navigate ENTER confirmation of...

Page 74: ...scaling occurs relative to the set frequency at cursor position frequency tuning F1 activate WIRELESS COMMUNICATION mode F2 activate AUTOMATED mode F3 activate deactivate DIFFERENTIAL mode F4 activat...

Page 75: ...gnal level ENTER activate FREQUENCY TUNING function navigate F1 turn on off SET 0 F2 select passband 1 or 20 MHz F3 activate OSCILLOSCOPE F4 activate Gain Setting AUTOMATED mode FREQUENCY TUNING funct...

Page 76: ...ORING F3 turn on USER LIST F4 activate Gain Setting F2 FUNC disabled USER LIST function MODE go to main menu of device ESC go to the previous mode step back navigate ENTER turn on ANALYZING DETECTED S...

Page 77: ...scaling Zoom 1 cursor positioning ENTER turn on FIXED FREQUENCY ANALYSIS F2 activate the AUTOMATED mode F3 activate deactivate DIFFERENTIAL mode F4 activate deactivate Attenuator F1 FUNC disabled 1 th...

Page 78: ...cy or signal level ENTER turn on FREQUENCY TUNING function navigate F2 toggle modulation FM AM F3 OSCILLOSCOPE activation F4 activate deactivate Attenuator F1 disabled FREQUENCY TUNING function MODE g...

Page 79: ...t deselect the 6P6C standard scheme F3 select deselect the 6P4C standard scheme F4 select deselect the 6P2C standard scheme choose pin number when setting manually ENTER select deselect pin when setti...

Page 80: ...from the PANORAMA mode MODE go to main menu of device F3 ESC turn off OSCILLOSCOPE F2 toggle modulation FM AM F4 turn on off Attenuator time axis zoom F1 FUNC disabled AUTOMATED mode MODE go to main...

Page 81: ...e axis zoom F1 FUNC disabled 10 5 LOW FREQUENCY AMPLIFIER ELECTRONIC SWITCH CONTROL mode MODE ESC go to main menu of device navigate ENTER F1 turn on OSCILLOSCOPE FUNC activate ELECTRONIC SWITCH SETTI...

Page 82: ...tage 30 V setting the Bias Voltage 30 V ENTER setting the Bias Voltage 0 V FUNC ESC F1 F4 disabled OSCILLOSCOPE MODE go to main menu of device F1 ESC go to ELECTRONIC SWITCH CONTROL mode F2 activate G...

Page 83: ...gs 82 11 SUPPLEMENT 2 TYPICAL SETTINGS OF THE ELECTRONIC SWITCH 8C8P connecting F1 Computer 8 wire line equipped RJ45 connector 6P6C connecting F2 6 wire telephone line equipped with connector RJ25 or...

Page 84: ...cal Electronic Switch Settings 83 6P2C connecting F4 2 wire telephone line equipped with RJ25 or RJ11 Manual setup of the electronic switch and ENTER Settings for an arbitrary 4 wire line not equipped...

Page 85: ...Jack is a standardized physical network interface comprising both connectors plug and socket and their connection scheme It is widely used in telecommunications The most common standards of this kind...

Page 86: ...nd green RX 3 4 blue 4 5 white and blue 5 6 green RX 6 7 white and brown 7 8 brown 8 12 4 CROSSOVER WIRING SCHEME The wiring scheme of a cable linking two network interface cards is different in that...

Page 87: ...white and brown 4 8 brown 5 12 5 WIRING SCHEME OF A THREE TWO AND ONE TWISTED PAIR CABLE RJ connector pin RJ25 RJ14 RJ11 Contemporary coloring Obsolete coloring 1 X white and green orange 2 X X white...

Page 88: ...telephone PAIRS OF WIRES USED IN TELEPHONE CIRCUITS line type RJ connector RJ connector pin Wire coloring Modern Obsolete 2 wire analog RJ 9 2 3 analog signal green orange red green RJ 11 14 25 3 4 a...

Reviews: