


1
A113-1 & A113-3 Revision 1
Removal of Old Brakes
1)
Raise front of car until the wheels and tires clear the floor and support the vehicle on
jack stands. Remove lug nuts and take tire and wheel assemblies off car.
2)
Using a tube wrench, remove the hollow banjo bolt that holds the end of the flexible
brake hose to the caliper.
BRAKE FLUID WILL CAUSE SEVERE DAMAGE TO YOUR PAINT. ALWAYS USE
EXTREME CAUTION WHEN HANDLING BRAKE FLUID.
TIP: With the flex lines off the caliper, brake fluid will be free to drain from the
hoses. The use of a hose pinch clamp (not vise grips!) or a plug in the end of
the hose will prevent this. This will also be important since you do not want the
master cylinder to go dry.
3)
With the hose removed, the caliper can be taken off by removing the two 14mm bolts
that hold the caliper bracket to the spindle. Save these bolts as they will be reused
later.
4)
With the caliper removed, the rotor will simply slide off the hub. If the rotor will not
slide off easily, spray some penetrating oil around the center hub and tap rotor with a
mallet until it breaks loose.
LEFT AND RIGHT ROTORS AS WELL AS CALIPERS ARE DIFFERENT! PLEASE
MAKE SURE TO CHECK THE MARKING ON THE BOXES TO INSURE YOU ARE
INSTALLING THE CORRECT PIECES ON THE CORRECT SIDES.
Installation of Kit
5)
With old rotor removed and hub surface whipped clean, new rotor can be installed.
Please note that packing material must be removed from surface of new rotors before
they are installed. Rotor can be temporarily held in place against hub with lug nuts.
6)
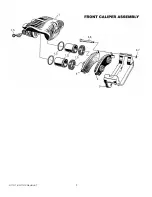
Calipers are sent as complete assemblies with pads already installed (Figure 1).
Make sure to select correct caliper so bleeder screw is facing up. Slide caliper over
rotor and line up holes in caliper bracket with those in the spindle. Using the 14mm
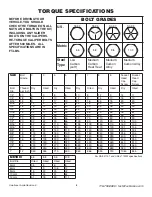
belts removed from the car in step 3, bolt bracket to spindle and torque to 90 ft/lbs.
7)
Reattach original flex line to caliper using banjo bolt and 1 new copper washer on
either side of the end of the hose. Torque banjo bolt to 20 ft/lbs.
8)
With all hardware bolted on, turn wheels lock to lock making sure there is no
interference or twisting of flexible brake hose.
Filling and Bleeding System
9)
It is advisable to replace the brake fluid if the color is brown or muddy. This is due to
water that has been absorbed by the fluid which will eventually corrode the brake lines
and master cylinder. This absorbed moisture can also cause a vapor lock situation
under extreme braking conditions. Flush system with clean brake fluid and replace
with a good grade of disc brake fluid DOT 4.
10)
The simplest and most effective way to bleed your brakes is to use the gravity
bleeding approach as follows:
a)
With calipers installed, make sure all fittings are tight and master cylinder is
topped off.