Squid Ink CoPilot 500 User Manual Download Page 146

146   System Updates 

2005995 Rev O – 210712 

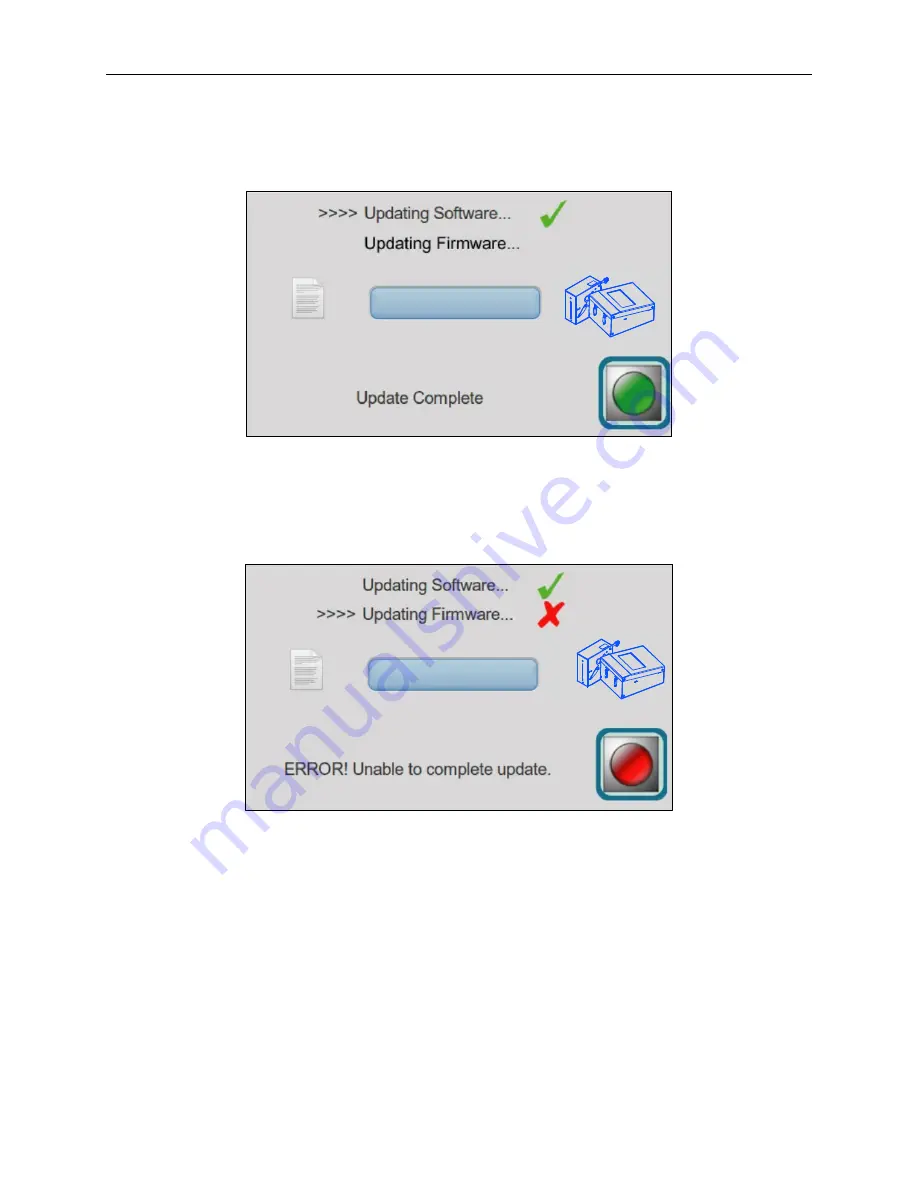
When the update is complete, an “Update Complete” screen will display with a green check next 

to the update indicating the update has been successful. 


If there is a problem with the update the “ERROR Unable to complete update” screen will 

display with a red X mark next to the problem update. 


In the unlikely event that there is a problem, remove the USB device containing the update, 

power the printer off and on, and then retry installing the update. If the problem persists, call 

Squid Ink Manufacturing Technical Support.


Summary of Contents for CoPilot 500

Page 1: ...2005482 Rev G 210505 BETA CoPilot 500 Industrial Inkjet Printing System User Guide...

Page 2: ...2 Abbreviations Terminology 2005995 Rev O 210712...

Page 3: ...ilot 500 Oil Printhead or CoPilot 500 Solvent Printhead Revised 7 12 2021 P N 2005995 Rev O Copyright and Trademarks Copyright 2021 Squid Ink Manufacturing All rights reserved All trademarks and brand...

Page 4: ...4 Abbreviations Terminology 2005995 Rev O 210712...

Page 5: ...Software Specifications 20 Component Dimensions 21 Printhead 21 Controller 22 Options 23 Mounting Hardware 24 Installation and Setup 25 General Recommendations 25 Material Handling 25 Grounding 25 AC...

Page 6: ...nnecting an Optional Low Ink Warning Beacon 57 Connecting to a Desktop PC 58 Connecting to a Local Area Network 59 USB Port 60 Optional Four Port USB Hub 61 Power Supply 62 Commissioning the Printhead...

Page 7: ...113 Entering the Proper Settings 113 Operation 115 Powering On 115 Creating a Print Message 116 Transferring a Print Message 116 Loading a Print Message 117 Printing a Message 118 Powering Off 118 Mai...

Page 8: ...r 140 CoPilot 500 Turbo CoPilot 500 HiSpeed Turbo Controller 141 System Updates 145 Applying Updates from USB 145 Product Warranty 147 Warranty Statement 147 Warranty Period 147 Printheads 147 Repairs...

Page 9: ...e format F Fahrenheit SCC 14 ITF A barcode format FAT32 A USB format SSCC 18 A barcode format fpm Feet per minute SSID Service Set Identifier ft Feet TUV Meets the requirements of the German Equipment...

Page 10: ...10 Abbreviations Terminology 2005995 Rev O 210712...

Page 11: ...ing maintenance NOTE Some service and maintenance procedures require the power to be left on During such procedures carefully follow the safety instructions Use only Squid Ink Manufacturing ink and Sq...

Page 12: ...maintaining the CoPilot 500 observe the following precautions WARNING Health Hazard Some inks and solvents may be a health hazard if exposed for too long Ensure that the area has adequate ventilation...

Page 13: ...rt 15 of the FCC Rules These limits are designed to provide reasonable protection against harmful interference when the equipment is operated in a commercial environment This equipment generates uses...

Page 14: ...the Printhead The ink is then ejected onto the substrate through the Ink Nozzles on the front of the Printhead Because the system uses capillary action rather than a motor to help supply the ink to th...

Page 15: ...nal level of Orion that allows connecting to multiple Printers a Download Instructions card is included in the shipping carton Do not throw this card away The card contains the Orion license number re...

Page 16: ...712 Printhead Overview Nozzle Face Ink Level Signal Port Cartridge Only Data Cable Port Photocell Mounting Bracket Holes Ink Line Fitting Purge Tube Capped Check Valve Hose Clamp Power Communication I...

Page 17: ...w Printhead 1 Data Cable Port Printhead 2 Data Cable Port Power Cord Receptacle Power Switch USB Port Ethernet Port Photocell Encoder OUT to Second CoPilot System Photocell Encoder IN Fuse Label with...

Page 18: ...nsor External Photocell trigger or optional Encoder Communication Interface One USB host and one Ethernet input Electrical Requirements 100 240 VAC 50 60 Hz 65 W maximum Storage Environment 34 F 1 C 1...

Page 19: ...rint Speed Up to 205 fpm 62 m min 205 dpi Up to 150 fpm 45 m min 205 dpi Up to 300 fpm 91 m min 205 dpi for static messages Contact Squid Ink Technical Services at 1 800 877 5658 for dynamic message s...

Page 20: ...mated rollover Barcodes Code 39 Interleaved 2 of 5 UPC A EAN 8 EAN 13 Code 128 UCC 128 SCC 14 ITF SCC 14 28 SSCC 18 MSI DataMatrix QR MicroQR and PDF417 bar codes standard Fonts Arial regular and bold...

Page 21: ...Introduction 21 2005995 Rev O 210712 Component Dimensions Printhead Front View Side View Bottom View...

Page 22: ...22 Introduction 2005995 Rev O 210712 Controller Top View Side View Front View Bottom View...

Page 23: ...ration with variable speed Conveyors 2004194 Barcode Laser Scanner Allows scan and print message retrieval 2004570 Spring Loaded Printhead Bracket Prevents Printhead from being accidentally bumped by...

Page 24: ...ttach directly to the Conveyor Contact your Squid Ink distributor for guidance on which stand best suits your needs and follow the mounting instructions for the mounting system that you choose NOTE St...

Page 25: ...ounded before using To further improve print quality and protect the system from static electricity install a 0 25 or wider Ground Braid Part Number 2005024 between the Printhead Controller and earth...

Page 26: ...clean is recommended A small waste receptacle is also recommended for soiled wipe disposal Vibration CoPilot 500 Print Engines do not de prime easily They are tolerant of being bumped by passing produ...

Page 27: ...g systems are available for the CoPilot 500 printing system Follow the instructions for the specific mounting system ordered with your Printer ATTENTION Use only the supplied Mounting Screws to attach...

Page 28: ...Mounting Screws into the two M6 mounting holes located on the bottom of the Controller VIDEO Mounting the Controller To see a video of this procedure click this link https youtu be zSjTfhCmU8M t 49 O...

Page 29: ...er than straight ahead If printing straight ahead the Printhead can be attached directly to a Floor Stand or Conveyor Mount see Replaceable Parts on page 129 VIDEO Mounting the Printhead To see a vide...

Page 30: ...T Nuts and accompanying Screws to attach the Mounting Bracket through the two vertical slots to the Mounting Arm and then tighten the T Nuts Mounting Bracket Printhead Attaching the Printhead to a Co...

Page 31: ...nk System VIDEO Mounting the Ink System To see a video of this procedure click this link https youtu be zSjTfhCmU8M t 370 Or scan the QR code at right using the camera app on your mobile device View T...

Page 32: ...ying Screws to attach the Mounting Bracket through the two vertical slots to the Mounting Arm and then tighten the T Nuts Mounting Bracket Mounting Arm Attaching the Mounting Bracket to the Mounting A...

Page 33: ...Needed to Mount a Bag Ink System Alan Wrench Phillips Head Screwdriver To Mount a Bag Ink System 1 Use the supplied Screws to attach the side of the Ink Tray to the Ink System Mounting Bracket Attach...

Page 34: ...rews The Photocell should be mounted on the upstream side of the Printhead so that it will see the product before the product passes in front of the Printhead VIDEO Mounting a Photocell To see a video...

Page 35: ...he Printhead is to the surface to be printed substrate the better the print quality Squid Ink recommends keeping the printed surface within 1 8 3 2 mm from the Nozzle Face While throw distances greate...

Page 36: ...36 Installation and Setup 2005995 Rev O 210712 Printheads Bag Ink System Controller Floor Stand Assembly Dual Printheads with Bag Ink System Mounted on Floor Stand...

Page 37: ...Installation and Setup 37 2005995 Rev O 210712 Controller Cartridge Ink System Printhead Printhead with Cartridge Ink System Mounted on Floor Stand Floor Stand Assembly...

Page 38: ...hen printing on an incline Conveyor or vertical Web The Printhead can be rotated 90 clockwise or counter clockwise sideshooter position when viewed from behind the Printhead The Printhead can be tilte...

Page 39: ...or the specific ink being used see Inks and Fluids on page 133 ATTENTION Never operate the Printhead without ink Doing so can cause overheating and damage the Printhead and will void the warranty Cart...

Page 40: ...and Ink Reservoir NOTE If the O Ring is missing the Printhead will have difficulty staying primed resulting in poor print quality and will leak profusely 5 Install a new Ink Cartridge onto the Ink Re...

Page 41: ...he Ink Reservoir d Once the Ink Cartridge is properly in position ink will fill the Ink Reservoir 6 Connect the Printhead and Ink Reservoir making sure that the Inline Check Valve Part Number 2002057...

Page 42: ...e Reservoir Vent Tube Part Number 2001069 for Oil Part Number 2001070 for Solvent is uncapped for operation NOTE The Reservoir Vent Tube must be uncapped during operation to allow air to flow into the...

Page 43: ...ct the Low Ink Signal Wire to the RJ 12 Ink Level Signal Port on the back of the Printhead 10 Correctly position the Printhead relative to the substrate see Distance from Substrate on page 35 ATTENTIO...

Page 44: ...epending on the mounting system used Contact your authorized Squid Ink distributor for guidance on the best mounting system for your needs 2 Ensure that the Printhead is properly aligned to the Ink Re...

Page 45: ...h one end of the fabricated Ink Line to the Ink Tray Nozzle and attach the other end to the Ink Line IN on the back of the Printhead Fabricating an Ink Line Connecting the Ink Tray to the Printhead In...

Page 46: ...Engine and will void the warranty IMPORTANT Twisting pulling or bending the Bag material can cause small cracks at the sealed joints leading to leaks IMPORTANT As the Bag becomes nearly empty 25 full...

Page 47: ...is too low the Printhead will be starved for ink and the print will begin missing jets Oil Based Systems For oil based systems the lowest surface of the Printhead should be at the same level as the to...

Page 48: ...Mode Printhead bottom is even with Ink Pan top Oil Printhead with Bag System Ink Pan Printhead Printhead Printhead Printhead Nozzle Face is even with Ink Pan top Printhead s lowest side is even with...

Page 49: ...tem Straightshooter Mode Printhead bottom is 2 50 8 mm higher than Ink Reservoir top Solvent Printhead with Cartridge System Ink Reservoir Ink Cartridge Printhead Printhead Printhead Printhead Nozzle...

Page 50: ...higher than Ink Pan top Solvent Printhead with Bag System Ink Pan Printhead Printhead Printhead Printhead Nozzle Face is 2 50 8 mm higher than Ink Pan top Printhead s lowest side is 2 50 8 mm higher...

Page 51: ...Rev O 210712 Cable Connections Connecting Photocell Trigger to Controller Connect the Photocell Signal Cable to the IN Port on the back of the Controller Photocell Data Connection IN Port Controller...

Page 52: ...Adapter Cable to the IN Port on the back of the Controller VIDEO Mounting and Connecting an Encoder To see a video of this procedure click this link https youtu be zSjTfhCmU8M t 626 Or scan the QR cod...

Page 53: ...devices should only be connected by trained and qualified personnel Please contact your authorized Squid Ink distributor to discuss device compatibility before connecting On the RJ12 Input Connector...

Page 54: ...are Data Connections for two Printheads They are labeled PRINTHEAD 1 and PRINTHEAD 2 Connect a Data Cable to PRINTHEAD 1 Connect the other end of the Data Cable to the Printhead that will be designat...

Page 55: ...connected from the power source when connecting a second Printhead To connect a second Printhead connect the Printhead Data Cable to PRINTHEAD 2 Port on the Controller and connect the other end to the...

Page 56: ...e IN and OUT Ports to the Ethernet Port The IN Port of the second Controller must be connected to the OUT Port on the first Controller NOTE Theoretically an infinite number of CoPilot 500 printing sys...

Page 57: ...t ink is running low before missed prints or Printhead damage occurs due to the printer running out of ink Since each installation is unique Squid Ink cannot anticipate an ideal location for the Low I...

Page 58: ...v O 210712 Connecting to a Desktop PC To connect to a desktop PC connect an Ethernet Cable to the Ethernet Port on the Controller and into the Ethernet Port on the PC Connecting to a PC Ethernet Cable...

Page 59: ...The network connection is located on the Controller To connect to a local area network plug the Ethernet Cable into the Ethernet Port on the Controller and into the Ethernet Port on a connected PC Lo...

Page 60: ...nner or removable USB Drive A removable USB Drive can be used to load messages from the Orion message creation software package and to install printer firmware and software updates The USB Button in t...

Page 61: ...500 is not limited to a single USB device The optional Four Port USB Hub Part Number 2004242 can provide three points of entry for USB devices Low Ink Warning Beacon Part Number 2003927 Connecting Mul...

Page 62: ...of the Controller Plug the supplied Power Cord into the Power Cord Receptacle making sure the Power Switch is in the OFF position and plug the other end of the Power Cord into a properly wired and gr...

Page 63: ...rinting Commissioning an Ink Cartridge System VIDEO Priming the Printhead To see a video of this procedure click this link https youtu be zSjTfhCmU8M t 824 Or scan the QR code at right using the camer...

Page 64: ...nd the Nozzle Face A slow drip out of the Printhead is required for an effective purge Continue to press the Priming Bulb until ink comes out of the Purge Tube without air bubbles 7 Replace the Cap on...

Page 65: ...inst the lower part of the Nozzle Face 9 Press the Priming Bulb repeatedly until bubble free ink comes out of all the Printhead Nozzles 10 When finished purging gently wipe excess ink from the Nozzle...

Page 66: ...he Printhead Purge Tube 2 Remove the Cap from the Printhead Purge Tube 3 Fold a lint free non abrasive wipe and hold it gently against the front of the Nozzle Face 4 Gently but firmly press down on th...

Page 67: ...ube This seal must be tight for the printer to function 6 Press the Ink Bag repeatedly until bubble free ink comes out of all the Printhead Nozzles 7 When finished purging gently wipe excess ink from...

Page 68: ...68 Installation and Setup 2005995 Rev O 210712...

Page 69: ...any other settings Button Function Start or Stop Printing Select Start to start printing Select Stop to stop printing Zoom Screen Select the Zoom Screen to view the message at an enlarged or reduced s...

Page 70: ...n Return to previous screen Switch between the Settings Page One Screen and the Settings Page Two Screen Information Set line speed Set distance from Printhead to trigger Photocell Show distance in in...

Page 71: ...rcode validation Connect to USB only enabled if a USB Drive is present A USB Drive is connected Copy messages and fonts from USB to Controller Copy messages and fonts from Controller to USB USB Debug...

Page 72: ...Open the Bluetooth Connect Screen Access or dismiss the on screen keyboard Recalibrate the Touchscreen Access a remote database server Search the remote database Show or change the current date Show...

Page 73: ...Touchscreen to restart If the Spit Mode is turned on the Printer continues to spit ink while in Sleep Mode see Spit Settings on page 87 reducing the chance of some types of ink drying in the Print No...

Page 74: ...rent message Product count Ink status Printing status If a USB Drive is plugged into the USB Port at startup the Touchscreen will automatically display the USB Load Screen To go the Home Screen select...

Page 75: ...een Zooming does not affect the print size of the message To access the Zoom Screen from the Home Screen select the Zoom button on the right side of the screen The 1 and 2 buttons indicate the active...

Page 76: ...troller Use the Up and Down arrows or drag the scroll bar to view the list of available messages To select a message for printing choose the desired message and then select APPLY Delete The Delete but...

Page 77: ...ng use the keyboard on the Touchscreen to enter a message ID Select APPLY to load the message for printing When the message is loaded a green checkmark is briefly displayed in the lower right corner o...

Page 78: ...contains two pages of Printer configuration settings Select to switch between Settings Page One Screen and Settings Page Two Screen Following describes the settings accessible through the Settings Scr...

Page 79: ...Encoder Timeout upper half of screen is the amount of time in seconds that the Printer waits for a signal after the Encoder Wheel stops spinning This number should be set to significantly higher than...

Page 80: ...80 Software Interface 2005995 Rev O 210712 Line Speed Using an Encoder To use an Encoder to control line speed select ON Select APPLY to save changes Select BACK to return to the previous screen...

Page 81: ...d and setting the Distance to Trigger to that distance Distance to Trigger can be set in inches or centimeters To Change the Distance to the Trigger 1 To set the unit of measure for the distance a Sel...

Page 82: ...w relative to the position of the Printer when viewed from behind the Printhead To Set the Print Direction for the Selected Printhead 1 Select the button that corresponds to the direction of the Conve...

Page 83: ...printed message based on the number of pulses from the Encoder during a given time period Use the Plus or Minus buttons or the slider to increase or decrease the Encoder Divider value Encoder Reset Th...

Page 84: ...6 Refer to the SquidConnect User Guide for more information If the SquidConnect Dongle is not installed this option is not available If SquidCheck is active this option is not available To use Repeat...

Page 85: ...nformation regarding the operational status of a CoPilot printer The outputs can be used to enable or disable the Printhead or notify the user or PLC when the printer is ready or actively printing whe...

Page 86: ...nted on Use the Counters Screen to set the current value of each printer counter in the current message To change the counter value use the Plus or Minus buttons or the slider to increase or decrease...

Page 87: ...printing with oil based ink always set the Spit Mode to OFF COLUMN Spits a column of ink the entire height of the Printhead at selected time periods GHOST ALL Spits a small amount of ink not enough to...

Page 88: ...continues to spit after the last trigger This is important if the Printer is idle for a long period such as overnight or after a long break The Printhead will continue to spit throughout the idle per...

Page 89: ...An optional SquidCheck Print Validation System Part Number 2003850 can be used to validate bar codes and ensure that they are present scannable and accurate For details on connecting the SquidCheck P...

Page 90: ...f system updates are available on an installed USB Drive this button becomes active Select this button to install the updates Copies all installed messages and fonts from the Controller to a connected...

Page 91: ...fonts from a connected USB Drive to the Controller All messages and fonts in the printer specific folder or the generic printer folder if the specific folder does not exist will be copied Ejects a con...

Page 92: ...shift for example to track the number of products labelled each shift 1 Select the Reset Ink Printhead button to reset the ink supply to full 2 On the Reset Screen select Head 1 or Head 2 3 Select th...

Page 93: ...ure for the Printhead in Fahrenheit or Celsius The appropriate environmental temperature range for the Printhead during operation is 34 104 F 1 40 C If the Printhead temperature reading fails likely b...

Page 94: ...e Calibrate Screen select the Calibrate button 3 In the Calibrate utility touch the center of each small box in turn as they appear 4 After the center box has been touched a Calibration Completed mess...

Page 95: ...t Stop Tab The Start Stop tab contains the Remote Mode ON and OFF buttons If Remote Mode is turned on the ON button is green If Remote Mode is turned off the OFF button is red Select APPLY to save cha...

Page 96: ...ted using Orion Normally the settings will be automatically populated with the default value and should not have to be changed If the address is changed in Orion it will also have to be changed at the...

Page 97: ...be the date that printing is taking place an expiration date or any other date desired in the message 1 Use the Plus or Minus buttons to select the date format at the bottom of the screen 2 Select th...

Page 98: ...y set to the current time to track time of packaging The time is displayed in hours minutes and seconds To change the time value select the Plus or Minus buttons for the hours minutes and seconds to i...

Page 99: ...ssage may indicate that the line speed is faster than the Printer is capable of printing To record a lower peak speed the Peak Encoder Speed must be reset An example of a time when lowering the peak s...

Page 100: ...tton is available the Custom Keyboard button is not available Custom Keyboard Selected When this button is available a custom keyboard associated with the user data for the specific message can be ope...

Page 101: ...Software Interface 101 2005995 Rev O 210712 Custom Keyboard Example...

Page 102: ...ht languages U S English German Mandarin Chinese Spanish Korean Japanese Russian Polish To Select a Language 1 On Settings Screen Two select the Language icon 2 In the Language window select the desir...

Page 103: ...erface 103 2005995 Rev O 210712 4 To open Language Screen Two select the More button The Controller displays the selected language 5 Restart the Controller for the language change to take effect Langu...

Page 104: ...that the new address does not conflict with existing devices To Provide a Static IP Address rather than a dynamic IP address 1 On Settings Screen Two select the IP Address button 2 In the IP Address d...

Page 105: ...User Data function allows messages that contain user data to be edited directly from the Touchscreen USB Keyboard or USB Barcode Scanner If the Message Contains User Data 1 On the Home Screen select...

Page 106: ...or tablet Wireless Router Part Number 2003946 for wireless connectivity between PC or tablet 300 ft range The software that comes with these devices does not need to be installed These drives are alre...

Page 107: ...cts the available wireless networks 6 In the SSID box select a network from the list of available wireless networks 7 If there is a security code for the network select to use the onscreen keyboard to...

Page 108: ...SB Adapter from the USB Port on the Controller To resume wireless insert the Wireless USB Adapter and select APPLY The SSID and password from the previous session are used once a wireless connection i...

Page 109: ...Software Interface 109 2005995 Rev O 210712 NOTE Restart the Controller when changing from wireless to Ethernet or from Ethernet to wireless...

Page 110: ...15 F 46 1 C is detected for the interface a full screen warning is displayed Tap the Touchscreen to dismiss the full screen warning The original screen is displayed If this happens the Printhead can s...

Page 111: ...erface 111 2005995 Rev O 210712 When the temperature drops below 130 F 54 4 C on a CoPilot 500 Oil system or below 115 F 46 1 C on a CoPilot 500 Solvent system the original screen is displayed Printin...

Page 112: ...5995 Rev O 210712 GUI Refresh GUI Refresh provides updates to the messages such as counter shift time or date as they occur over time Press the GUI Refresh button to turn off on GUI Refresh GUI Refres...

Page 113: ...TE This video shows an example of how to perform software setup for a specific scenario The desired parameters will vary based on needs connected equipment inks used Conveyor direction and other facto...

Page 114: ...114 Software Setup 2005995 Rev O 210712...

Page 115: ...he Nozzle Face before priming or printing Ensure that all components have been securely mounted Ensure that all Data and Power Cables are properly seated and connected Ensure that Ink Lines are correc...

Page 116: ...rred to the Controller by USB or Ethernet To Transfer a Print Message by USB 1 Insert a USB Drive into the USB Port of the PC NOTE The USB format must be FAT32 or NTFS 2 Transfer the file for the prin...

Page 117: ...rk from a remote PC or network To Load a Print Message 1 From the Home Screen go to the Message Screen by selecting the Message button 2 Use the Up and Down arrows or drag the scroll bar to view the l...

Page 118: ...ht of Message on the Home Screen 2 To start printing select the Start button in the upper left 3 To stop printing select the Stop button in the upper left Powering Off To power off turn the Power Swit...

Page 119: ...e Nozzle Faceplate becomes contaminated or clogged gently wipe the front of the Printhead with a non abrasive lint free wipe Part Number 2005470 and gently spray using a spray bottle of internal flush...

Page 120: ...yringe and Tube from Flush Kit P N 2001022 for oil based P N 2001083 for solvent based Quart Container of Internal Flush Fluid Appropriate for the Ink Used see Inks and Fluids on page 133 Waste Ink Re...

Page 121: ...ne IN and gently push the flush fluid through the Ink Line IN Ink and flush fluid will come out the Nozzle Face 14 Refill the syringe and repeat until the fluid coming out of the Nozzle Face is clear...

Page 122: ...Purge Tube 4 Remove the Cap from the Printhead Purge Tube 5 Fold one or more non abrasive lint free wipes and hold them gently against the front of the Nozzle Face 6 Gently but firmly press down on t...

Page 123: ...ds on page 133 Preparing a CoPilot 500 for Shipping or Storage Items Needed to Prepare a CoPilot 500 Printhead for Shipping or Storage Non Abrasive Lint Free Wipes Syringe and Tube from Flush Kit P N...

Page 124: ...ems Needed to Prepare a CoPilot 500 Ink Reservoir for Shipping or Storage Non Abrasive Lint Free Wipes 2 Quarts of Internal Flush Fluid see Inks and Fluids on page 133 Large Waste Ink Receptacle To Pr...

Page 125: ...Repeat two more times 7 Screw the Shipping Cap onto the Ink Reservoir ATTENTION To avoid damage that can affect functionality Ink Reservoirs should spend a minimum amount of time in storage or shippin...

Page 126: ...bag of appropriate internal flush fluid instead 2 Place a container suitable for capturing ink beneath the Nozzle side of the Ink Tray 3 Disconnect the Ink Line from the Ink Tray Nozzle 4 Gently but f...

Page 127: ...94 Controller display goes black with one sentence of text System power corruption Install a Line Conditioner Part Number 2004199 to ensure clean electrical supply High static discharge Add a 0 25 or...

Page 128: ...128 Troubleshooting 2005995 Rev O 210712...

Page 129: ...005095 Oil CoPilot 500 Oil 2005900 1 Cartridge 1 2005931 2 2 2005932 Solvent CoPilot 500 Solvent 2005901 1 1 2005933 2 2 2005934 Oil CoPilot 500 Oil 2005900 1 Bag 1 2005935 2 2 2005936 Solvent CoPilot...

Page 130: ...01160 Bag Ink System Non Porous Solvent 2002023 CoPilot 500 Starter Kit Oil Based Bag Oil 2002024 CoPilot 500 Starter Kit Solvent Based Bag Solvent 2003585 Low Ink Alarm Beacon Assembly Kit Oil 200358...

Page 131: ...g Plates for CoPilot 500 Printheads and Ink System Mounting Brackets 2004947 2 long Arms 30 Controller Mounting L Bracket black Mounting Plates for CoPilot 500 Printheads and Ink System Mounting Brack...

Page 132: ...s 2004928 Tubing kit with Slider Brackets for two CoPilot 500 Printheads and Ink Systems 2004943 Tubing kit single head with black Printhead Plate for low profile Printhead mounting 2004944 Tubing kit...

Page 133: ...rnal Cleaning Fluid as an Internal Flush Fluid or Storage Solution and never use External Cleaning Fluid on the Printer Face ATTENTION Always use nonabrasive lint free wipes Part Number 2007021 when c...

Page 134: ...SEMBLY PO Oil 1 2002058 CHECK VALVE ASSEMBLY PO Solvent 1 3 2006088 BOTTLE O RING 221 50 DUR VITON Oil 1 2006094 BOTTLE O RING 221 50 DUR EPDM Solvent 1 4 2006006 DUST CAP 2 OD BLACK ROUND LPDE 1 5 20...

Page 135: ...Parts List 135 2005995 Rev O 210712 Cartridge Ink System Assembly Part Number 2001065 Oil Part Number 20001066 Solvent...

Page 136: ...EM LUER CAP PP 1 12 2006026 LUER LOCK RING USED W 2006027 1 13 2006027 FITTING MALE LUER 1 8 BARB 1 14 2006070 TIEWRAP 4 WITH 4 MTG HOLE 1 15 2006082 SCREW FHP M3 X 10MM SS 8 16 2006083 SCREW SHC M6 X...

Page 137: ...15 COVER INK SYSTEM 1 3 2003017 TRAY INK SYSTEM 1 4 2006007 NUT HEX 8 32 KEPS SS 2 5 2006020 WASHER FLAT 8 SST 2 6 2006022 FITTING FEM LUER TO 1 8 BARB 1 7 2006023 LUER LOCK RING 1 8 2006024 FITTING Q...

Page 138: ...SYSTEM 1 3 2003017 TRAY INK SYSTEM 1 4 2006007 NUT HEX 8 32 KEPS SS 2 5 2006020 WASHER FLAT 8 SST 2 6 2006021 FITTING OCONN FEM W E 1 7 2006022 FITTING FEM LUER TO 1 8 BARB 1 8 2006023 LUER LOCK RING...

Page 139: ...5908 FAB INSIDE GUARD COPILOT 500 1 5 1440010 PCB ASSY PRINTHEAD COPILOT 500 1 6 2005999 PRINT ENGINE OIL BASED COPILOT 500 Oil 1 2005998 PRINT ENGINE SOLVENT BASED COPILOT 500 Solvent 1 7 2005917 GAS...

Page 140: ...2 CoPilot 500 Controller CoPilot 500 HiSpeed Controller The CoPilot 500 Controller has been replaced by the CoPilot 500 Turbo Controller The CoPilot 500 HiSpeed Controller has been replaced by the CoP...

Page 141: ...Parts List 141 2005995 Rev O 210712 CoPilot 500 Turbo CoPilot 500 HiSpeed Turbo Controller...

Page 142: ...HSCREEN 1 N S 1603548 CABLE ASSY JUMPER FOR IEC LINE 1 N S 1603575 BATTERY 3V 230mAh COIN CELL 1 7 1603576 POWER SWITCH ROCKER 10A 250 VAC 1 N S 1603578 CABLE ASSY JUMPER FOR IEC NEUT 1 N S 1603601 FU...

Page 143: ...S 6 17 2004000 TQ MODULE Turbo HiSpeed Turbo 1 N S 2004031 FERRITE CORE 192 OHM SOLID 15X15X18MM Standard HiSpeed 1 N S 2004032 DOUBLE COATED TISSUE TAPE Standard HiSpeed 2 N S 2004033 EVA FOAM HARD S...

Page 144: ...144 Parts List 2005995 Rev O 210712...

Page 145: ...ORTANT All updates are downloaded using the Orion Message Creation Software Package For detailed instructions on receiving software and firmware updates for the CoPilot 500 printing system refer to th...

Page 146: ...successful If there is a problem with the update the ERROR Unable to complete update screen will display with a red X mark next to the problem update In the unlikely event that there is a problem remo...

Page 147: ...acement print engines sold separately and installed by the customer are not warranted Repairs All repairs are rigorously tested for optimum operation and print performance and warranted to be under no...

Page 148: ...the replacement component Upon receipt of the returned component Squid Ink will evaluate it and issue credit where necessary For components that have been misused or externally damaged Squid Ink will...

Page 149: ...Y SET FORTH HEREIN FAILS OF ITS ESSENTIAL PURPOSE IN NO EVENT WILL SQUID INK MANUFACTURING INC BE LIABLE FOR ANY SPECIAL CONSEQUENTIAL INDIRECT OR SIMILAR DAMAGES INCLUDING LOST PROFIT OR LOST OPPORTU...

Page 150: ...2005995 Rev O 210712...

Page 151: ...the CoPilot 500 printing system contact your authorized Squid Ink reseller or Squid Ink Technical Support Toll Free Phone 800 253 2627 Phone 55 5426 4137 Email info alfamaq mx Web www alfamaq mx Than...

Page 152: ...152 Technical Support 2005995 Rev O 210712...

Reviews: