


Ramping:
This setting adjusts how long it will take to switch between periods. This allows you to do a slow transition
between temps when multiple periods are selected.
High / Low Alarms:
This menu will
let you set a high and low temperature for the selected output that when breached causes an
audible alarm. There is also a setting called 30 Min Mute. This setting by default is disabled and is only
available in temperature related modes. This will mute the low temperature alarm for 30 minutes anytime the
low alarm is triggered. This is useful to allow time for the temperature to reach the target setting or if a door is
open while maintaining an incubator. If the Low Alarm is triggered you can reactivate the mute by entering the
menu or by pressing the PLUS button on the main display that shows the probe temperatures. This will allow
another 30 minutes before the Low Alarm becomes active again.
Sensor Match:
The Sensor Match setting is used to alter the temperature read by the temperature probe to match other
equipment.
Note: The sensor used in the Herpstat Probes are typically more accurate than most other
equipment. Adjustments to this setting are usually not necessary.
Basking Assist:
The Basking Assist option is primarily for use with basking lights as a heat source. Once the target temperature
has been reached instead of turning the power off it will continue providing a reduced power up to a degree
above the target temperature.
This feature can also help with ceramic heat elements and radiant heat panels if
you find the temperature has a large fluctuation range.
MaxPower:
This setting is available only in Heating mode. This controls the maximum power level that will be sent to the
heating device. It can be used to limit the power for safety.
Swing:
This setting is available in the Cooling mode. This controls the range of temperature. Once the cooling device is
activated the
sensed
temperature must drop this amount below the
current period temperature setting.
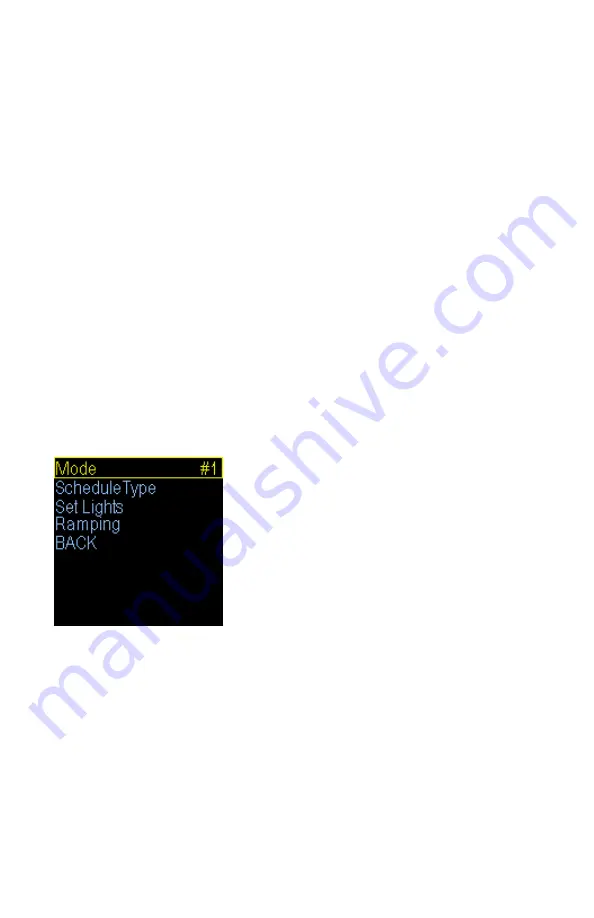
Output Setup for Lighting Control
From the initial menu screen select an output using the Plus and Minus button and press Enter.
Output Mode: (Lighting ON/OFF, Lighting Dimming)
Note: When the Mode is changed all settings for selected output will be set to the defaults for that
particular mode.
Select the Mode option and set it to either Lighting (ON/OFF) or Lighting (Dimming). The ON/OFF mode will
switch the output fully on or off and is used for standard fluorescent lighting. Dimming mode can be used with
incandescent lights, most transformerless LED lighting, most dimmable fluorescent lights and can adjust the
power going to the lights to provide simulated sunrise, sunsets, and moonlighting.
ScheduleType:
This setting selects how many different time periods you would like to use. If you want one light setting
all the
time use the Constant option. If you want a separate day and night lighting
choose 2 periods. More advanced
setups can use up to 4 periods.
Set Lights:
This is where you will select the amount of power the lights will receive during the period
and the time at which
the unit will switch to this power level
if you have multiple periods selected in the ScheduleType option. Use the
Enter button to progress through the options
.
Ramping:
This setting adjusts how long it will take to switch between periods. This allows you to do a slow transition
between
lighting periods to simulate sunrise and sunset when multiple periods are selected.


