Do not force the pump housing and gear housing together.
29. Locate the four socket screws and lock washers that secure
the pump housing to the gear housing. The longer screws
(2.25”) are fastened into the top internal holes. The shorter
screws (2”) are fastened into the bottom external bosses.
30. Using a 1/4” hex wrench, snug and tighten the socket
screws in a crossing pattern. Torque to 200–230 in./lbs.
31. If the fluid section was removed, reinstall by engaging the
notch in the top of the piston with the groove in the bottom
of the slider assembly. Push the fluid section up toward
the pump housing until the dowel pins in the pump
housing engage the holes in the fluid section housing.
32. Insert the two socket screws that secure the fluid section
to the pump housing and alternately snug, tighten, and
torque the screws to 400-440 in./lbs.
33. Position the front cover over the pump housing. Secure
the front cover using the four front cover screws.
34. Using a 11/16” open-end wrench, attach the fluid hose to
the fitting on the back of the fluid section. Tighten
securely.
Replacing the Electronic Pressure
Control (EPC) Assembly
Electrostatic discharge (ESD) potential could cause
damage to electronic pressure control. Use SprayTECH
ESD wrist strap P/N 0507958 or equivalent when working
on electronic pressure control.
1. Perform the Pressure Relief Procedure.
2. Using a Phillips
screwdriver, remove
the four screws that
secure the electronic
pressure control
(EPC) assembly to the
EPC housing.
Carefully remove the
EPC assembly from
the housing. Gently
move the assembly
away from the sprayer
and allow the assembly to hang from the housing.
3. Remember the locations of all the wire connections on the
EPC board (refer the electrical schematic located in the
Parts List section of this manual). If necessary, label all
the connections so that they can be replaced in their exact
location when the assembly is replaced.
4. Disconnect all the wires from the EPC board.
5. Connect all the wires to the new EPC assembly board
(refer to the labels created earlier in this procedure or the
electrical schematic in the Parts List section of this
manual).
6. Carefully place the EPC assembly over the EPC housing
taking care not to pinch any wires.
7. Install the four screws that secure the EPC assembly to
the EPC housing. Tighten securely.
8. Take the sprayer to a SprayTECH Authorized Service
Center for re-calibration.
EPC
Housing
EPC Assembly Screw
EPC Assembly
EPC
Board
WARNING
CAUTION
NOTE: While sliding the pump housing into place, the
crankshaft pin will begin to protrude from the
bearing in the center of the pump housing.
Position the slider assembly so that as the
crankshaft pin protrudes from the main
bearing, it engages the connecting rod
bearing.
Replacing the Transducer
Electrostatic discharge (ESD) potential could cause
damage to electronic pressure control. Use SprayTECH
ESD wrist strap P/N 0507958 or equivalent when working
on electronic pressure control.
1. Perform the Pressure Relief Procedure.
2. Using a Phillips
screwdriver, remove
the four screws that
secure the electronic
pressure control
(EPC) assembly to
the EPC housing.
Carefully remove the
EPC assembly from
the housing. Gently
move the assembly
away from the sprayer
and allow the assembly to hang from the housing.
3. Locate the transducer wire in the EPC housing. This wire
will be protruding from a hole in the lower left hand corner
of the EPC housing. Disconnect this wire from the EPC
board (it has a phone jack-style connector).
4. Break off the locking tab from the phone jack-style
connector at the end of the transducer wire.
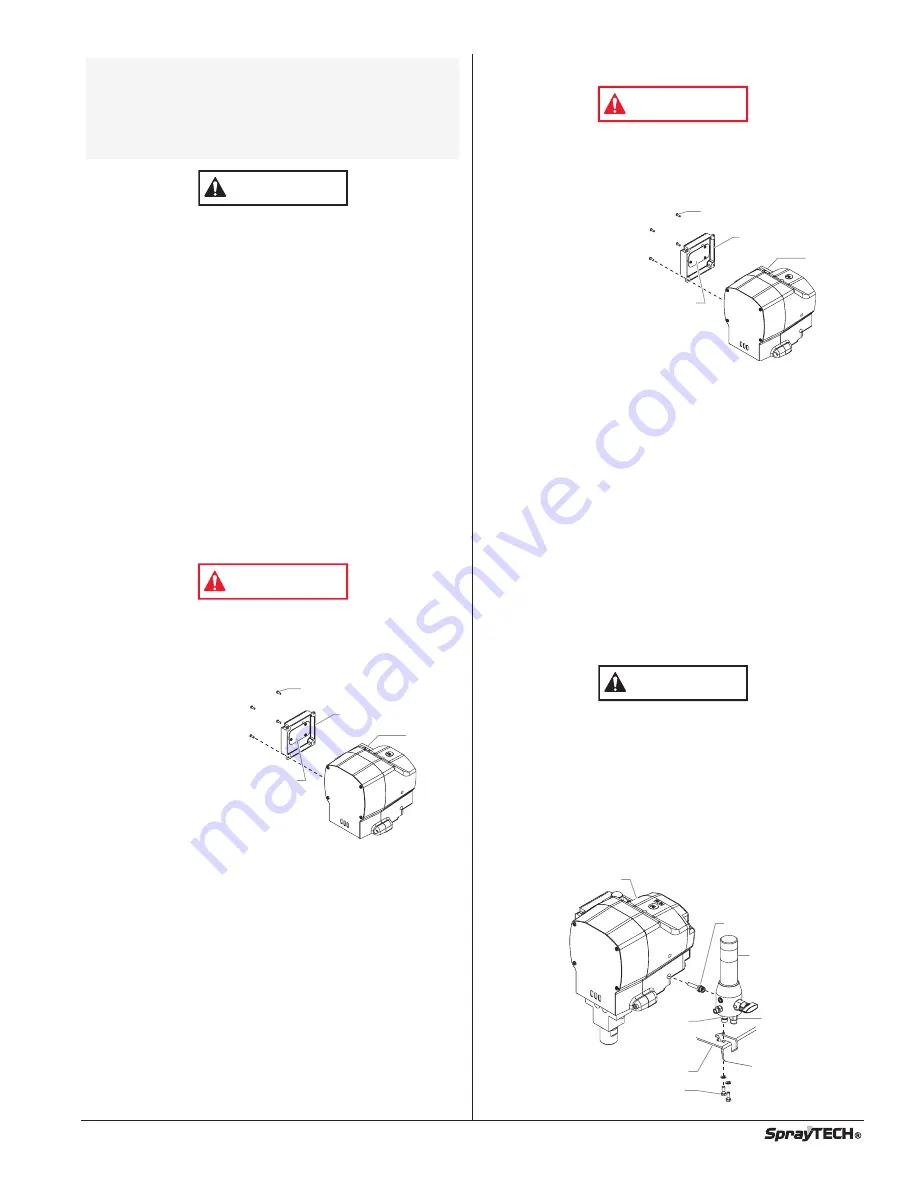
5. Using a 7/8” open-end wrench, loosen and remove the
fluid hose from the fitting on the bottom of the filter
assembly.
6. Remove the return hose from the fitting on the bottom of
the filter assembly.
7. Using a 1/2” socket, remove the two hex screws that
secure the filter assembly to the cart.
8. Lift the filter assembly off the cart so that the transducer
tube moves out of the hole in the gear housing. Gently
pull the transducer wire through the housing until it is fully
disengaged from the hole.
9. Mount the filter assembly in a vise for easy access to the
transducer.
Do not over-tighten the vise.
10. Using a 3/4” open-end wrench, turn the transducer nut
counterclockwise to remove the transducer from the filter
housing.
11. Locate the new transducer. Make sure that there is a
white, Teflon o-ring on the end of the transducer that gets
inserted into the filter housing.
12. Insert the transducer into the filter housing port. Rotate
the transducer nut clockwise to tighten it into the filter
housing. Torque the nut to 360–400 in./lbs.
13. Remove the filter assembly from the vise.
Transducer
Filter Assembly
Hex Screw
Gear Housing
Return
Hose
Fitting
Filter
Assembly
Fluid
Hose
Fitting
Cart
CAUTION
EPC
Housing
EPC Assembly Screw
EPC Assembly
EPC
Board
WARNING
© SprayTECH. All rights reserved.
11


