background image

4

www.teejet.com

BoomPilot

®

PRinCiPle of oPeRation

The BoomPilot system controls the sections valves according to the GPS position. The GPS makes it possible to avoid overlaps or skips.
The Section Driver Module (SDM) is designed for switching active high when spraying. This means that a 12V signal is issued to control the 

corresponding section valve.
The SDM is connected in parallel with the controller section switches.
The BoomPilot controls the section valves in automatic mode, and  the controller section switches should be set to off unless the operator 

wants to override the auto mode and thus force spraying.
The BoomPilot monitors the controller section switches that controls the valves in manual mode. The the Master switch can be used both in 

automatic mode as well as in manual mode.

Figure 2: Principle of operation

SDM

Controller Section Switch

Valve

installation

If there are questions concerning the installation of the BoomPilot system on this vehicle, or due to the changes in component 

specifications the parts supplied in the kit are not exactly as presented in this document, please contact your dealer or TeeJet 

Customer service representative for clarification before installation. TeeJet Technologies is not responsible for misuse or incorrect 

installation of the system.

NOTE: All references to left and right are stated as if the user is seated in the driver’s seat. 
NOTE:  BE VERY CAREFUL TO ABSOLUTELY SECURE ALL CABLES AND HOSES SO THAT THEY DON’T INTERFERE WITH THE MANY 

MOVING PARTS OF THE MACHINE!

1.  Locate the connection point for the SDM harneSS

Locate the existing system’s switchbox and Blanchard REB3 console. As shown in system diagram, the Optima Module Interface serves as a 

link between the Blanchard REB3 Controller and the BoomPilot Section Driver Module 

(E)

.

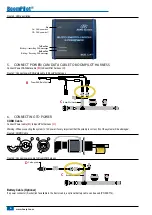
2.  Mount & connect SDM

1.  Mount SDM 

(E)

 as shown where LED’s can be seen for troubleshooting.

2.  Connect SDM 

(E)

 to BoomPilot Harness 

(C)

.

Figure 3: Connect SDM

B

A

A

B

xxx-xxx

xxyyxx

e

C

Summary of Contents for TeeJet BOOMPILOT

Page 1: ...B o o m P i lot Install ation MANUAL Automatic boom section control installation manual for use with Blanchard REB3 Controller w Matrix Pro...

Page 2: ...OSS OF USE OR DATA INTERRUPTION OF BUSINESS OR FOR INDIRECT SPECIAL INCIDENTAL OR CONSEQUENTIAL DAMAGES OF ANY KIND EVEN IF TEEJET TECHNOLOGIES HAS BEEN ADVISED OF SUCH DAMAGES ARISING FROM TEEJET TEC...

Page 3: ...reconnect Harnesses Cables 5 5 Connect Power CAN Data Cable to BoomPilot Harness 6 6 Connecting to power 6 COBO Cable 6 Battery Cable Optional 6 7 RECOMMENDED ELECTRONICS INSTALLATION 7 8 COMPLETE ELE...

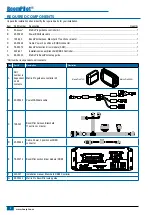
Page 4: ...ation manual Blanchard REB3 Controller 1 G 98 05243 Matrix Pro BoomPilot setup guide 1 Part number is dependent on kit contents Item Part Description Illustration A Part number is dependent on kit con...

Page 5: ...BoomPilot Optional accessory 901 000 Switch box 11 sections Master 900 995 Optima Module Interface Blanchard REB3 Controller Connectors and fuses Description Description A 8 position Connector Power C...

Page 6: ...are questions concerning the installation of the BoomPilot system on this vehicle or due to the changes in component specifications the parts supplied in the kit are not exactly as presented in this...

Page 7: ...bles The BoomPilot SDM harness C tees into the existing system s connection between the Blanchard REB3 rate controller and the switchbox 1 Disconnect existing connection between the Blanchard REB3 rat...

Page 8: ...r DATA 45 05626 Power CAN Data Cable BoomPilot harness B A A B xxx xxx xxyyxx B C 6 Connecting to power COBO Cable Connect Power cable D to BoomPilot harness C Warning When connecting the system to 12...

Page 9: ...hbox Switches on REB3 computer are deactivated once the CAN interface is connected Please use switches on the switchbox to manually drive the section valves Switches should be in OFF position when wor...

Page 10: ...8 www teejet com BoomPilot Setting Blanchard Console Options Use the following notes to setup your Blanchard console for use with BoomPilot and Matrix...

Page 11: ...9 020 047 R2 EN BoomPilot...

Page 12: ...kits have been developed to work in conjunction with your automated boom section control system This kit contains the necessary components and instructions to install ABSC on a Blanchard REB3 Control...

Reviews: