background image

38

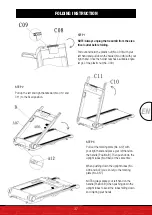
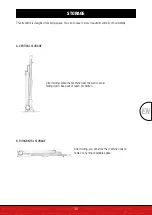
Place your hand at position E and lift up the treadmill.

STEP 4

E

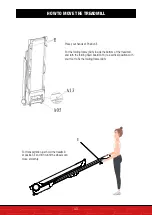
STEP 5

Place your hand at position E and use your foot to 
turn the folding fixed board (No. A13) to a horizontal 
position.

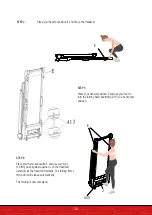
STEP 6

Place your hand at position E and use your foot 
to firmly push against position J on the treadmill. 
Carefully tilt the treadmill forwards. The folding frame 
(No. A05) will release automatically.

The folding is now complete!   

E

A05

J

Summary of Contents for FX300

Page 1: ...FX300 DE EN ES FR IT NL ...

Page 2: ...2 ...

Page 3: ...weisungen entsprechend Die Betriebssicherheit und die Funktion des Gerätes können nur dann gewährleistet werden wenn sowohl die allgemeinen Sicherheits und Unfallverhütungs vorschriften des Gesetzgebers als auch die Sicherheitshinweise in diesem Benutzerhandbuch beachtet werden Wir übernehmen keine Haftung für Schäden die durch unsachgemäßen Gebrauch bzw fehlerhafte Bedienung entstehen i Bitte ste...

Page 4: ...rials für dich Aufbau Benutzung Abbau In 3 einfachen Schritten zum schnellen und sicheren Start 1 QR Code scannen 2 Videos anschauen 3 schnell und sicher starten Link zu den Videos https service innovamaxx de fx300_video ...

Page 5: ...9 WARTUNG UND PFLEGE 11 KLAPPANLEITUNG 13 AUFBEWAHRUNG 15 WIE MAN DAS LAUFBAND UMSTELLT 16 WICHTIGE ELEKTRISCHE INFORMATIONEN 17 FUNKTION 17 ÜBUNGSANLEITUNG 18 HERZFREQUENZMESSUNG 18 FUNKTIONEN DER KONSOLE 19 HERZFREQUENZREGELUNG 22 FEHLERBEHEBUNG 23 WICHTIGE INFORMATIONEN 24 ANWENDUNGSSOFTWARE APP 25 DECLARATION OF CONFORMITY 147 ...

Page 6: ...fe für das Gerät Halten Sie Kinder und Tiere fern von dem Gerät Ältere oder körperlich benachteiligte Personen sollten das Gerät nur unter Aufsicht benutzen sofern ein Eingreifen durch die Aufsichtsperson notwendig wird Verwenden Sie keine Sprays oder Aerosol Produkte in der Nähe des Geräts um dieses nicht zu beschädi gen Halten Sie das Gerät trocken und fern von Nässe und Feuchtigkeit Die Motorab...

Page 7: ...Ihrer Kleidung an Überprüfen Sie vor der Benutzung ob das Laufband ausreichend geschmiert und angespannt ist Die Lauff läche muss mittig verlaufen Stellen Sie sicher dass alle sichtbaren Schrauben angezogen sind Kinder dürfen nicht mit dem Gerät spielen Das Reinigen und Warten des Geräts darf nicht von Kindern durchgeführt werden Wenn der Stromstecker beschädigt ist muss dieser durch Fachpersonal ...

Page 8: ... Inbusschlüssel 1 D07 Sicherheitsschlüssel 1 D19 Stromkabel 1 F Schmiermittel 1 Unter folgendem Link Unter folgendem Link finden Sie die Explosionszeichnung finden Sie die Explosionszeichnung und die Ersatzteileliste und die Ersatzteileliste https service innovamaxx de fx300_spareparts https service innovamaxx de fx300_spareparts ...

Page 9: ...aben SCHRITT 2 Ziehen Sie die drehbare Platte Nr A12 mit der rechten Hand heraus Legen Sie gleichzeitig Ihre linke Hand auf den Griff Position B und ziehen Sie dann die Standrohre nach oben Nr A06 und A07 Beim Hochziehen der Standrohre Nr A06 und A07 können Sie die drehba re Platte Nr A12 loslassen Sie hören ein Klicken wenn die Standrohre richtig eingerastet sind Alle Bauteile und vormontierten T...

Page 10: ... Ziehen Sie die Kunststoffmutter heraus halten Sie sie Nr C09 mit der linken Hand fest und drehen Sie den Halter Nr C08 mit der rechten Hand Sobald der Halter in einem geeigneten Winkel steht können Sie die Plastikmutter los lassen Nr C09 SCHRITT 5 Die Montage ist damit fertig Sicherheitsschlüssel D07 in den Mag netbereich der Konsole D einstecken ...

Page 11: ...FBANDES Stellen Sie das Laufband auf ebenen Untergrund und stellen Sie es auf 6 8 km h ein um zu prüfen ob das Laufband Nr C31 rutscht Wenn sich das Laufband Nr C31 nach rechts bewegt drehen Sie die rechte Einstellschraube im Uhrzei gersinn dann drehen Sie die linke Einstellschraube gegen den Uhrzeigersinn Wenn sich das Band nicht verschiebt wiederholen Sie diesen Schritt bis es zen triert ist Sie...

Page 12: ...Seite 2 Die beweglichen Teile sollen sich frei und leise drehen Anomalien an beweglichen Teilen beeinträchtigen die Sicherheit des Geräts Schrauben regelmäßig kontrollieren und anziehen 3 Um das Laufband besser zu pflegen und seine Lebensdauer zu verlängern wird empfohlen es regelmäßig zu warten 4 Ein loses Laufband führt dazu dass der Läufer während der Benutzung abrutscht Ein zu festes Band führ...

Page 13: ...Ziehen Sie den linken und rechten Griff hoch Nr C10 und C11 in die feste Position SCHRITT 3 Ziehen Sie die drehbare Platte mit der rechten Hand Nr A12 Ziehen und legen Sie die linke Hand auf den Griff Position B Drücken Sie dann die Standrohre Nr H G gleichzeitig nach unten Beim Herunterdrücken der Standrohre Nr A06 und A07 können Sie die drehbare Platte Nr A12 loslassen HINWEIS Legen Sie Ihre lin...

Page 14: ...drehen Sie mit dem Fuß die klappbare feste Platte Nr A13 in eine horizontale Position SCHRITT 6 Legen Sie Ihre Hand auf Position E und drücken Sie mit dem Fuß fest gegen Position J auf dem Laufband Kippen Sie das Laufband vorsichtig nach vorne Der Klapprahmen Nr A05 wird automatisch gelöst Das Einklappen ist damit fertig E A05 J ...

Page 15: ... vertikal oder horizontal lagern möchten A VERTIKALE AUFBEWAHRUNG Stellen Sie das Gerät nach dem Klappen in der Nähe der Wand auf damit es nicht umfällt Für Kinder unzugänglich aufbewahren B HORIZONTALE AUFBEWAHRUNG Nach dem Klappen können Sie die Maschine unter einem Tisch oder einer anderen freien Stelle ver stauen ...

Page 16: ...bis sich die Räder leichtgängig bewegen Legen Sie Ihre Hände auf Position E Legen Sie den Klapprahmen A05 in den Boden des Laufban des und drehen Sie die klappbare feste Platte A13 mit dem Fuß in eine vertikale Position um den Klapprahmen A05 zu fixieren WIE MAN DAS LAUFBAND UMSTELLT ...

Page 17: ...ckdose passt lassen Sie eine geeignete Steckdose von einem Elektriker installieren WARNUNG 1 Verwenden Sie NIEMALS einen Fehlerstrom Schutzschalter FI mit diesem Laufband Halten Sie das Netzkabel von allen beweglichen Teilen des Laufbandes fern einschließlich des Hebemechanismus und der Transportrollen 2 Betreiben Sie das Laufband NIEMALS mit einem Generator oder einer USV Stromversorgung 3 Entfer...

Page 18: ...ART Taste um das Gerät zu starten 4 Das Gerät startet mit der voreingestellten Geschwindigkeit von 1 km h Wenn Sie sich wohl fühlen können Sie die Geschwindigkeit langsam erhöhen 5 Wenn Sie mit dem Training fertig sind drücken Sie die STOP Taste oder entfernen Sie das magnetische Ende des Sicherheitsschlüssels um das Gerät anzuhalten HERZFREQUENZMESSUNG Es ist gefährlich die Herzfrequenz während d...

Page 19: ...FENSTERANZEIGEN Jedes Fenster zeigt abwechselnd alle paar Sekunden jede Funktion an 1 GESCHWINDIGKEIT PULS Der Geschwindigkeitsbereich liegt zwischen 1 0 16 km h 1 km h ist die Standard Laufgeschwindigkeit Wenn der Läufer einen Finger auf den Pulssensor auf der Konsole legt berechnet das System den Herzschlag des Läufers und zeigt ihn in diesem Fenster an Der Pulsbereich liegt zwischen 50 200 Schl...

Page 20: ... erhalten Das Fenster zeigt PAU an wenn Sie die Taste START im Pausenmodus drücken läuft das Gerät weiter Wenn Sie die Taste STOP drücken stoppt das Gerät und alle Daten werden auf die Grundeinstellung zurückgesetzt 3 M Drücken Sie diese Taste wenn Sie angehalten haben um einen Modus zu wählen Durch einmaliges Drücken wird die Standardmodus 0 0 aufgerufen H1 ist der ZEIT Countdown Modus ab 15 00 M...

Page 21: ...ainingszeit erhöhen oder verringern möchten Drücken Sie die START Taste um das Intervallprogramm zu starten Das Intervallprogramm ist in 10 Abschnitte unterteilt Jede Trainingszeit entspricht der eingestellten Zeit geteilt durch 10 Wenn die Geschwindigkeit das nächste Intervall erreicht ertönt ein Piepsen und die Geschwindigkeit wird entsprechend dem eingestellten Intervall geändert Drücken Sie di...

Page 22: ...igt und zeigt das Standardalter von 30 Jahren an Der Benutzer kann die GESCHWINDIGKEITSTASTEN drücken um das Alter einzustellen Das Alter kann zwi schen 15 und 80 Jahren eingestellt werden Verwenden Sie die HRC PARAMETER oben als Referenz 3 Nach Auswahl des Alters drücken Sie die Taste M und das System schlägt Ihnen einen geeigneten Herzfrequen zwert entsprechend Ihrem Alter vor Drücken Sie die GE...

Page 23: ...nnung ist zu niedrig oder zu hoch Die Steuerplatine ist beschädigt Starten Sie das Laufband neu Überprüfen Sie die Eingangsspannung Kontrollieren Sie die Steuerplatine bei Beschädigung austauschen Ein beweglicher Teil des Laufbandes klemmt und der Motor kann sich nicht richtig drehen Überprüfen Sie die beweglichen Teile des Laufbandes um sicherzustellen dass sie korrekt funktionieren Überprüfen Si...

Page 24: ... ist sehr wichtig in Ihrem eigenen Tempo zu trainieren Eines Tages werden Sie in der Lage sein kontinuierlich für 30 Minuten zu üben 1 Fragen Sie Ihren Arzt vor dem Üben oder Training Bitten Sie den Arzt Ihren Trainings und Ernährungsplan zu überprüfen sowie Ihnen Anregungen zu Ihrem Übungsplan zu geben 2 Setzen Sie Ihre Übungsziele nach Rücksprache mit Ihrem Arzt um sicherzustellen dass der Plan ...

Page 25: ...se zur Nutzung der App Als Android Nutzer stellen Sie bitte sicher dass unter dem Punkt Einstellungen Gerätesicherheit ein Haken unter Unbekannte Quellen gesetzt ist Bitte denken Sie daran die Bluetooth Funktion auf Ihrem Gerät einzuschalten Kinomap Über den QR Code am Anfang des Handbuches werden Sie zu verschiedenen YouTube Tutorials weitergeleitet Dort erhalten Siemehr Informationen über die Ap...

Page 26: ... auf die Pflicht zur getrennten Erfassung hin Nach dem ElektroG sind wir als Vertreiber von Elektrogeräten nach 17 Abs 2 ElektroG in Verbindung mit 17 Abs 1 ElektroG verpflichtet bestimmte Elektro und Elektronikaltgeräte unentgeltlich zurückzunehmen Dieser gesetzlichen Verpflichtung kommen wir über die DR Deutsche Recycling Service GmbH take e way GmbH nach Daneben können Sie Elektroaltgeräte an d...

Page 27: ...and use the device according to the instructions The operational safety and function of the device can only be guaranteed if the legal provisions on general safety and accident prevention as well as the safety instructions in this user manual are observed We shall not assume any liability for damages resulting from improper use or incorrect operation i Please ensure that all persons using the devi...

Page 28: ...Video Tutorials for you Construction Use Reduction 3 simple steps for a fast and safe start 1 Scan the QR Code 2 Watch videos 3 Start fast and safely Link to the videos https service innovamaxx de fx300_video ...

Page 29: ...NTENANCE AND CARE 35 FOLDING INSTRUCTION 37 STORAGE 39 HOW TO MOVE THE TREADMILL 40 IMPORTANT ELECTRICAL INFORMATION 41 FUNCTIONS 41 EXERCISE INSTRUCTIONS 42 HEART RATE MEASUREMENTS 42 FUNCTION OF THE CONSOLE 43 HEART RATE CONTROL 46 TROUBLESHOOTING 47 IMPORTANT MATTER 48 APPLICATION SOFTWARE APP 49 DECLARATION OF CONFORMITY 147 ...

Page 30: ...s a handle Keep children and pets away from the equipment while in use Elderly or disabled users should only use this treadmill in the presence of an adult who can provide assistance if required Do not operate where aerosol spray products are being used or where oxygen is being administered Keep dry do not operate in a wet or moist condition The motor cover can become hot while the treadmill is in...

Page 31: ...dmill on a carpet that is greater than 1 3 cm in height Before using the treadmill check that the belt is aligned and centered on the running deck and all visible fasteners on the treadmill are sufficiently tightened and secure Children shall not play with the appliance Cleaning and user maintenance shall not be made by children without supervision If the supply cord is damaged it must be replaced...

Page 32: ...13 Allen Wrench 1 D07 Safety Key 1 D19 Power Wire 1 F Lubricant Oil 1 At the following link At the following link you will find the exploded drawing you will find the exploded drawing and the spare parts list and the spare parts list https service innovamaxx de fx300_spareparts https service innovamaxx de fx300_spareparts ...

Page 33: ...t the Rotating Plate No A12 with your right hand At the same time place your left hand at the Handle Po sition B then pull up the Upright Tubes No A06 and A07 When pulling up the Upright Tubes No A06 and A07 you can release the Ro tating Plate No A12 You will hear a click when the upright tubes are suc cessfully locked in Firmly tighten all component parts and pre assembled parts ...

Page 34: ... the treadmill Pull out and hold the plastic nut No C09 with your left hand and turn up the holder No C08 with your right hand Once the holder is at a suitable angle you can let go of the plastic nut No C09 STEP 5 The assembly is now complete Insert the Safety Key D07 into the ma gnetic area of the Console D ...

Page 35: ...he most suitable position is when the belt is pulled out 50 75mm from the running board CENTERING THE RUNNING BELT Place the treadmill on level ground and set it at 6 8km h to check if the Running Belt No C31 drifts If the running belt No C31 moves to the right turn the right adjustment bolt turn clockwise then turn the left adjustment bolt turn counter clockwise If the belt does not move repeat t...

Page 36: ...e 2 The moving parts should turn freely and quietly Abnormality of moving parts will affect the safety of the equipment Inspect and tighten bolts regularly 3 To better maintain the treadmill and prolong its lifespan it is recommended that maintenance be done on a regular basis 4 A loose running belt will result that the runner slides off during the use A too tight belt will result a decrease of th...

Page 37: ...09 STEP 2 Pull up the left and right handle bar No C10 and C11 to the fixed position STEP 3 Pull out the rotating plate No A12 with your right hand and place your left hand on the handle Position B Then push down the upright tubes No H G at the same time When pushing down the upright tubes No A06 and A07 you can let go the rotating plate No A12 NOTE Always place your left hand on the handle Positi...

Page 38: ... use your foot to turn the folding fixed board No A13 to a horizontal position STEP 6 Place your hand at position E and use your foot to firmly push against position J on the treadmill Carefully tilt the treadmill forwards The folding frame No A05 will release automatically The folding is now complete E A05 J ...

Page 39: ...ose to store treadmill vertically or horizontally A VERTICAL STORAGE After folding place the machine near the wall to avoid falling down Keep out of reach of children B HORIZONTAL STORAGE After folding you can store the machine under a table or any other available space ...

Page 40: ...d tilt it until the wheels can move smoothly Place your hands at Position E Put the folding frame A05 inside the bottom of the treadmill and turn the folding fixed board A13 to a vertical position with your foot to fix the folding frame A05 HOW TO MOVE THE TREADMILL ...

Page 41: ...ether the product is properly grounded Do not modify the plug provided with the product If it does not fit the outlet have a proper outlet installed by an electrician WARNING 1 NEVER use a ground fault circuit interrupter GFCI with this treadmill Keep the power cord away from any moving parts of the treadmill including the elevation mechanism and the transport wheels 2 NEVER operate the treadmill ...

Page 42: ...ress the START button to start the machine 4 The machine will start at the system default setting speed of 1 0 KPH when you feel comfortable you may slowly increase this speed 5 When you are finished with your exercise press the STOP button to stop the machine or you can remove the magnetic end of the Safety Key to stop the machine HEART RATE MEASUREMENTS It is dangerous to measure the heart rate ...

Page 43: ...or located on the console the system will calculate the runner s heart beat and display it in this window The pulse range is 50 200 beats min This data is just for reference and cannot be used as the medical data 2 TIME STEPS Displays the time elapsed Display starts at 0 00 minutes seconds After it reaches 59 59 minutes seconds the display will change to 01 00 hours minutes Maximum display for tim...

Page 44: ...l data will recover to initial setting 3 M When stopped press this button to select a MODE Pressing once will enter 0 0 the default operating mode H1 is the TIME countdown mode starting from 15 00 mins H2 is the DISTANCE countdown mode starting from 1 KM and H3 is the CALORIES countdown mode which starts from 50 KCAL P1 P2 P9 are preset programs When setting each mode and programs you can press sp...

Page 45: ...BUTTONS if you wish to increase or decrease the exercise time Press the START button to start the interval program The interval program is divided into 10 sections Each exercise time equals the setting time divided by 10 When the speed enters the next interval the treadmill will beep and the speed will be changed according to the set interval Press SPEED BUTTONS to change the SPEED After finishing...

Page 46: ...and heart rate target of 114 2 Press M button and enter age setting The window will display and show the default age of 30 years The user can push SPEED BUTTONS to adjust the age The age range is from 15 to 80 years Use the HRC PARAMETER above for reference 3 After selecting the age press the M button and the system will recommend a suitable heart rate value according to your age Press SPEED BUTTO...

Page 47: ...ncoming voltage is too low or too high The control board is damaged Restart the treadmill Check the incoming voltage to ensure it is correct Check the control board replace if damaged A moving part of the treadmill is stuck and therefore the motor is unable to rotate properly Inspect moving parts of the treadmill to ensure that they are operating correctly Check the motor listen for strange noise ...

Page 48: ...ery important to exercise at your own pace Some day you will be able to exercise continuously for 30min 1 Please consult your doctor before exercise or training Ask the doctor to inspect your training and diet plan and give suggestions on your exercise plan 2 Set exercise goal after consulting with your doctor to ensure that the plan is practical and start exercise plan at leisure 3 You can add so...

Page 49: ... or higher Android iOS Notes on using the App As an android user please make sure that under Settings Device Security the Unknown sources is set by ensuring it is ticked Please remember to turn on the Bluetooth feature on your device Kinomap The QR code at the beginning of the manual will guide you to various YouTube tutorials There you can access more information about the App and the device Andr...

Page 50: ...the obligation to dispose of the batteries separately According to the ElektroG as distributors of electrical devices we are obliged to take back certain old electrical and electronic equipment free of charge in accordance with Section 17 2 ElektroG and in conjunction with Section 17 1 ElektroG We comply with this legal obligation through DR Deutsche Recycling Service GmbH take e way GmbH You can ...

Page 51: ...guridad y funcionamiento operativos del dispositivo solo puede garantizarse si se tienen presentes las disposiciones legales sobre seguridad general y prevención de accidentes así como también las instrucciones de seguridad en este manual de usuario Nosotros no asumimos ninguna responsabilidad por daños resultantes del uso inadecuado o incorrecto del dispositivo i Para obtener información sobre có...

Page 52: ... video para usted Construcción Utilizar Reducción En 3 sencillos pasos para un arranque rápido y seguro 1 Escanear el código QR 2 Ver vídeos 3 Comienza rápido y seguro Enlace a los videos https service innovamaxx de fx300_video ...

Page 53: ...NSTRUCCIONES DE PLEGUE 61 ALMACENAMIENTO 63 CÓMO DESPLAZAR LA CINTA DE CORRER 64 INFORMACIÓN IMPORTANTE SOBRE LA SEGURIDAD ELÉCTRICA 65 FUNCIONES 65 INSTRUCCIONES DE ENTRENAMIENTO 66 MEDICIÓN DE LA FRECUENCIA CARDÍACA 66 FUNCTION OF THE CONSOLE 67 CONTROL DE LA FRECUENCIA CARDÍACA 70 SOLUCIÓN DE PROBLEMAS 71 RECOMENDACIONES 72 SOFTWARE APLICACIÓN 73 DECLARATION OF CONFORMITY 147 ...

Page 54: ...cabello y de otros obstáculos No use la caminadora al aire libre No tire ni jale la caminadora por su cable eléctrico Mantenga niños y mascotas lejos del equipo cuando esté en uso Los usuarios de edad avanzada o con alguna discapacidad deben usar la caminadora solo en presencia de un adulto que pueda ofrecer ayuda de ser necesario No maneje el equipo en lugares donde se estén usando productos en a...

Page 55: ...os tornillos visibles estén bien apretados y asegurados Los niños no deben jugar con el aparato Los niños no deben limpiar ni realizar ningún mantenimiento sin supervisión Si el cable de alimentación está dañado debe reemplazarse por el fabricante su agente de servicio o por personas cualificadas para prevenir riesgos Nunca maneje esta caminadora si está doblada Permita que la cinta de detenga por...

Page 56: ...13 Llave Allen 1 D07 Clave de seguridad 1 D19 Cable de alimentación 1 F Lubricante 1 En el siguiente enlace En el siguiente enlace encontrarás el dibujo de explosión encontrarás el dibujo de explosión y la lista de repuestos y la lista de repuestos https service innovamaxx de fx300_spareparts https service innovamaxx de fx300_spareparts ...

Page 57: ...temente espacioso PASO 2 Tire la placa giratoria con la mano de recha No A12 Al mismo tiempo in troduzca la mano izquierda en el man go Posición B y luego tire los tubos de la horquilla hacia arriba No A06 y A07 Puede soltar la placa giratoria No A12 una vez que ha tirado los tubos No A06 y A07 Escuchará un clic cuando los tubos estén correctamente engan chados Apriete todos los componentes y piez...

Page 58: ...ta de correr Tire la tuerca de plástico y sosténgala No C09 con la mano iz quierda mientras que con la mano de recha gire el soporte No C08 Podrá soltar la tuerca de plástico No C09 una vez que el soporte esté bien po sicionado PASO 5 El montaje está terminado Inserta la llave de seguridad D07 en el área magnética de la consola D ...

Page 59: ...TA DE CORRER Coloque la cinta de correr sobre una superficie plana y ajustándola a 6 8 km h para comprobar el posible deslice la cinta de correr No C31 En el caso de que la cinta No C31 se mueve hacia la derecha gire el tornillo de ajuste derecho por en sentido horario luego gire el tornillo de ajuste iz quierdo por en sentido antihorario En caso de que la cinta no se mueva volver a repetir este p...

Page 60: ...tro lado 2 Las partes móviles deben girar libremente y en silencio Las anomalías en las piezas móviles afectan la seguridad del dispositivo Verifique y apriete los tornillos regularmente 3 Para mantener mejor la cinta de correr y prolongar su vida útil se recomienda mantenerla regularmente 4 Una cinta de correr suelta hace que el corredor se salga durante el uso Una banda demasiado apretada conduc...

Page 61: ...mangos No C10 y C11 hasta que estén en una posición fija PASO 3 Tire de la placa giratoria con la mano derecha No A12 y coloque la mano izquierda sobre el mango Posición B luego presione las tuberías verticales Nº H y G hacia abajo al mismo tiempo Puede soltar la placa giratoria No A12 presionando hacia abajo los tubos verticales No A06 y A07 NOTA Para evitar la caída de los tubos con consecuentes...

Page 62: ...e su pie para girar la placa fija con bisagras No A13 a una posición horizontal PASO 6 Coloque su mano según la posición E y presione firmemente contra la posición J en la máquina para correr con el pie hacia adentro Incline la cinta con cuidado hacia adelante y el marco retráctil No A05 se abrirá automáticamente E A05 J ...

Page 63: ... cinta de correr vertical u horizontalmente A ALMACENAMIENTO VERTICAL Esta cinta está diseñada para ahorrar espacio Puede elegir almacenar la cinta de correr vertical u horizontal mente B ALMACENAMIENTO HORIZONTAL Después de plegar puede guardar la cinta debajo de una mesa u otro espacio libre ...

Page 64: ...hasta que las ruedas se muevan suavemente Posicionar los brazos según la posición E Coloque el marco plegable A05 en la parte inferior de la cinta de correr y use el pie para girar la placa fija plegable A13 a una posición vertical para fijar el marco plegable A05 CÓMO DESPLAZAR LA CINTA DE CORRER ...

Page 65: ...uministrado Si no encaja en la toma de corriente haga que un electricista instale una toma de corriente adecuada ADVERTENCIA 1 NUNCA use un dispositivo de corriente residual FI con esta caminadora Mantenga el cable de alimentación lejos de todas las partes móviles de la cinta de correr incluidos el mecanismo de elevación y los rodillos de transporte 2 NUNCA opere la máquina para correr con un gene...

Page 66: ...3 Presione el botón START para iniciar el dispositivo 4 El dispositivo partirá a la velocidad preestablecida de 1 km h En caso de sentirse a gusto puede aumentar la velocidad lentamente 5 Cuando haya terminado el entrenamiento presione el botón STOP o retire el extremo magnético de la llave de seguridad para detener el dispositivo MEDICIÓN DE LA FRECUENCIA CARDÍACA Es peligroso medir su ritmo card...

Page 67: ...talla cada pocos segundos 1 SPEED PULSE El rango de velocidad está entre 1 0 16 km h 1 km h es la velocidad de funcionamiento estándar Colocando un dedo sobre el sensor de pulso en la consola el sistema calcula el latido del corredor y lo muestra en esta ventana El rango de pulso es 50 200 latidos min Estos datos son solo de referencia y no pueden usarse como datos médicos 2 TIME STEPS Muestra el ...

Page 68: ...ionando Cuando presione el botón STOP la unidad se detendrá y todos los datos se restablecerán a los valores predeterminados 3 M Presione este botón cuando se haya detenido para seleccionar un modo Presione una vez para ingresar al modo predeterminado 0 0 H1 es el modo de cuenta regresiva de tiempo de 15 00 minutos H2 es el modo de cuenta regresiva STRETCH que comienza en 1 KM y H3 es el modo de c...

Page 69: ...l tiempo de ejercicio Presione el botón START para iniciar el programa de intervalos El programa de intervalo está dividido en 10 secciones Cada tiempo de entrenamiento es igual al tiempo establecido dividido por 10 Cuando la velocidad alcanza el siguiente intervalo suena un pitido y la velocidad cambia según el intervalo establecido Presione las TECLAS SPEED para cambiar la velocidad Después de c...

Page 70: ...ostrará la ventana que indica la edad predeterminada de 30 años El usuario puede presionar los botones de velocidad para establecer la edad La edad se puede ajustar entre 15 y 80 años Use el PARÁMETRO HRC arriba para referencia 3 Después de seleccionar la edad presione el botón M y el sistema le sugerirá un valor adecuado de frecuencia cardíaca de acuerdo con su edad Presione las TECLAS VELOCIDADE...

Page 71: ...brecarga de corriente SSistema de autoprotección El voltaje de entrada es demasiado bajo o demasiado alto El tablero de control está dañado Reinicie la cinta de correr Verifique el voltaje de entrada Verifique el tablero de control reemplace si está dañado Una parte móvil de la cinta de correr se atasca y el motor no puede girar correctamente Verifique las partes móviles de la cinta de correr para...

Page 72: ...en cerca de 6 8 semanas No se desanime si necesita más tiempo Es muy im portante que se ejercite a su propio ritmo Algún día podrá ejercitarse de manera continua durante 30 minutos 1 Por favor consulte a su médico antes de ejercitarse o entrenar Pídale al médico que revise su entrenamien to y su plan de dieta y que le de sugerencias sobre su plan de ejercicios 2 Establezca un objetivo con sus ejer...

Page 73: ...or Android iOS Consejos para el uso de las aplicaciones Como usuario de Android por favor asegúrese de marcar la opción Fuentes desconocidas en Ajustes Seguridad del dispositivo Por favor recuerde activar la función Bluetooth en su dispositivo Kinomap El código QR al principio del manual le llevará varios tutoriales en YouTube Allí encontrará más información sobre la aplicación y el dispositivo An...

Page 74: ...idores de aparatos eléctricos estamos obligados a retirar gratuitamente determinados residuos de aparatos eléctricos y electrónicos de acuerdo con el artículo 17 apartado 2 de la ley alemana sobre aparatos eléctricos y electrónicos en relación con el artículo 17 apartado 1 de la ley alemana sobre aparatos eléctricos y electrónicos Cumplimos con esta obligación legal a través de la empresa DR Deuts...

Page 75: ...tions La sécurité et le fonctionnement opérationnelles de l appareil ne peuvent être garanties que si les dispositions légales relatives à la sécurité générale et à la prévention des accidents ainsi que les consignes de sécurité contenues dans ce manuel d utilisation sont respectées Nous n assumons aucu ne responsabilité pour les dommages résultant d une mauvaise utilisation ou d un fonctionnement...

Page 76: ...Construction Utilisation Réduction 3 étapes simples pour un démarrage rapide et sécurisé 1 Scannez le code QR 2 Regarder les vidéos 3 Démarrez rapidement et en toute sécurité Lien vers les vidéos https service innovamaxx de fx300_video ...

Page 77: ...NANCE ET ENTRETIEN 83 INSTRUCTIONS DE PLIAGE 85 RANGEMENT 87 COMMENT DÉPLACER LE TAPIS DE COURSE 88 INFORMATIONS ÉLECTRIQUES IMPORTANTES 89 FONCTIONS 89 INSTRUCTIONS D EXERCICE 90 MESURES DE FRÉQUENCE CARDIAQUE 90 FONCTION DE LA CONSOLE 91 CONTRÔLE DE LA FRÉQUENCE CARDIAQUE 94 DÉPANNAGE 95 FAIT IMPORTANT 96 LOGICIEL D APPLICATION APP 97 DECLARATION OF CONFORMITY 147 ...

Page 78: ...s cheveux et d autres obstructions N utilisez pas le tapis roulant à l extérieur Ne retirez pas le fil du tapis roulant par son cordon d alimentation et n utilisez pas le cordon comme une poignée Gardez les enfants et les animaux domestiques éloignés de l appareil pendant son utilisation Les utilisateurs âgés ou handicapés ne devraient utiliser ce tapis roulant qu en présence d un adulte qui peut ...

Page 79: ...es soyez extrêmement prudent lorsque vous marchez sur ou hors du tapis roulant Lisez attentivement ce mode d emploi avant utilisation Capacité de poids maximale est de 100 kg Retirez la clé de sécurité Foan 1 3 cm de hauteur Avant d utiliser le tapis roulant vérifiez que la ceinture est aligné et centré sur la plate forme de marche et que toutes les fixations visibles sur le tapis roulant sont suf...

Page 80: ... Allen 1 D07 Clé de sécurité 1 D19 Câble électrique 1 F Huile de lubrification 1 A l adresse suivante A l adresse suivante vous trouverez le dessin éclaté vous trouverez le dessin éclaté et la liste des pièces de rechange et la liste des pièces de rechange https service innovamaxx de fx300_spareparts https service innovamaxx de fx300_spareparts ...

Page 81: ... d espace ÉTAPE 2 Tirez la plaque rotative avec votre main droite N A12 tout en posant votre main gauche sur la poignée Positi on B puis tirez les tubes supérieurs N A06 et A07 Lorsque vous tirez sur ces tubes N A06 et A07 vous pouvez libérer la plaque rotative N A12 Vous entend rez un clic lorsque les tubes supérieurs seront correctement engagés Serrez fermement tous les composants et les pièces ...

Page 82: ...e Retirez et maintenez l écrou en plas tique N C09 avec votre main gauche et faites pivoter le support N C08 avec votre main droite Une fois que le support est à un angle approprié vous pouvez lâcher l écrou en plastique N C09 ÉTAPE 5 Le montage est terminé Insérez la clé de sécurité D07 dans la zone magnétique de la console D ...

Page 83: ...PIS ROULANT Placez le tapis de course sur une surface plane avec une vitesse de 6 8 km h afin de vérifier si le tapis roulant N C31 glisse Lorsque le tapis roulant N C31 se déplace vers la droite tournez le boulon d ajustement droit de dans le sens des aiguilles d une montre puis tournez le boulon d ajustement gauche de dans le sens con traire des aiguilles d une montre Répétez cette étape jusqu à...

Page 84: ...urner librement et silencieusement Les anomalies sur les pièces en mou vement affectent la sécurité de l appareil Vérifiez et serrez les boulons régulièrement 3 Pour prolonger la durée de vie du tapis de course il est recommandé de le maintenir régulièrement 4 Un tapis roulant desserré fait glisser le coureur pendant son utilisation Une bande trop serrée réduit la performance du moteur et augmente...

Page 85: ...que N C09 ÉTAPE 2 Tirez les poignées gauche et droite N C10 et C11 vers la position fixe ÉTAPE 3 Tirez la plaque rotative avec la main droite N A12 et placez la main gauche sur la poignée Position B puis poussez les tubes supérieurs N H G en même temps En poussant les tubes supérieurs N A06 et A07 vous pouvez libérer la plaque rotative N A12 REMARQUE Placez toujours votre main gauche sur la poigné...

Page 86: ...lisez votre pied pour faire pivoter la plaque pliante fixe N A13 en position horizontale ÉTAPE 6 Placez votre main en position E et pousser fermement avec votre pied contre la position J du tapis de course Inclinez le tapis de course vers l avant avec précaution et le cadre pliant N A05 sera automatiquement relâché E A05 J ...

Page 87: ...oisir de ranger le tapis verticalement ou horizontalement A RANGEMENT VERTICAL Après le pliage placez l appareil près du mur afin qu il ne tombe pas Tenir hors de portée des enfants B RANGEMENT HORIZONTAL Après le pliage vous pouvez ranger la machine sous une table ou dans un espace libre ...

Page 88: ... à ce que les roues se déplacent en douceur Mettez vos mains sur la position E Placez le cadre pliant A05 dans le bas du tapis de course et utilisez le pied pour faire pivoter la plaque pliante fixe A13 en position verticale pour fixer le cadre de pliage A05 COMMENT DÉPLACER LE TAPIS DE COURSE ...

Page 89: ...ar un électricien AVERTISSEMENT 1 NE JAMAIS utiliser un disjoncteur différentiel de fuite à la terre DDFT avec ce tapis roulant Éloignez le cordon d alimentation de toutes les pièces mobiles du tapis de course y compris du mécanisme de levage et des roues de transport 2 N utilisez JAMAIS le tapis de course avec un générateur ou une alimentation UPS 3 Ne retirez JAMAIS de pièces sans d abord déconn...

Page 90: ... Appuyez sur le bouton START pour démarrer l appareil 4 L appareil démarre à la vitesse préréglée de 1 km h Si vous vous sentez à l aise vous pouvez augmenter la vitesse lentement 5 Lorsque vous avez terminé vos exercices appuyez sur le bouton STOP ou retirez l extrémité magnétique de la clé de sécurité pour arrêter l appareil MESURES DE FRÉQUENCE CARDIAQUE Il est dangereux de mesurer votre rythme...

Page 91: ...surer la fréquence cardiaque AFFICHAGE Chaque fenêtre affiche alternativement chaque fonction toutes les quelques secondes 1 SPEED PULSE La plage de vitesse se situe entre 1 0 et 16 km h 1 km h est la vitesse de course standard Lorsque le coureur pose un doigt sur le capteur cardiaque sur la console le système calcule son rythme cardiaque et l affiche dans cette fenêtre La plage de pulsation est d...

Page 92: ...vées La fenêtre affiche PAU Si vous appuyez sur le bouton START en mode pause l appareil continuera à fonctionner Lorsque vous appuyez sur le bouton STOP l appareil s arrête et toutes les données sont réinitialisées 3 M Appuyez sur ce bouton lorsque vous avez fait une pause pour sélectionner un mode Appuyez une fois pour accéder au mode par défaut 0 0 H1 est le mode compte à rebours de 15 00 minut...

Page 93: ...ouches deVITESSES pour augmenter ou diminuer la durée de l exercice Appuyez sur le bouton START pour lancerleprogrammed intervalle Leprogrammed intervalleestdiviséen10sections Chaquetempsd entraînement est égal au temps défini divisé par 10 Lorsque la vitesse atteint l intervalle suivant un bip retentit et la vitesse change selon l intervalle défini Appuyez sur les touches de VITESSES pour changer...

Page 94: ...fficher la fenêtre indiquant l âge par défaut de 30 ans L utilisateur peut appuyer sur les touches pour régler l âge L âge peut être ajusté entre 15 et 80 ans Utilisez le paramètre HRC PARAMETER ci dessus pour référence 3 Après avoir sélectionné l âge appuyez sur la touche M pour que le système vous propose une valeur de fréquen ce cardiaque appropriée en fonction de votre âge Appuyez sur les touc...

Page 95: ... d autoprotection La tension d entrée est trop basse ou trop élevée Le tableau de commande est endommagé Redémarrez le tapis de course Vérifiez la tension d entrée Vérifiez le tableau de commande remplacez le s il est endommagé Une partie mobile du tapis de course se bloque et le moteur ne peut pas tourner correctement Vérifiez les pièces mobiles du tapis de course pour vous assurer qu elles fonct...

Page 96: ... selon votre propre rythme Un jour vous serez en mesure de faire des exercices en continu pendant 30 min 1 Veuillez consulter votre médecin avant l exercice ou l entraînement Demandez au médecin d inspecter votre plan de formation et d alimentation et de donner des suggestions sur votre plan d exercice 2 Fixez l objectif d exercice après avoir consulté votre médecin pour vous assurer que le plan e...

Page 97: ... sur l utilisation de l application Les utilisateurs d Android doivent veiller à ce que la case source inconnues soit cochée dans la catégorie Sécu rité de l appareil des paramètres généraux N oubliez pas d activer la fonction Bluetooth de votre appareil Kinomap Le code QR situé dans la première partie du manuel d utilisation vous permettra d accéder à plusieurs tutoriels YouTube Vous y obteniez d...

Page 98: ...galement l obligation de collecte séparée separado Selon l ElektroG en application de l article 17 paragraphe 2 et en liaison avec l article 17 paragraphe 1 nous sommes tenus en tant que distributeur d équipements électriques de reprendre gratuitement certains appareils électriques et électroniques usagés Nous remplissons cette obligation légale par l intermédiaire de DR Deutsche Recycling Service...

Page 99: ...e istruzioni La sicurezza e la funzionalità del dispositivo possono essere garantite solo se vengono rispettate le disposizioni legali sulla sicurezza generale e per la prevenzione degli incidenti nonché le istruzioni di sicurezza contenute nel presente manuale d uso Non ci assumiamo alcuna responsabilità per i danni derivanti da un uso improprio o da un uso errato del dispositivo i Assicurarsi ch...

Page 100: ...o Tutorial per te Montaggio Utilizzo Smontaggio 3 semplici passaggi per un inizio veloce e sicuro 1 Scannerizza il QR Code 2 Guarda il Video 3 Inizia ad allenarti Link per il Video https service innovamaxx de fx300_video ...

Page 101: ...ONE E PULIZIA 107 SISTEMA DI PIEGAMENTO 109 CUSTODIA 111 IL TRASPORTO CORRETTO 112 INFORMAZIONI IMPORTANTI SULLE COMPONENTI ELETTRICHE 113 FUNZIONI 113 ESERCIZI 114 MISURAZIONE FREQUENZA CARDIACA 114 FUNZIONI DELLA CONSOLE 115 REGOLAZIONE FREQUENZA CARDIACA 118 RISOLUZIONE ERRORE 119 QUESTIONI IMPORTANTI 120 SOFTWARE DI UTILIZZO APP 121 DECLARATION OF CONFORMITY 147 ...

Page 102: ...r la Riparazione Mai azionare lo strumento con le fissure per l aria bloccate Mantenere le aperture per la ventilazione libere da polvere capelli e alter ostruzioni Non usare il tapis roulant fuori casa Non tirare il tapis roulant tramite il cavo di corrente o usare il cavo di corrente come maniglia Mantenere bambini e animali a distanza dall attrezzo in uso Utenti anziani o disabili dovrebbero us...

Page 103: ...e molta attenzione quando si sale e scende dal tapis roulant in funzione Leggere attentamente il manual prima dell uso La capacità massima di peso è 100 kg Estrarre la Chiave di sicurezza 1 3 cm in altezza Prima di usare il tapis roulant controllare che la cinghia sia allineata e centrata alla base per la corsa e che tutti i ganci visibili sul tapis roulant siano sufficientemente stretti e sicuri ...

Page 104: ...e 1 B13 Brugola 1 D07 Chiave di accesso di sicurezza 1 D19 Cavo elettrico 1 F Olio lubrificante 1 Al seguente link Al seguente link troverete il disegno esploso troverete il disegno esploso e la lista dei pezzi di ricambio e la lista dei pezzi di ricambio https service innovamaxx de fx300_spareparts https service innovamaxx de fx300_spareparts ...

Page 105: ...di avere spazio sufficiente PASSO 2 Estrarre la piastra girevole con la mano destra Nr A12 Al contempo posizio nate la mano sinistra sul manubrio po sizione B e tiratee i tubi verticali verso l alto Nr A06 e A07 Estraendo i tubi Nr A06 und A07 po trete rilasciare la piastra girevole Nr A12 Se i tubi sono stati posizionati correttamente sentirete un click Avvitare bene tutti gli elementi e i pezzi ...

Page 106: ... di plastica con la mano sinistra Nr C09 tenete fermo il pezzo e con la mano destra Nr C08 rotate il supporto Potrete rilasciare il dado di plastica solo non appena il supporto è stato posizionato correttamente con un angolazione adeguata Nr C09 PASSO 5 Montaggio concluso correttamente Inserire la chiave di accesso di sicu rezza D07 nella zona magnete della console D ...

Page 107: ...dalla superficie di corsa CENTRAGGIO DEL TAPIS ROULANT Posizionate il tapis roulant su una superfcie piatta e impostate la velocità a 6 8 km h per verificare il corretto scorrimento del nastro Nr C31 Se il tapis roulant si muove verso destra Nr C31 al lora girate la vite di regolazione destra di in senso orario e successivamente girate la vite di regolazio ne sinistra di in senso antiorario Se il ...

Page 108: ...icato Ripetere il procedimento sull altro lato 2 I pezzi mobili dovrebbero muoversi trasquillamente e senza provocare rumori Anomalie su questi pezzi mettono a repentaglio la sicurezza dell apparecchio Avvitare saldamente le viti e controllarle regolarmente 3 Per aumentare la durata di vita del tapis roulant è consigliata una manutenzione costante 4 Se il nastro è allentato l utente corre il risch...

Page 109: ...one adeguata PASSO 2 Tirate il manubrio dx e sx verso il basso Nr C10 und C11 per collocarli nella posizione fissa PASSO 3 Estrarre la piastra girevole con la mano destra Nr A12 Al contempo posizionate la mano sinistra sul manubrio posizione B e tirate contemporaneamente i tubi verticali verso il basso Nr H G In questo modo Nr A06 und A07 potrete lasciare la piastra girevole Nr A12 INDICAZIONE Las...

Page 110: ...a E e mettete la piastra fissa ribaltabile Nr A13 in posizione orizzontale aiutandovi col piede PASSO 6 Mettete la vostra mano come mostrato in figura E e premete col piede sul tapis roulant contro la posizione mostrata nella figura J Piegate il tapis roulant in avanti con cautela Il telaio ribaltabile Nr A05 si allenterà automaticamente E A05 J ...

Page 111: ...acchinario può essere riposto in posizione verticale oppure orizzontale A IN VERTICALE Dopo averlo chiuso posizionate il tapis roulant vicino al muro in modo che non cada Tenere lontano dalla portata dei bambini B IN ORIZZONTALE Una volta piegato potete riporlo ad esempio sotto un tavolo ...

Page 112: ... le ruote si muoveranno facilmente Mettete le mani come in figura E Per fissare il telaio ribaltabile A05 mettetelo a terra dalla parte della base di appoggio e girate la piastra fissa ribaltabile A13 fino a raggiungere la posizione verticale Aiutatevi col piede IL TRASPORTO CORRETTO ...

Page 113: ...to Non modificate la presa in dotazione e lasciate installare la presa da un elettricista ATTENZIONE 1 Non utilizzate MAI un interruttore differenziale per questo tapis roulant Tenete lontano il cavo di rete da tutte le parti mobili del tapis roulant compreso il meccanismo di sollevamento e le ruote di trasporto 2 Per questo tapis roulant non utilizzate MAI un generatore o un alimentatore elettric...

Page 114: ...Premete il tasto START per avviare il tapis roulant 4 La velocità pre programmata è di 1 km h Lentamente potrete aumentarla 5 Una volta terminato l allenamento premete il tasto STOP o rimuovete la chiave magnetica della chiave di sicurezza Il macchinario si arresterà di conseguenza MISURAZIONE FREQUENZA CARDIACA E pericoloso misurare la frequenza cardiaca durante la corsa Misuratela solo a riposo ...

Page 115: ...infrarossi Nr G01 per misurare la vostra frequenza cardiaca FINESTRE Ogni finestra a turno mostra diverse funzioni ogni secondo 1 VELOCITA POLSO Il range di velocità è 1 0 16 km h 1 km h è l impostazione standard Se l utente mette un dito sul sensore del polso presente sulla console il sistema calcola il battito cardiaco e lo mostra in questa finestra Il range polso si trova tra i 50 e i 200 batti...

Page 116: ... PAU Se premete il tasto START quando siete in pausa il tapis roulant riprenderà la sua funzionalità Se premete STOP il tapis roulant si fermerà e tutti i dati ritorneranno alla impostazioni iniziali 3 M Questo tasto serve per scegliere la modalità di utilizzo Premendo una volta sola sarà attivata la modalità 0 0 H1 da accesso alla modalità Countdown TEMPO calcolabile a partire da 15 00 minuti H2 ...

Page 117: ...DI IMPOSTAZIONE VELOCITA per aumentare o diminuire i minuti countdown Premete START per iniziare il programma ad intervalli Questa tipologia di programma è divisa in 10 fasi Ogni unità di allenamento equivale al tempo impostato diviso 10 Quando la velocità raggiunge l intervallo successivo il sistema emette un segnale sonoro e la velocità verrà automaticamente modificata Premete i TASTI DI IMPOSTA...

Page 118: ...ma non adatta automaticamente la velocità che può essere modificata solo manualmente Dopo questa fase il sistema adatta la velocità basandosi sul valore frequenza cardiaca ogni 0 5 km h percorsi Quando con HP1 o HP2 è stata raggiunta la velocità massima ma il valore di frequenza cardiaca da raggiungere non è stato raggiunto la velocità rimane costante Il tapis roulant si ferma automaticamente quan...

Page 119: ...05 Protezione sovraccarico di corrente Sistema di auto protezione Il voltaggio di ingresso è troppo alto o troppo basso Il pannello di controllo è danneggiato Riavviate il tapis roulant Verificate il voltaggio in ingresso Controllate il pannello di controllo e sostituitelo se danneggiato Un pezzo mobile del tapis roulant è bloccato e il motore non può rotare correttamente Controllate i pezzi mobil...

Page 120: ...de più tempo È molto importante allenarsi al proprio ritmo Un giorno sarete in grado di allenarvi in maniera continua per 30 minuti 1 Si prega di consultare il proprio medico prima di allenarsi o di fare esercizio Chiedere al medico di control lare il vostro piano di allenamento e dieta e dare suggerimenti sul piano di esercizio 2 Si prega di impostare gli obiettivi per il vostro allenamento dopo ...

Page 121: ...S 8 0 o versioni successive Android iOS Note sull uso dell app Come utente Android assicurati che in Impostazioni Sicurezza dispositivo sia impostato un segno di spunta sotto Fonti sconosciute Ricordarsi di attivare la funzionalità Bluetooth sul dispositivo Kinomap Il codice QR all inizio del manuale ti guiderà a vari tutorial di YouTube Lì otterrai maggiori informazioni sull app e sul dispositivo...

Page 122: ...a anch esso l obbligo di raccolta differenziata Secondo la ElektroG noi in qualità di distributori di apparecchi elettrici siamo obbligati a ritirare gratuitamente i rifiuti di apparecchi elettrici ed elettronici ai sensi della legge 17 comma 2 assieme alla legge 17 comma 1 della ElektroG Rispettiamo questo obbligo legale tramite la DR Deutsche Recycling Service GmbH take e way GmbH Inoltre è poss...

Page 123: ...ijfsveiligheid en de werking van het apparaat kunnen alleen worden gegarandeerd als zowel de algemene wettelijke veiligheidsinstructies en de ongevallenpreventievoorschriften als de veiligheidsinstructies in deze gebruiksaanwijzing in acht worden genomen We aanvaarden geen aansprakelijkheid voor schade veroorzaakt door oneigenlijk gebruik of verkeerde bediening i Zorg ervoor dat alle personen die ...

Page 124: ...rials voor jou Montage Gebruik Demontage In 3 eenvoudige stappen voor een snelle en veilige start 1 Scan de QR code 2 Bekijk video s 3 Begin snel en veilig Koppeling naar de video s https service innovamaxx de fx300_video ...

Page 125: ...CTIES 129 ONDERHOUD EN ZORG 131 OPKLAPMECHANISME 133 OPSLAG 135 TRANSPORT 136 WICHTIGE ELEKTRISCHE INFORMATIONEN 137 FUNKTION 137 ÜBUNGSANLEITUNG 138 HERZFREQUENZMESSUNG 138 FUNKTIONEN DER KONSOLE 139 HERZFREQUENZREGELUNG 142 FOUTMELDINGEN 143 WICHTIGE INFORMATIONEN 144 APPLICATIESOFTWARE APP 145 DECLARATION OF CONFORMITY 147 ...

Page 126: ...lijk benadeelde personen mogen het apparaat alleen onder toezicht gebruiken als tussenkomst van de supervisor noodzakelijk is Gebruik geen sprays of spuitbussen in de buurt van het apparaat om schade te voorkomen Houd het apparaat droog en uit de buurt van water en vocht De motorkap kan tijdens gebruik warm worden Plaats het apparaat op een hittebestendige ondergrond Houd de stekker uit de buurt v...

Page 127: ...k moet gecentreerd zijn Zorg ervoor dat alle zichtbare schroeven zijn vastgedraaid Kinderen mogen niet met het apparaat spelen De reiniging en het onderhoud van het apparaat mogen niet door kinderen worden uitgevoerd Als de stekker beschadigd is moet deze worden vervangen door gekwalificeerd personeel Gebruik het toestel niet wanneer het is opgeklapt Stop de loopband voordat je de stekker uittrekt...

Page 128: ...ssel 1 B13 Inbusschlüssel 1 D07 Sicherheitsschlüssel 1 D19 Stromkabel 1 F Schmiermittel 1 In de volgende link In de volgende link vind je de explosietekening vind je de explosietekening en de onderdelenlijst en de onderdelenlijst https service innovamaxx de fx300_spareparts https service innovamaxx de fx300_spareparts ...

Page 129: ...n SCHRITT 2 Ziehen Sie die drehbare Platte Nr A12 mit der rechten Hand heraus Legen Sie gleichzeitig Ihre linke Hand auf den Griff Position B und ziehen Sie dann die Standrohre nach oben Nr A06 und A07 Beim Hochziehen der Standrohre Nr A06 und A07 können Sie die drehba re Platte Nr A12 loslassen Sie hören ein Klicken wenn die Standrohre richtig eingerastet sind DRAAI Alle componenten en voorgemont...

Page 130: ... Ziehen Sie die Kunststoffmutter heraus halten Sie sie Nr C09 mit der linken Hand fest und drehen Sie den Halter Nr C08 mit der rechten Hand Sobald der Halter in einem geeigneten Winkel steht können Sie die Plastikmutter los lassen Nr C09 SCHRITT 5 Die Montage ist damit fertig Sicherheitsschlüssel D07 in den Mag netbereich der Konsole D einstecken ...

Page 131: ...een vlakke ondergrond en stel hem in op een maximale snelheid van 3 5 km u om te controleren of de roterende loopband C31 wegglijdt Wenn sich das Laufband Nr C31 nach rechts bewegt drehen Sie die rechte Einstellschraube im Uhrzei gersinn dann drehen Sie die linke Einstellschraube gegen den Uhrzeigersinn Wenn sich das Band nicht verschiebt wiederholen Sie diesen Schritt bis es zen triert ist Siehe ...

Page 132: ... beweglichen Teile sollen sich frei und leise drehen Anomalien an beweglichen Teilen beeinträchtigen die Sicherheit des Geräts Schrauben regelmäßig kontrollieren und anziehen 3 Um das Laufband besser zu pflegen und seine Lebensdauer zu verlängern wird empfohlen es regelmäßig zu warten 4 Ein loses Laufband führt dazu dass der Läufer während der Benutzung abrutscht Ein zu festes Band führt zu einer ...

Page 133: ... Ziehen Sie den linken und rechten Griff hoch Nr C10 und C11 in die feste Position SCHRITT 3 Ziehen Sie die drehbare Platte mit der rechten Hand Nr A12 ziehen und legen Sie die linke Hand auf den Griff Position B Drücken Sie dann die Standrohre Nr H G gleichzeitig nach unten Beim Herunterdrücken der Standrohre Nr A06 und A07 können Sie die drehbare Platte Nr A12 loslassen HINWEIS Legen Sie Ihre li...

Page 134: ... drehen Sie mit dem Fuß die klappbare feste Platte Nr A13 in eine horizontale Position SCHRITT 6 Legen Sie Ihre Hand auf Position E und drücken Sie mit dem Fuß fest gegen Position J auf dem Laufband Kippen Sie das Laufband vorsichtig nach vorne Der Klapprahmen Nr A05 wird automatisch gelöst Das Einklappen ist damit fertig E A05 J ...

Page 135: ...ertikal oder horizontal lagern möchten A VERTIKALE AUFBEWAHRUNG Stellen Sie das Gerät nach dem Klappen in der Nähe der Wand auf damit es nicht umfällt Für Kinder unzugänglich aufbewahren B HORIZONTALE AUFBEWAHRUNG Nach dem Klappen können Sie die Maschine unter einem Tisch oder einer anderen freien Stelle ver stauen ...

Page 136: ... positie totdat de wielen soepel bewegen Legen Sie Ihre Hände auf Position E Legen Sie den Klapprahmen A05 in den Boden des Laufban des und drehen Sie die klappbare feste Platte A13 mit dem Fuß in eine vertikale Position um den Klapprahmen A05 zu fixieren TRANSPORT ...

Page 137: ...eckdose passt lassen Sie eine geeignete Steckdose von einem Elektriker installieren WARNUNG 1 Verwenden Sie NIEMALS einen Fehlerstrom Schutzschalter FI mit diesem Laufband Halten Sie das Netzkabel von allen beweglichen Teilen des Laufbandes fern einschließlich des Hebemechanismus und der Transportrollen 2 Betreiben Sie das Laufband NIEMALS mit einem Generator oder einer USV Stromversorgung 3 Entfe...

Page 138: ...ART Taste um das Gerät zu starten 4 Das Gerät startet mit der voreingestellten Geschwindigkeit von 1 km h Wenn Sie sich wohl fühlen können Sie die Geschwindigkeit langsam erhöhen 5 Wenn Sie mit dem Training fertig sind drücken Sie die STOP Taste oder entfernen Sie das magnetische Ende des Sicherheitsschlüssels um das Gerät anzuhalten HERZFREQUENZMESSUNG Es ist gefährlich die Herzfrequenz während d...

Page 139: ...FENSTERANZEIGEN Jedes Fenster zeigt abwechselnd alle paar Sekunden jede Funktion an 1 GESCHWINDIGKEIT PULS Der Geschwindigkeitsbereich liegt zwischen 1 0 16 km h 1 km h ist die Standard Laufgeschwindigkeit Wenn der Läufer einen Finger auf den Pulssensor auf der Konsole legt berechnet das System den Herzschlag des Läufers und zeigt ihn in diesem Fenster an Der Pulsbereich liegt zwischen 50 200 Schl...

Page 140: ...n erhalten Das Fenster zeigt PAU an wenn Sie die Taste START im Pausenmodus drücken läuft das Gerät weiter Wenn Sie die Taste STOP drücken stoppt das Gerät und alle Daten werden auf die Grundeinstellung zurückgesetzt 3 M Drücken Sie diese Taste wenn Sie angehalten haben um einen Modus zu wählen Durch einmaliges Drücken wird die Standardmodus 0 0 aufgerufen H1 ist der ZEIT Countdown Modus ab 15 00 ...

Page 141: ...rainingszeit erhöhen oder verringern möchten Drücken Sie die START Taste um das Intervallprogramm zu starten Das Intervallprogramm ist in 10 Abschnitte unterteilt Jede Trainingszeit entspricht der eingestellten Zeit geteilt durch 10 Wenn die Geschwindigkeit das nächste Intervall erreicht ertönt ein Piepsen und die Geschwindigkeit wird entsprechend dem eingestellten Intervall geändert Drücken Sie d...

Page 142: ...igt und zeigt das Standardalter von 30 Jahren an Der Benutzer kann die GESCHWINDIGKEITSTASTEN drücken um das Alter einzustellen Das Alter kann zwi schen 15 und 80 Jahren eingestellt werden Verwenden Sie die HRC PARAMETER oben als Referenz 3 Nach Auswahl des Alters drücken Sie die Taste M und das System schlägt Ihnen einen geeigneten Herzfrequen zwert entsprechend Ihrem Alter vor Drücken Sie die GE...

Page 143: ...ingangsspannung ist zu niedrig oder zu hoch Die Steuerplatine ist beschädigt Starten Sie das Laufband neu Überprüfen Sie die Eingangsspannung Kontrollieren Sie die Steuerplatine bei Beschädigung austauschen Ein beweglicher Teil des Laufbandes klemmt und der Motor kann sich nicht richtig drehen Überprüfen Sie die beweglichen Teile des Laufbandes um sicherzustellen dass sie korrekt funktionieren Übe...

Page 144: ...s ist sehr wichtig in Ihrem eigenen Tempo zu trainieren Eines Tages werden Sie in der Lage sein kontinuierlich für 30 Minuten zu üben 1 Fragen Sie Ihren Arzt vor dem Üben oder Training Bitten Sie den Arzt Ihren Trainings und Ernährungsplan zu überprüfen sowie Ihnen Anregungen zu Ihrem Übungsplan zu geben 2 Setzen Sie Ihre Übungsziele nach Rücksprache mit Ihrem Arzt um sicherzustellen dass der Plan...

Page 145: ...ATIESOFTWARE APP Opmerkingen over het gebruik van de app Zorg er als Android gebruiker voor dat onder Instellingen Beveiliging een vinkje staat bij Onbekende bronnen Vergeet niet om de Bluetooth functie op je apparaat in te schakelen Kinomap De QR code aan het begin van de handleiding leidt je naar verschillende YouTube tutorials Daar krijg je meer informatie over de app en het apparaat Android iO...

Page 146: ...en aan dat gescheiden inzameling verplicht is Volgens de ElektroG norm zijn we als distributeurs van elektrische apparaten conform 17 lid 2 ElektroG in combinatie met 17 lid 1 ElektroG verplicht om bepaalde elektrische en elektronische apparatuur kosteloos terug te nemen Deze wettelijke verplichting komen we na via de DR Deutsche Recycling Service GmbH take e way GmbH Daarnaast kun je afgedankte e...

Page 147: ...147 Unter folgendem Link finden Sie die Konformitätserklärung At the following link you will find the declaration of conformity https service innovamaxx de fx300_conformity DECLARATION OF CONFORMITY ...

Page 148: ...Verkauf durch Distributed by Distribuido por Distribué Distribuito da Verkoop via InnovaMaxx GmbH Allee der Kosmonauten 33 C G 12681 Berlin 49 30 220 663 569 service innovamaxx de http www sportstech de ...

Reviews: