SportsPlay 381-403H Installation Manual Download Page 6

381-403H WHEELCHAIR SWING 

Installation Guide 


Safety Surfacing


WARNING! – INSTALLATION OVER A HARD SURFACE SUCH AS 
CONCRETE, ASPHALT OR PACKED EARTH MAY RESULT IN 
SERIOUS INJURY OR DEATH FROM A FALL 

Because accidental falls are likely to occur around play equipment, SportsPlay 
Equipment Inc. recommends that a resilient safety surfacing that will meet 
standard ASTM F1292 be placed under and around the structure and extend 
throughout the entire use zone. 

SportsPlay Equipment Inc. does not manufacture safety surfacing.  All 
manufacturers of safety surfacing require different depths of surfacing for fall 
heights.  Consult your surfacing supplier about the required safety surfacing 
depth for your play equipment. 

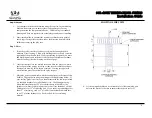
SportsPlay Equipment Inc. manufactures all playgrounds to accommodate 
12” of safety surfacing.  If you intend to adjust the height of the surfacing 
you will need to adjust the depth of the footing to accommodate the 
surfacing height. 

Refer to the CPSC Handbook for Public Playground Safety for the recommended 
type and depth of the protective surfacing as well as all other playground safety 
concerns. 

For a copy of the most current issue of the CPSC Handbook for Public 
Playground Safety, write to: 


U.S. Consumer Product Safety Commission 


Office of Information and Public Affairs 


Washington DC, 20207 


USA 


Call - 1-800-638-2772 (US and Canada only) 
Call - 301-504-0990  
Direct Link - http://www.cpsc.gov 


For a copy of either the standard for surfacing (ASTM F1292) or for play 
equipment (ASTM 1487) write to: 


American Society for Testing and Materials 


100 Bar harbor drive 


West Conshohocken PA, 19428-2959 


USA 


Call – 618-832-9585 


Web Site – 

www.astm.org


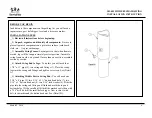
You must consider the type of safety surfacing you will use before beginning 
the installation process.  There are two general types, organic/loose fill or 
synthetic unitary (pour in place).  You must know which type of surfacing 
you are going to use prior to installing the playground.  This unit was 
designed for 12” of loose fill surfacing so if the customer wants to use a 
synthetic unitary product that has a much smaller height than 12” you must 
dig the footing holes deeper to allow for the difference. 

If loose fill surface material is to be used (example: wood mulch) you will 
need to consider containment borders.  There are many products to choose 
from including hard plastic and natural products such as wood (Creosoted 
railroad ties are NOT recommended for use as borders in a play area).  Loose 
fill materials are easily displaced so use of some type of containment border 
is necessary to keep the surfacing material inside the intended area.  Some 
customers also prefer to have a weed mat installed to prevent weed growth.  
Choose a mat that will prevent growth but will also allow for drainage. 


Summary of Contents for 381-403H

Page 1: ...HEELCHAIR SWING Installation Guide 1 INSTALLATION INSTRUCTIONS 381 403H ACCESSIBLE WHEELCHAIR SWING Please read the entire manual before beginning installation 1 CTN 5 PIPE 2 WF 8 TOTAL PCS 148 WEIGHT...

Page 2: ...381 403H WHEELCHAIR SWING Installation Guide 2...

Page 3: ...381 403H WHEELCHAIR SWING Installation Guide 3...

Page 4: ...g them to the part list and component instruction pages Always compare the number of pallets cartons or other items the BOL has listed with the number actually received Note the any discrepancies on t...

Page 5: ...esigned to install on a clear and level site There should be no more than 3 of grade variations in a 10 span Footing layout is the first critical step once the installation begins Mark all holes using...

Page 6: ...n and Public Affairs Washington DC 20207 USA Call 1 800 638 2772 US and Canada only Call 301 504 0990 Direct Link http www cpsc gov For a copy of either the standard for surfacing ASTM F1292 or for pl...

Page 7: ...digger Wheelbarrow Large construction bar 5 Claw hammer Large dead blow rubber hammer Small sledgehammer to use in blocking the posts Strong and sturdy step ladders Extension cords power supply Level...

Page 8: ...sed immediately A maintenance section is included in the appendix of this instruction booklet If a part is missing or damaged the playground must be put out of service while the part is replaced Lack...

Page 9: ...e 2 Once the structure is in the desired location within the play area mark the locations of the post by inserting a stake into the center of each post location see drawing below for an example If usi...

Page 10: ...you may start installing concrete You must use concrete with a minimum of 2 500 psi 2 Always pre mix the concrete to the manufactures directions before pouring it into the hole Never put dry concrete...

Page 11: ...at some point you may want to apply lubricating oil to the hardware Stainless steel hardware has a tendency to seize so if you are planning on removing the hardware you may want to apply lubricant to...

Page 12: ...g from dangerous heights displacing of surfacing etc Inspecting for missing or broken equipment Do not allow children to play on broken equipment or equipment with missing components Keep children in...

Page 13: ...removes the swing platform of secures it to the nearest support to prevent unsupervised mis use of the equipment Additionally it is recommended that a barrier be placed in front on the sides and behi...

Page 14: ...IR SWING Installation Guide 14 X SET SCREW D SHACKLE 2 3 8 SWING HANGER 5 16 X 1 BUTTON HEAD NUT 5 16 X 2 BUTTON HEAD BOLT 5 16 LOCK WASHER 3 16 ALLEN WRENCH YELLOW BAG ALLEN WRENCH BLUE BAG 5 16 ALLE...

Page 15: ...381 403H WHEELCHAIR SWING Installation Guide 15 COMPONENT INSTALLATION INSTRUCTIONS...

Page 16: ...d MAINTENANCE As the owner of the playground you are responsible for maintenance of the equipment and play area A maintenance schedule must be developed and the equipment inspected frequently A mainte...

Page 17: ...506 D Shackle 2 6 196 802 x Socket Set Screw 6 7 116 545 5 16 x 2 Button Head Bolt 2 8 216 512 5 16 x 1 Button Head Nut 2 9 326 501 5 16 Lock Washer 2 10 416 350 3 16 Socket Key 2 11 416 500BPK 5 16...

Page 18: ...ottom of the support post on a suitable flat blocking material to prevent it from sinking further into the soil We recommend you use a brick block of wood or several inches of gravel The footing depth...

Page 19: ...April 8 2020 4 3381 403H WHEELCHAIR SWING INSTALLATION INSTRUCTION ELEVATION AND FOOTING LAYOUT VIEW...

Page 20: ...ake an adjustment It is recommended that you add a drop of oil to bolts that may have to be removed before you install them Do not tighten bolts all the way until the unit is completely assembled and...

Page 21: ...correct position Assemble swing frame on side on ground If more than one section assemble section by section __4 Attach Swing End to Legs To do this you will need four 1 7 8 x 11 pipe 2 two swing end...

Page 22: ...ide and dig holes __8 Stand swing upright onto legs and brace in footing holes so that 2 3 of pipe will be under intended level of resilient surfacing and the top rail is at desired height Plumb and l...

Page 23: ...s set back fill dirt over the footing holes inspect the area and components for tools hazardous debris and sharp edges Verify all components are installed and all hardware is tight and then install th...

Reviews: