background image

15 


www.spokey.eu

 
www.spokey.pl 

USER’S GUIDE 

NOTES 

Please keep this operation manual for future use. This exercise machine is intended for home use only. 


TECHNICAL SPECIFICATIONS 

Net weight 

– 37 kg, Flywheel – 13 kg 

Dimensions of the assembled exercise machine 

– 109 x 51 x 116cm 

Maximum weight of the user 

– 100 kg 

The equipment is designed for full body exercise


  Prior  to  the  assembly  of  the  device  and  training,  read  carefully  this 

instruction  manual.  Safe  and  effective  use  of  the  device  can  be 
guaranteed only if it is assembled, maintained, and used appropriately, 
in  a  manner  described  in  the  manual.  If  you  are  not  the  user,  please 
provide  all  the  users  with  this  instruction  and  inform  them  about  all 
possible hazards and precautions. 

  Prior to starting  with  any  exercises,  please consult  a  doctor in  order to 

make sure that there are no mental or physical conditions that could be 
harmful to your health and safety. The consultancy with a doctor may also 
protect  you  against  an  inappropriate  use  of  the  device.  A  doctor  will 
specify whether taking drugs that would have an effect on pulse, pressure 
or cholesterol level is justified. 

  Pay  attention  to  your  body  signals.  Inappropriate  or  excessive  training 

may  have  a  negative  influence  on  your  health.  Immediately  stop 
exercising  if  any  of  the  following  symptoms  occurs:  pain,  chest 
constriction,  irregular  pulse,  exceptional  shortness  of  breath,  faints, 
vertigo,  nausea.  If  any  of  the  above  symptoms  occurs,  contact  your 
doctor immediately and give up training until then. 

  Children and animals should be kept away from the device. The device 

is intended only and exclusively for adults. 

  The  device  should  be  placed  on  a  straight,  stable  and  tough  surface, 

protected with a mat or a carpet. For the sake of safety, 2 m of free space, 
needed for a safe usage, should be left to each side around the device. 
Prior to starting any exercises, make sure that all the bolts and nuts are 
tightly fitted. Please, pay special attention to the parts that are prone to 
wearing out the most. 

  An appropriate safety level of this device may by guaranteed only if it is 

subject to regular service and inspection. 

  The  device  should  be  always  used  in  accordance  with  its  purpose. 

Should during the assembly or use any of the parts appear to be faulty 

or make alarming sounds, stop using the exerciser and have it serviced . 
You must not use a damaged device.  

  During training, wear appropriate clothes. Avoid loose clothes that could 

get  caught  in  the  device  or  such  that  could  restrict  or  even  make 
movement impossible. It is also advised to exercise in appropriate sport 
shoes.  At  the  beginning,  set  a  slow  pace.  During  exerc ises,  hold 
handgrips and do not leave the saddle. 


The  bicycle  is  intended  for  home  use.  Maximum  allowed  user’s  body 
weight amounts to 100 kg. 

  Take special precautions while lifting and moving the device. The device 

should  be  always  moved  by  two  persons.  While  lifting  or  moving  the 
equipment,  maintain  an  appropriate  posture  so  as  to  avoid  backbone 
damage. 

  The  equipment  was counted  among class  H  and C  and is intended for 

home use exclusively. It cannot be used as a therapeutic or rehabilitation 
equipment. 

  While assembling the device, strictly follow the enclosed instruction and 

use  only  the  parts  included  in  the  set.  Prior  to  the  assembly,  check 
whether the set contains all the parts that the enclosed list includes. 

  It  is  advised  against  leaving  control  devices,  which  could  restrict 

movement, in such a position that any of the elements sticks out. 

Warning:  prior  to  starting  a  training  on  this  device,  read  the  instruction 
manual  carefully.we  do  not  hold  responsibility  for  injuries  or  damages  to 
objects caused by an inappropriate use of this product. Body injuries may 
happen due to an inappropriate or too intensive training.  
WARNING!  Heart  rate  monitoring  system  May  be  inaccurate.  Over 
excercising  May  result  In  serious  injury  Or  death.  If  you  feel  faint  stop 
excercising immediately.  
Health injury may result from the incorrect or too intensive training 


PREPARATIONS 

1. Before assembly make sure there is enough space. 
2. Use the recommended tools.  
3. Before assembly check if there are all the parts in the box.  
It is recommended that product should be assembled by at least two people 
to avoid injuries.  

Most of the assembly equipment listed here has been packed separately, 
but some elements come preassembled in certain assembly parts. If it is 
required, dissassemble them and assemble again.   
Read  the  instructions  of  all  assembly  steps  and  familiarize  with  all  the 
devices installed.


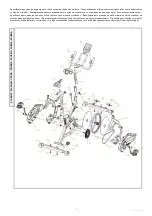
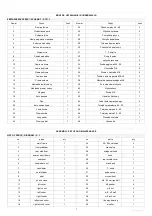
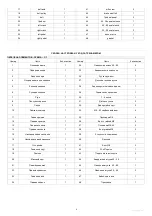
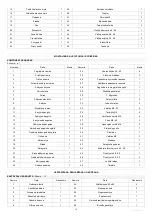
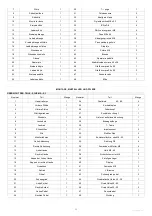
ASSEMBLY INSTRUCTIONS (

Drawings 

– p. 

2-4) 

Note: Follow the assembly instructions below:  

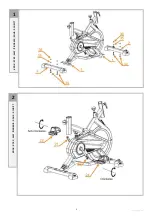
STEP 1   

as  the  picture  show  ,  insert  the  4  carrige  screw  (  34  )  to  front  and  rear 

stabilizer , together with the frame( 2 / 3 ). put the gasket in it ( 35 ), and fix 

it with nut bolt ( 36 ). 

STEP 2   

screw the right and left pedal ( 23 / 24 ) to the left and rightcrank ( 21 / 22 

). screw 4 - 5 circles by hand , then fasten it with the wrench . Note: Right 

foot  installation  is  clockwise,  Left  foot  installation  is  counterclockwise. 

Please make sure that the nut of Pedals could be threaded through the hole 

on  Crank  well  enough,  or  the  thread  on  Pedals  and  Cranks  will  be 

smoothed  by incorrect  operation. It is  a  good idea to  apply grease  to  the 

threads before attaching them to the crank, this will assure that they can be 

removed in the future. Tighten both Pedals as firmly as possible. After using 

the  Exercise  Bike  for  one  week,  retighten  the  Pedals.  For  best 

performance, keep the Pedals tightened. 

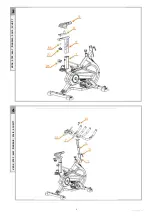
STEP 3   

loosing lock knob (28)  and  pull  out, insert the seat post (5)  into the  main 

frame (1). adjust the seat post assembly (5/8) to your desired height, then 

tighten the lock knbo (28) place (8) on (5), then fix it with the gasket (48) 

and plum knob (27). place seat (9) onto the seat slidder (8), secure the seat 

(9) by tightening the seat locking nuts.(38) 

STEP 4   

as  the picture shows, loosing nuts under  phone cage (10)  and  remove it 

from  handlebar  (7).  fix  the  handlebar  (7)  with  3pcs  screws  (  41)  to  the 

handlebar post (6). then insert it to the main frame (1), use the 7-knob (31) 

and fix tightly. put the phone cage (10) on handlebar (7), press it down to 

the handlebar, then lock it. 

STEP 5   

insert  the  monitor  (40)  to  the  phone  cage  (10).  join  the  sensor  wires 
(47).please note before doing exercise, please make sure product is good. 
*These 2 parts need to be in the same side when connect. 

Handlebar Height 

To  adjust  the  handlebar  height,  slacken  the  spring  knob  and  secondary 
knob and pull both knobs back. Slide the handlebar post along the housing 
on  the  main  frame  to  the  desired  height  and,  with  the  holes  aligned 
correctly, tighten the spring adjusting knob and then the secondary knob.


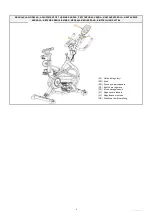
EQUIPMENT SPECIFICATION  

SAFETY REMARKS

EN 

Summary of Contents for 926188

Page 1: ...TANA SCHEMAT DIAGRAM SCH MA SCHEMA SH MA 1 PL ROWER SPINNINGOWY 12 EN SPIN BIKE 15 RU 18 CZ SPINNINGOV ROTOPED 21 SK SPINNINGOV BICYKEL 24 LT SPININGO DVIRATIS 27 LV SPINBAIK VELOTRIENA IERIS 30 DE SP...

Page 2: ...it od ilustrace nebo mohou b t zm n ny pecifik cia tohto produktu sa m e minim lne l i od uvedenej na obr zku alebo pod ahn prav m io produkto specifikacijos gali iek tiek skirtis nuo parodyt arba pas...

Page 3: ...2 www spokey eu 1 KROK STEP INGSNIS SOLIS SCHRITT 2 KROK STEP INGSNIS SOLIS SCHRITT...

Page 4: ...3 www spokey eu 3 KROK STEP INGSNIS SOLIS SCHRITT 4 KROK STEP INGSNIS SOLIS SCHRITT...

Page 5: ...4 www spokey eu 5 KROK STEP INGSNIS SOLIS SCHRITT...

Page 6: ...kl s LV Paka j stabilizatora tapas DE Endkappen am hinteren Stabilisator PRZENOSZENIE URZ DZENIA MOVING THE DEVICE P EN EN ZA ZEN PREN ANIE ZARIADENIA RENGINIO PERK LIMAS KIT VIET IER CES P RVIETO ANA...

Page 7: ...E SADDLE NASTAVEN SEDLA NASTAVENIE SEDADLA S DYN S REGULIAVIMAS S DEK A REGUL ANA EINSTELLUNG SATTEL PL Ga ka do regulacji EN Knob RU CZ Knofl k pro regulace SK K uka na regulovanie LT Reguliavimo ran...

Page 8: ...O pasa 1 41 ruba M8 3 18 Ko o pasowe 1 42 Hamulec klockowy 1 19 Pas 1 43 Peda ko a zamachowego 2 20 Ko o zamachowe 1 44 Tulejka kwadratowa 45 38 1 21 Lewa korba 1 45 Tulejka owalna 40 80 1 22 Prawa k...

Page 9: ...2 right crank 1 46 25 50 oval sleeve 2 23 left pedal 1 47 sensor wire 1 24 right pedal 1 48 gasket 1 C 1 1 1 24 40 80 4 2 1 25 2 3 1 26 1 4 1 27 1 5 1 28 1 6 1 29 1 7 1 30 7 1 8 1 31 2 9 1 32 2 10 1 3...

Page 10: ...ub M8 3 18 Kladka 1 42 Blokov brzda 1 19 P s 1 43 Ped l setrva n ku 2 20 Setrva n k 1 44 Vlo ka tvercov 45 38 1 21 Lev klika 1 45 Vlo ka ov ln 40 80 1 22 Prav klika 1 46 Vlo ka ov ln 25 50 2 23 Lev pe...

Page 11: ...10 Displ jaus r mas 1 33 Var tas M8 53 4 11 Kairysis dangtis 1 35 Tarpiklis D8 6 12 De inysis dangtis 1 36 Var tas su ver le M8 4 13 Kairysis apdangalas 1 37 Pus M8 45 2 14 De inysis apdangalas 1 38 A...

Page 12: ...Menge Nummer Teil Menge 1 Hauptrahmen 1 24 Ovalleiste 40 80 4 2 Vordere St tze 1 25 Kurbelstopfen 2 3 Hintere St tze 1 26 Federknopf 1 4 Sitztr gerrahmen 1 27 Zus tzlicher Knopf 1 5 Sitzs ule 1 28 Hi...

Page 13: ...jako sprz t terapeutyczny lub rehabilitacyjny Montuj c urz dzenie nale y ci le stosowa si do za czonej instrukcji i u ywa tylko cz ci do czonych do zestawu Przed rozpocz ciem monta u nale y sprawdzi c...

Page 14: ...powinno by u ywane Nigdy nie naprawiaj urz dzenia na w asn r k Naprawy powinien dokona wykwalifikowany pracownik firmy SPOKEY ZASILANIE Baterie 1 5v AAA 2 szt nie do czone do urz dzenia Instalacja bat...

Page 15: ...ia wykonywane na zwyk ym rowerze UWAGA Przed przyst pieniem do wicze nale y wykona rozgrzewk U YTKOWANIE I TRENING Dotyczy licznika Oznakowanie sprz tu symbolem przekre lonego kontenera na odpady info...

Page 16: ...ts included in the set Prior to the assembly check whether the set contains all the parts that the enclosed list includes It is advised against leaving control devices which could restrict movement in...

Page 17: ...y employee POWER SUPPLY Batteries 1 5V AAA 2 pieces not supplied with the bicycle Inserting batteries 1 Insert two batteries at the back of the counter 2 Make sure that the batteries are correctly pos...

Page 18: ...NUAL Adherence to the following TRAINING CYCLE will bring many benefits to your health such as physical fitness muscle development and weight loss in conjunction with the calorie intake control USAGE...

Page 19: ...18 www spokey eu 37 13 109 x 51 x 116 100 2 a 100 H C 1 2 3 P c 2 4 1 4 34 2 3 35 36 2 23 24 21 22 4 5 3 28 5 1 RU...

Page 20: ...19 www spokey eu 5 8 28 8 5 48 27 8 9 38 4 10 7 7 3 ma 41 6 1 7 31 10 7 5 40 10 47 2 o c 5 o c 3 1 8 1 5v AAA 2 1 2 3 4 auto on off 4 MODE 3 a MODE SET SCAN RESET 3 SCAN ODO TIME 99 59 SPEED...

Page 21: ...20 www spokey eu DISTANCE CALORIE ODO PULSE 5 P TIME 00 00 99 59 MIN SEC SPEED 0 0 999 9ML H DISTANCE 0 00 9999ML CALORIE 0 0 9999 CAL PULSE 40 206 BEATS MIN BPM 1 2 3 WEE...

Page 22: ...dodr ovat n vod a pou vat pouze sti p ipojen k tomuto setu P ed zah jen m mont e zkontrolovat zda jsou v echny sti jak je to uvedeno na p ipojen m seznamu VAROV N P ed pou it m je t eba si p e st n vo...

Page 23: ...t pov en osoba firmy SPOKEY Nikdy netahat za kabel Nap jen Bat rie 1 5v AAA 2 ks Nen p ipojeno ke kole Instalace bateri 1 Vlo te dv baterie na zadn stran po tadla 2 Zkontrolujte zda jsou baterie ve sp...

Page 24: ...ek Cvi en na trena ru nahrad cvi en prov d n na obvykl m kole JAK TR NOVAT Dodr ov n tr ninkov ho cyklu p in pozitivn efekty pro fyzickou kondici utv en svalstva a spolu s kontrolou spalovan ch kalori...

Page 25: ...aby nedo lo k po kodeniu Va ej chrbtice Po as mont e zariadenia dodr ujte prilo en n vod a pou vajte v lu ne s iastky ktor boli dodan spolu so zariaden m Pred zah jen m mont e najsk r skontrolujte i V...

Page 26: ...p s Opravu mus vykona kvalifikovan zamestnanec firmy SPOKEY Nikdy ne ahajte k bel Nap janie Bat rie 1 5v AAA 2 ks Nepripojen k bicykli In tal cia bat ri 1 Vlo te dve bat rie na zadnej strane po tadla...

Page 27: ...icykli nahradzuje telesn aktivitu vykon van na norm lnom bicykli N VOD NA TR NING Dodr iavanie TR NINGOV HO CYKLU prin a ve a zdravotn ch v hod tak ch ak mi s fyzick kond cia tvarovanie svalov a v spo...

Page 28: ...rodym ir naudoti tik dalis einan ias komplekt Prie pradedant montavim b tina patikrinti s ra e nurodyt dali komplektacij Nerekomenduojama yra palikti reguliacini rengini galin i trukdyti vartotojo jud...

Page 29: ...eriodi kai tikrinti elektros laid ir ki tuk Gedimo atveju renginio negalima naudoti Niekada neremontuokite renginio savaranki kai Remontus privaloma atlikti kvalifikuotas SPOKEY firmos darbuotojas Nie...

Page 30: ...metu nugara turi b ti tiesi r pav Pratimai ant stacionarinio dvira io yra tokie pat efektyv s kaip ir ant prasto dvira io Treniravimo instrukcija TRENIRAVIMO CIKLO laikymasis duoda daug naudos sveikat...

Page 31: ...komplekt Neieteicams palikt regul anas ier ces kas var tu trauc t lietot ja kust b m t d st vokl lai k ds to elements izst d tu Nerekomend jam atst t regul anas piederumus kuri var trauc t lietot ja...

Page 32: ...v k anu atbild gai iest dei p c sp k eso likuma par vides aizsardz bu Ieteicams periodiski p rbaud t elektr bas vadu un kontaktdak u Boj jumu gad jum ier ci nedr kst lietot Nekad neremont jiet ier ci...

Page 33: ...laik mugurai j b t taisnai z m jums Vingrin jumi stacion r trena ier aizst j vingrin jumus veicamus parast velosip d TRENI A INSTRUKCIJA TRENI A CIKLA iev ro ana dod daudz labumu vesel bai k piem fizi...

Page 34: ...onen dass die Regulierungsanlagen die bei der Bewegung des Benutzers st ren k nnen in solcher Einstellung gelassen werden dass irgendwelche Elemente hervorstehen Warnung Vor der Benutzung des Ger tes...

Page 35: ...zierten Mitarbeiter der Firma SPOKEY durchzuf hren Stromversorgung Batterien 1 5v AAA 2 Stk nicht im Lieferumfang enthalten Installation der batterie 1 Legen Sie zwei Batterien an der R ckseite des Z...

Page 36: ...immer auf die gerade Haltung denken Das Training auf dem Hometrainer ersetzt das Training auf dem blichen Fahrrad TRAININGSANLEITUNG Befolgung des TRAININGSZYKLUS hat viele Vorteile f r die Gesundheit...

Page 37: ...okey sp z o o al Ro dzie skiego 188c 40 203 Katowice biuro spokey pl office spokey eu CZ Spokey s r o Sadov 618 738 01 Fr dek M stek Czesk republika SK Kanlux s r o M R tef nika 379 19 911 01 Tren n S...

Reviews: