S o u n d P e r c u s s i o n L a b s . c o m
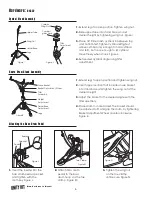
Mounting the Toms to the Bass Drum
1.
Insert long section of the first tom arm a few inches
into the Tom Mounting Bracket. Wing nut faces left
when standing behind base drum in playing position.
2.
Tighten the wing nut on the Tom Mounting Bracket.
3.
Loosen the wing nut on the tom arm and angle the
top part of the tom arm to just below horizontal and
retighten the wing nut. Figure G.
4.
Place the Tom Mount of 10” tom onto the tom arm
and tighten the wing nut on the tom mount.
5.
Repeat Step 1 through 4 for the 12” tom.
6.
Adjust height and angle of toms for desired playing.
7.
Secure memory locks for additional stability and
memory by tightening the collar of the memory lock
with the drum key at the mounts of the bass and
tom. The next time you need to set up the drums, the
memory locks will ensure the same angle and height.
Figure H.
5
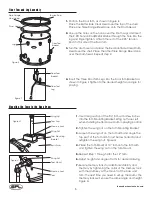
Floor Tom and Leg Assembly
1.
Position the Floor Tom as shown in Figure E.
Place the Batter Side Clear Head over the top of the shell.
Place one Triple Flange Steel Hoop onto the Drum Head.
2.
Line up the holes on the hoop over the Drum Lugs and insert
the 2.25” Tension Rod/Metal Washer through the hole into the
lug and finger tighten. Attach the rest of the 2.25” Tension
Rods to this side of the floor tom.
3.
Turn the drum over and place the Resonant Side Clear Drum
Head over the shell. Place the other Triple Flange Steel Hoop
over the drum head. Repeat step 2.
Figure E
Triple Flange
Steel Hoop
Drum Head
Tension Rod
Lug
4.
Insert the three Floor Tom Legs into the Floor Tom Brackets as
shown in Figure F. Tighten to the desired height and angle for
playing.
Figure F
Floor Tom
Leg
Floor Tom
Bracket
Figure G
Tom Arm
Memory Lock
Wing Nut
Tom Mounting
Bracket
Wing Nut
Tom Mount
Memory Lock
Figure H
Wing Nut
Bass Drum
Tom
Floor Tom
Bracket


