background image

OPERATION  

 SPT17/20X  86037300  01/24/07 

  3-4  


OPERATION 


For indoor use only. 
 
When using the pad, always keep the machine 
moving when in contact with the floor. 
 
 
High starting torque. Hold machine firmly with 
both hands. 
 

1.  Ensure that the pad driver is in good shape. 

Install or change pad if necessary. 

 
2.  Plug the machine into a wall outlet as 

described in the grounding instructions. 

 
3.  Lower the handle by unlocking the adjustment 

handle and moving the handle into position. 
Relock the handle when it is in a comfortable 
position. 


Insure that handle is locked in position before 
starting machine. 

 
4.  Push the safety lock forward, unlocking the 

switch levers. 

 
5.  With the safety lock forward, squeeze one or 

both of the switch levers, turning the machine 
on. (These levers can be operated 
independently of each other). The safety lock 
will not re-engage until both levers are 
released. 

 
6.  To stop the machine, release the switch 

levers.  

 
7.  Do not let machine rest on pad.  When 

finished with the machine, return handle to the 
storage position.   


NOTE:  The machine is equipped with a circuit 
breaker to protect the motor in the event an 
overload condition occurs. The circuit breaker is 
located on the rear of the motor. Push the reset 
button to restart the machine. If the breaker trips 
again, correct the cause of overloading before 
proceeding. 


DAILY MAINTENANCE 

1.  Inspect power cord for wear. To prevent 

electrical shock replace cords with frayed or 
cracked insulation immediately. 

 
2.  Place machine in the storage position. 
 
3.  Check pad condition. Change if soiled or torn. 


PAD INSTALLATION 

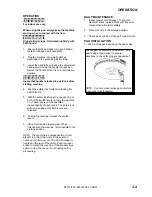
1.


Lay machine back, exposing the under side. 


!

CAUTION

!

WARNING

!

WARNING


Ensure pad is centered on pad driver.  Pull 
pad to edge of pad driver in several 
directions to check for proper engagement. 


NOTE:  Use care when replacing center lock 
to prevent cross threading. 

Summary of Contents for SPT17 10090370

Page 1: ...Operating Instructions ENG MODELS SPT17 10090370 SPT20X 10090380 Read these instructions before using the machine FLOOR POLISHER G 86037300 01 24 07 PRV NO 980132...

Page 2: ..._______________________________________________________________ Address _______________________________________________________________________________________________ Phone Number ___________________...

Page 3: ...rd Intensity Level 2 2 Grounding Instructions 2 3 OPERATION Technical Specifications 3 1 Handle Installation 3 2 Operation 3 3 Pad Driver Installation 3 4 MAINTENANCE Maintenance 4 1 Machine Troublesh...

Page 4: ...working condition The PARTS LIST section contains assembled parts illustrations and corresponding parts list The parts lists include a number of columns of information REF column refers to the referen...

Page 5: ...ne near flammable fluids dust or vapors This machine is suitable for commercial use for example in hotels schools hospitals factories shops and offices for more than normal housekeeping purposes Maint...

Page 6: ...afe operation of equipment Report machine damage or faulty operation immediately Do not use the machine if it is not in proper operating condition Following is information that signals some potentiall...

Page 7: ...es This appliance is for use on a nominal 120 volt circuit and has a grounded plug that looks like the plug in Fig A A temporary adaptor that looks like the adaptor in Fig C may be used to connect thi...

Page 8: ...SPT17 1 0 hp SPT20X 1 5 hp Brush Pad speed SPT17 SPT20X 175 rpm Electrical system 115 volts 60 Hz Cable 50 15 m 14 3 built in cord wrap Switches Dual levers with safety lock Wheels Two 5 12 7 cm dia...

Page 9: ...asting and are held in place by tightening the bolts and washers items 2 and 3 against the spacer 3 Remove bolt nut and washers items 4 5 and 6 from lower block on handle assembly Attach links as show...

Page 10: ...bled by applying more force to the nut From the factory the locking is in the up position when the machine handle is locked The pivot pin 86222560 PRV NO 66334 on the handle adjust bar is off center i...

Page 11: ...fety lock will not re engage until both levers are released 6 To stop the machine release the switch levers 7 Do not let machine rest on pad When finished with the machine return handle to the storage...

Page 12: ...SPT17 20X 86037300 01 24 07 3 5 THIS PAGE LEFT BLANK INTENTIONALLY...

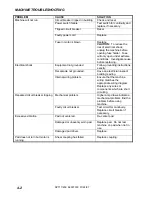
Page 13: ...purpose scrub brush with stiff bristles Polypropylene works well for maintaining concrete wood and tile floors FINISHED FLOORS Nylon Polish is the softest brush It will gently clean finished tile or t...

Page 14: ...low grounding instructions exactly Receptacle not grounded Have an electrician inspect building s wiring Internal wiring problem Ensure that the machine wiring matches the appropriate wiring diagram R...

Page 15: ...WIRING DIAGRAM NOTES SPT17 20X 86037300 01 24 07 4 3 NOTES...

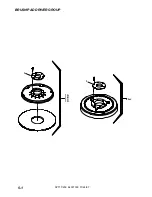
Page 16: ...BRUSH PAD DRIVER GROUP SPT17 20X 86037300 01 24 07 1A 1B 1D 1C 3 3 2A J 5 1...

Page 17: ...02240 BRUSH 17 NYL SCRUB W CLT PLT 2C 86000130 02241 BRUSH 17 MILD GRIT W CLT PLT 2D 86283710 02205 BRUSH 17 AGG GRIT W C P 2E 86000110 02206 BRUSH 17 POLYPRO W CLT PLT 2F 86283790 02239 BRUSH 20 NYL...

Page 18: ...FRAME GROUP SPT17 20X 86037300 01 24 07 1 4 5 8 9 11 13 14 15 16 17 18 19 20 21 22 23 25 26 MOTOR ASM SEE PG 5 5 21 3 24 7B 7A 2B 2A 5 3...

Page 19: ...HANDLE ADJUST 10 OPEN 11 86136360 57275 1 NUT M10X1 5 HEX NYLOK PLTD 12 OPEN 13 86274230 70135 2 SCR M8 X 30 HHMS 14 86136640 70262 2 SCR M8 X 20 HHMS PLTD 15 86276570 70691 2 SCR M6 X 25 HHMS BLK 16...

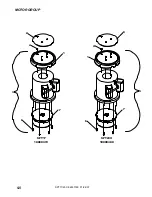
Page 20: ...MOTOR GROUP SPT17 20X 86037300 01 24 07 1 7 6 1 2 4 3 6 7 4 8 5 SPT20X 10090380 SPT17 10090370 5 5...

Page 21: ...70723 6 SCR M5 X 8 X 15MM SHCSM 7 86223030 62917 1 PLATE ADAPTER MP MOTOR 8 86220080 500792 1 LABEL MAIN SPIRIT DELUXE MOTOR COMPONENTS NOT SHOWN REF PART NO PRV NO QTY DESCRIPTION SERIAL NO FROM NOT...

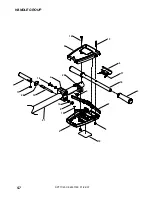
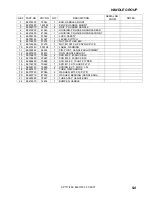
Page 22: ...HANDLE GROUP SPT17 20X 86037300 01 24 07 1 11 20 12 2 5 14 13 6 17 18 3 7 19 9 15 8 4 10 21 22 16 9 5 7...

Page 23: ...NUT M6X1 HEX BLK 9 86136360 57275 1 NUT M10X1 5 HEX NYLOK PLTD 10 86219740 500194 1 LABEL WARNING 11 86222560 66334 1 PIN PIVOT HANDLE ADJUSTMENT 12 86223550 67430 1 ROD HANDLE ADJUST 13 86136670 7068...

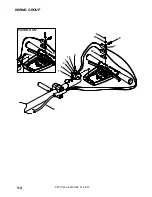
Page 24: ...WIRING GROUP SPT17 20X 86037300 01 24 07 5 9 8 4 6 2 11 6 11 3 1 10 9 7 5 12 PRIOR TO SN...

Page 25: ...47 SJT BLK 4 86247920 57069 1 NUT ORG WIRE 2 5 18G 2 14G 5 86136780 70801 2 SCR M3 5 X 40 PHTF TYPE B WAS 70688 6 86288450 70689 2 SCR M4 8 X 10 HHTF TYPE B 7 86007110 72123 2 SWITCH 25A SPST 125 250...

Page 26: ...SERIAL NO FROM NOTES 86225710 87202 WASHER BEARING HANDLE ADJ 86224740 73990 SPRING EXT 5 OD X 3 5L 86224750 73993 SPRING COMP 48 OD X 875L 86007110 72123 SWITCH 25A SPST 125 250V SNAP 86215130 14344...

Page 27: ...NOTES SPT17 20X 86037300 01 24 07 5 12...

Reviews: