background image

CUSTOMER SERVICE 1-888-707-1880


9


                          Dyaco Canada Inc. ©2013


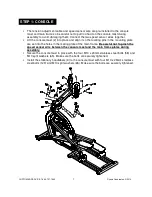
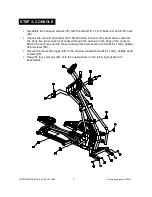
  Assemble the transport wheels (79) with the two 5/16” x 1-3/4” bolts (44) and 5/16” nuts 

(45) 

  Unpack the console and install the 3 AA batteries. Connect the speed sensor wire into 

the white two pin connector accessed through the opening in the back of the console. 
Mount the console onto the console mast plate and secure with four M5 x 10mm phillips 
head screws (59). 

  Secure the two bottle cages (98) to the console mast with four M5 x 10mm phillips head 

screws (59) 

  Snap the four end caps (84) onto the cup washers on the left & right pedal arm 

assemblies. 


STEP 3: CONSOLE


Summary of Contents for 16117680US

Page 1: ...OWNER S MANUAL MODEL NO 16117680US Assembly Operation Trouble Shooting Parts Warranty CAUTION You must read and understand this owner s manual before operating unit ...

Page 2: ...es any implied warranties including any implied warranties of merchantability of fitness for particular purpose are limited in duration to the first 24 months from date of purchase All other obligations or liabilities including liability for consequential damages are hereby excluded REPAIR PARTS AND SERVICE All of the parts for the e glide shown in figure can be ordered from Dyaco Canada Inc 6050 ...

Page 3: ...e part from the manufacturer 5 Fitness equipment must always be installed on a flat surface do not place the unit on a loose rug or uneven surface It is recommended to use an equipment mat to prevent the unit from moving while it is being used which could possibly scratch or damage the surface of your floor 6 No changes must be made which might compromise the safety of the equipment 7 It is recomm...

Page 4: ...ur e glide such as watching television reading etc These distractions may cause you to lose balance resulting in serious injury Always hold on to a handrail or hand bar while making control changes Things To Know Your new e glide is engineered and manufactured to the strictest industry standards and tolerances All E glide trainers no matter who the manufacturer have a multitude of moving linkages ...

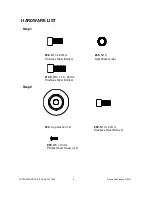
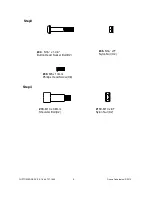
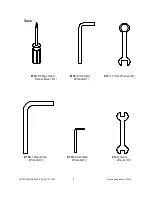
Page 5: ...o Canada Inc 2013 HARDWARE LIST Step1 Step2 65 M10 Split Washer x8 32 Cup washer x2 58 M10 x 20mm Stainless Steel Bolt x2 58 M10 x 20mm Stainless Steel Bolt x4 59 M5 x 10mm Phillips Head Screw x12 129 M10 x 1 5 25mm Stainless Steel Bolt x4 ...

Page 6: ...ICE 1 888 707 1880 5 Dyaco Canada Inc 2013 Step3 Step4 44 5 16 x 1 3 4 Button Head Socket Bolt X2 59 M5 x 10mm Phillips Head Screw X8 74 M10 x 38mm Shoulder Bolt X2 110 M10 x 8T Nylon Nut X2 45 5 16 x7T Nylon Nut X2 ...

Page 7: ...TOMER SERVICE 1 888 707 1880 6 Dyaco Canada Inc 2013 Tools 118 12mm Allen Wrench X1 119 5mm Allen Wrench X1 115 Phillips Head Screw Driver X1 120 13m m_ Wrench X1 117 17mm Wrench X1 116 8mm Allen Wrench X1 ...

Page 8: ...e locating pins in the mounting plate are set into the holes in the mating plate of the main frame Be careful not to pinch the speed sensor wire between the console mast and the main frame plates during assembly Secure the console mast in place with the four M10 x 20mm stainless steel bolts 58 and M10 split washers 65 Make sure the bolts are securely tightened Install the stationary handlebars 3 t...

Page 9: ...r as damage to the bearings could occur The swing arms have been previously installed at the factory and should fit properly although it is a snug fit Secure the swing arms in place with the M10 x 20mm stainless steel bolts 58 and cup washers 32 and tighten Snap the decorative caps 85 over the cup washers Connect the clear drain hoses 106 and install the foot pedals 86 left 87 right with twelve M5...

Page 10: ... speed sensor wire into the white two pin connector accessed through the opening in the back of the console Mount the console onto the console mast plate and secure with four M5 x 10mm phillips head screws 59 Secure the two bottle cages 98 to the console mast with four M5 x 10mm phillips head screws 59 Snap the four end caps 84 onto the cup washers on the left right pedal arm assemblies STEP 3 CON...

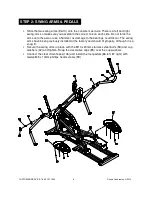
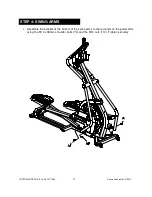
Page 11: ... 888 707 1880 10 Dyaco Canada Inc 2013 Assemble the bracket at the bottom of the swing arms to the rod ends on the pedal arms using the M10 x 38mm shoulder bolts 74 and the M10 nuts 110 Tighten securely STEP 4 SWING ARMS ...

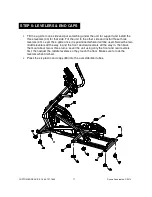
Page 12: ...Level the e glide once it is positioned where it will be used Screw the two middle levelers all the way in and the front and rear levelers all the way in then back them out about two or three turns Level the unit using only the front and rear levelers first then adjust the middle levelers so they touch the floor Make sure to lock the levelers when finished Press the six plastic end caps 83 into th...

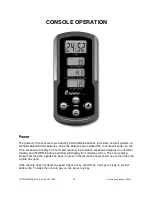
Page 13: ...l power on the Time window will display an hour meter reading the Distance window will display an odometer reading and the RPM Cadence window will display the software version The hour reading shows how long the e glide has been in use and the distance shows how many virtual miles the e glide has gone If the console does not detect a speed signal or key activations it will go to sleep to protect b...

Page 14: ...d to set workout time before the start key is pressed The down key will decrease the time setting by 1 minute for each key press The time will change more rapidly when the key is held down for 2 seconds The key is also used to switch the time reading to count down remaining time Start Stop Reset Starts and stops the program timer Performs a complete reset of the console when held for 3 seconds Dis...

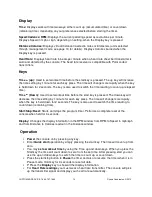
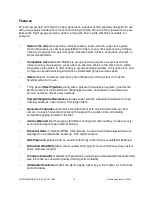
Page 15: ...n use Thirty pound Steel Flywheel along with a patented transmission system provides the perfect amount of inertia that both challenges the rider and assists in maintaining a smooth and even ride at every cadence Powerful Magnetic Resistance provides super smooth abundant resistance for high intensity workouts ride variation and larger riders Generous Footpads allow precise foot placement both for...

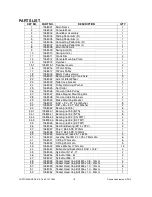
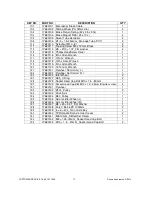
Page 16: ...Arm 1 28 1768028 Tension Cable Retainers 2 29 1768029 Brake Mounting Bracket 1 31 1768031 5 16 23 2T_Flat Washer 8 32 1768032 3 8 30 3 0T_Flat Washer 2 33 1768033 Bearing 6005 6 33 1 1768033 1 Bearing 6005 NTN 4 34 1 1768034 1 Bearing 6003 NTN 8 34 2 1768034 2 Bearing 6003 CN TMT 4 34 3 1768034 3 Bearing 6003 C3 TMT 4 35 1768035 Bearing 6203 C3 TMT 4 36 1768036 Rod End Bearing M14 x P2 0 2 37 1768...

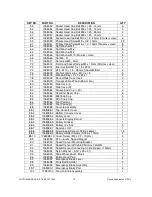
Page 17: ...ansportation Wheel 65mm dia 2 80 1768080 Side Case L 1 81 1768081 Side Case R 1 82 1768082 Square End Cap 50 2 83 1768083 Oval End Bevel Cap 6 84 1768084 M8 Snap Cap 4 85 1768085 M10 Snap Cap 2 86 1768086 Foot Pedal L 1 87 1768087 Foot Pedal R 1 88 1768088 Console Assembly 1 88 1 1768088 1 Top Console Cover 1 88 2 1768088 2 Bottom Console Cover 1 88 3 1768088 3 Battery cover 1 88 4 1768088 4 Conso...

Page 18: ... 1 119 17680119 5th L Allen Wrench 1 120 17680120 13 14m m_Wrench 1 121 17680121 Flywheel Set Collar L 1 122 17680122 Flywheel Set Collar R 1 124 17680124 Idler Wheel 2 127 17680127 Ø35_C Ring 2 128 17680128 Socket Head Cap Bolt M10 x 1 5 80mm 1 129 17680129 Socket Head Cap Bolt M10 x 1 5 25mm Stainless steel 4 131 17680131 Flywheel 1 132 17680132 Ø174_Pulley 2 133 17680133 Drive Axle 1 134 176801...

Page 19: ...CUSTOMER SERVICE 1 888 707 1880 18 Dyaco Canada Inc 2013 ...

Page 20: ...well such as vegetable oil or soy based lubrication products like Biokleen from Ecoviva o To enter the management mode press Start Stop and Up keys simultaneously for 3 seconds o The time window will show the software checksum for engineering use then tests the LCD display by sequencing all segments on o The next display shows total usage time in the time window software version In Speed window an...

Page 21: ... essential component of physical fitness It is the efficient functioning of the heart and lungs Aerobic Fitness The largest amount of oxygen that you can use per minute during exercise is called your maximum oxygen uptake MVo2 This is often referred to as your aerobic capacity The effort that you can exert over a prolonged period of time is limited by your ability to deliver oxygen to the working ...

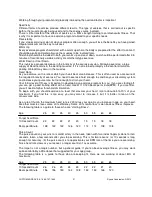
Page 22: ...our pulse rate but not enough to strain your heart Your initial level of fitness is important in developing an exercise program for you If you are starting off you can get a good training effect with a heart rate of 110 120 beats per minute BPM If you are fitter you will need a higher threshold of stimulation To begin with you should exercise at a level that elevates your heart rate to about 65 to...

Page 23: ...will enjoy your program more and feel better for it Muscle Soreness For the first week or so this may be the only indication you have that you are on an exercise program This of course does depend on your overall fitness level A confirmation that you are on the correct program is a very slight soreness in most major muscle groups This is quite normal and will disappear in a matter of days If you e...

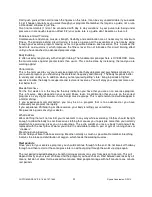
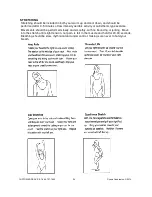
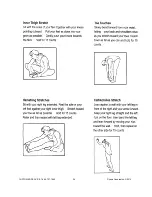
Page 24: ...ed after 3 5 minutes of low intensity aerobic activity or callisthenic type exercise Movements should be performed slowly and smoothly with no bouncing or jerking Move into the stretch until slight tension not pain is felt in the muscle and hold for 20 30 seconds Breathing should be slow rhythmical and under control making sure never to hold your breath ...

Page 25: ...CUSTOMER SERVICE 1 888 707 1880 24 Dyaco Canada Inc 2013 ...

Reviews: