25
• The left side of the screen will display the number of data
sets with detail information for each set.
• The first data set will appear in the graph on the right side. • Click any data set to graph that set.
Page 1: ...1 4 Channel Datalogging Thermometer 800024 Instruction Manual...
Page 2: ...UCTION 3 FEATURES 4 MATERIALS SUPPLIED 4 FRONT PANEL DESCRIPTION 5 LCD DISPLAY 6 SET UP 7 MEASUREMENT PROCEDURES 12 SOFTWARE INSTALLATION 16 DATALOGGING 19 POWER SUPPLY 26 CARE AND MAINTENANCE 26 SPEC...
Page 3: ...ermocouple probes simultaneously on a large backlit LCD Up to 16 000 data records for each channel can be stored in the meter and saved graphed and processed on a computer through the included USB int...
Page 4: ...ors T1 T2 delta mode 16 000 data points stored per channel Direct upload of data to EXCEL text or graph files Customizable data graphing Adjustable Automatic shutoff Backlight Instant Recall Function...
Page 5: ...rd Button 2 LCD Display 9 Recall Button 3 Power Button 10 Setup Button 4 Backlight Button 11 Memory Button 5 Maximum Minimum Average Button 12 USB Interface Power Supply 6 Data Hold Button 13 Tilt Sta...
Page 6: ...FULL Memory Full Indicator MEM88 Save Reading In Memory RECALL88 Recall stored reading TYPE KJET Thermocouple type 8888 Temperature reading T1 T2 T3 T4 Temperature channel T1 T2 Delta mode ALARM Alar...
Page 7: ...OWER to turn the meter on 2 Press SETUP to enter Setup Mode 3 Press MEM to cycle through the setup options Note Press SETUP to exit Setup Mode The meter will return to Normal Mode Thermocouple Type 1...
Page 8: ...to adjust the minutes 3 Press or To move from seconds to minutes 4 Press or to adjust the seconds 5 Press MEM to save the selection Offset Values Thermometer readings can be adjusted to compensate for...
Page 9: ...ess MEM to set the alarm thresholds 3 The first digit of the high alarm threshold flashes Press or to increase or decrease the value 4 Press to select the next digit 5 Press or to increase or decrease...
Page 10: ...on the display Press or to toggle between T1 T2 Delta Mode off and on Automatic Shutoff 1 Press or to disable automatic shutoff or to select 10 or 30 minutes or 1 2 4 or 8 hours before automatic shut...
Page 11: ...to select the month Press if needed to return to a previous selection 3 Press or to set the month 4 Press to select the day 5 Press or to set the day 6 Press to select the hour 7 Press or to set the h...
Page 12: ...on to illuminate the LCD screen 2 The backlight will shut off automatically after 30 seconds or press the backlight button to turn it off sooner Select Temperature Units Press C F to toggle between Ce...
Page 13: ...minimum and average values will continue to be updated 1 Press MIN MAX AVG to enter Maximum Minimum Mode and record maximum minimum and average values MAX values are continually updated and displayed...
Page 14: ...if battery power is extremely low Note REC FULL stays on the display until the data is cleared Computer can still access the data even though REC FULL is displayed Clearing the Recorded Data 1 Press a...
Page 15: ...he time of the reading for 2 seconds followed by the saved data 3 Press RECALL to return to Normal Mode Clearing Readings in Memory 1 Press and hold POWER for 3 seconds to turn the meter off 2 Press a...
Page 16: ...eginning the installation in a computer which does not possess the minimum requirements can lead to either an unsuccessful installation or failure of the program to run after installing it 2 Since pro...
Page 17: ...there is none open the Explorer and navigate to the optical drive Double click on either the Autorun or Setup file 7 Once the wizard is running simply follow the prompts until the installation proces...
Page 18: ...different steps 1 Click on the Start Menu 2 Select Control Panel 3 Launch the Add Remove Programs 4 Highlight SE800024 5 Click on Add Remove 6 Click Next 7 Click Next 8 Click Finish OR 1 Click on the...
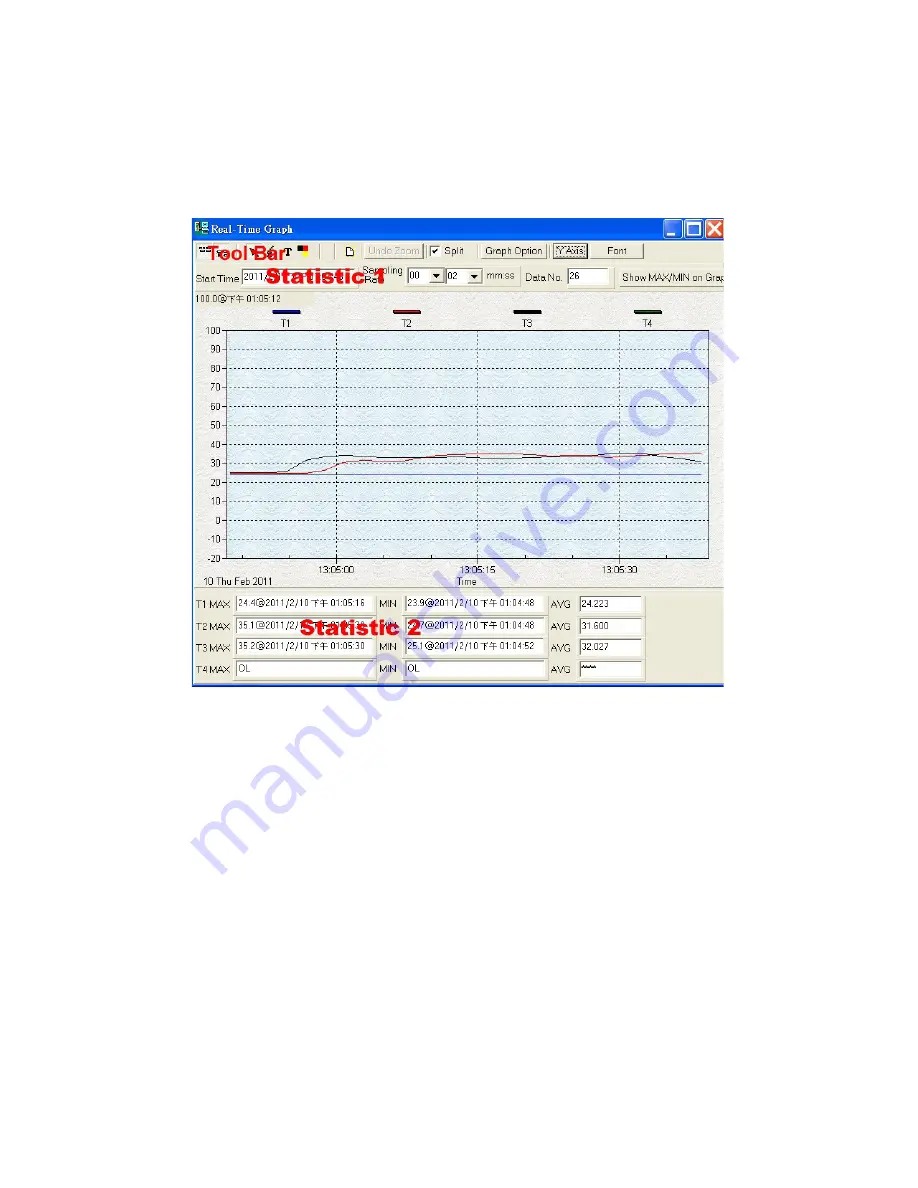
Page 19: ...ge of the meter displays along with a real time graph 5 The readings on the meter should display on the on screen panel If No Connection displays re connect the cable 6 Click Real Time to begin record...
Page 20: ...he graph to mark it with an X This option is not available when Split is selected Change cursor to an I Click anywhere on the graph to add an annotation This option is not available when Split is sele...
Page 21: ...21 Viewing the Graph To zoom in Press the left mouse button and drag the cursor to select the new area To zoom out Click Undo Zoom Combine the four channel Separate the four channel...
Page 22: ...ame style and size for annotations 3 Click Y Axis to customize the maximum and minimum values on the graph Saving Real Time Data 1 Click the graph window you want to save The selected graph window wil...
Page 23: ...23 4 Click Save Printing the Graph 1 Click File and select Print or simply click the printer icon 2 Select the destination printer and click OK...
Page 24: ...24 Downloading Recorded Data Select Data Logger from the main menu bar or click the datalogger icon under the main menu An indicator shows the loading progress...
Page 25: ...The left side of the screen will display the number of data sets with detail information for each set The first data set will appear in the graph on the right side Click any data set to graph that se...
Page 26: ...over and reinstall the screw Replace the batteries when the low battery icon blinks on the LCD Note Before replacing the batteries turn the meter off and disconnect the temperature probes CARE AND MAI...
Page 27: ...148 F 0 4 of reading 0 7 C 0 4 of reading 1 4 F T 200 to 400 C 328 to 752 F Temperature Coefficient 0 01 of reading 0 05 C per C 18 C or 28 C Sample Rate 0 5 seconds Operating RH 10 to 90 RH no conde...
Page 28: ...oes not cover probes batteries battery leakage or damage resulting from accident tampering misuse or abuse of the product Opening the meter to expose its electronics will break the waterproof seal and...