background image

Syntrack


 Synthesizer

E

Velocity   target:   0=none,   1=volume,   2=cutoff,   3=distortion.   Please   note:   The 
corresponding controllers and MIDI Controllers will be switched off. Example: if Velocity 
target is set to 1, the volume is controllable by the velocity value of the Notes only.

F

Keyfollow: 0=off, 1=on

T

Retrigger: 0=off, 1=on

Storage of program number and volume level

When Setup mode is left via the STORE button, the current program number and volume level 
are stored. These values will be activated the next time the instrument is switched on.

1.5.1.2 Wave Select mode

The current wave number of the program is displayed in flashing mode and can now be altered 
via UP or DOWN. All wave forms are presented further below. After reaching wave number 99, the 
expansion ROM is accessed. This is indicated by the point on the left ("EXP").

1.5.1.3 Standard mode

Changing the current program number

Press the UP or DOWN button, or select the program of your choice on your sequencer.

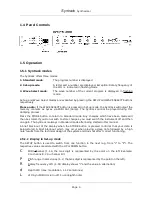
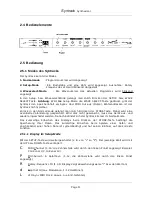
1.5.2 Meaning of the LEDs above the controllers

These  light-emitting diodes  indicate that the controller below is  not  currently  active, i.e. it is 
currently being remoted either via the MIDI controller or by the program memory. As soon as a 
controller is turned it becomes active, however, as a result of which the LED goes out and the 
change is immediately audible.

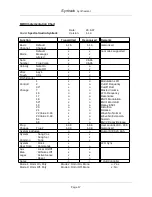
1.5.3 Composition of a program

A program comprises:

- wave number
- cut-off value
- resonance value
- ENV modulation value
- decay value, ENV 1
- release/decay value, ENV 2
- distortion value
- ENV 2 switch position (release/decay)

The volume value is global and does not belong to a specific program. This value is stored upon 
leaving Set-up mode, as are the LFO and other parameters specified under Set-up.

1.5.4 Creating a user program

1. Use the UP or DOWN button to select the program which you wish to overwrite with a new 
program. The program number must be between 30 and 99.

2. Seek the desired wave form with WAVE SELECT. On exiting with STORE, this wave form will be 
stored   under   the   selected   program   number.   As   the   differences   between   the   waves   apply 
primarily in the overtone range, it is recommendable to turn the cut-off controller to maximum for 
this purpose.

Page 4

Summary of Contents for SYNTRACK

Page 1: ...Owner s Manual Bedienungsanleitung...

Page 2: ...rogramme 4 1 5 4 Creating a user programme 4 1 5 5 Explanations on controllers Technical data 5 1 5 6 Using the external audio input 5 1 6 Initial start up 5 1 7 MIDI control 5 1 7 1 Dump 6 1 8 Format...

Page 3: ...ual has been produced with the greatest of care Spectral Audio is nevertheless unable to accept any responsibility for errors Reproduction is permissible only subject to the manufacturer s consent 1 2...

Page 4: ...not wish to store changes you must switch the instrument off and then on again The Syntrack is always in Standard mode after being started in this manner A brief black out of the display when the STO...

Page 5: ...ove the controllers These light emitting diodes indicate that the controller below is not currently active i e it is currently being remoted either via the MIDI controller or by the program memory As...

Page 6: ...eceive a note command so as to enable it to drive the VCA This means that a connection is required at MIDI In even if the Syntrack is only being used as a filter 1 6 Initial start up Use a MIDI cable...

Page 7: ...ll then use the lower nibble 25 mod 16 9 as receiving channel For reseting back to factory settings the Syntrack has to receive original sysex data You may use our factory sysex data from our homepage...

Page 8: ...is not set correctly 3 The GATE indicator does work but there is no sound or very distorted sound You have probably connected a DC power adapter and not an AC alternating current Make sure you use an...

Page 9: ...ves to 200 insert a new EPROM To insert the second wave EPROM turn off the unit Open the cover and insert the new EPROM next to the existing one Be sure that the mark on the EPROM looks to the same di...

Page 10: ...leistungsstarken Cascade Filter Klang erweitert mit einem Wavetable Oszillator Der Wavetable Oszillator bietet im Gegensatz zu den sonst blichen Analogen Oszillatoren bedeutend mehr Klangm glichkeite...

Page 11: ...anderen W rmequelle Setzten Sie es keinen Temperaturen ber 50 Grad Celsius oder unter 10 Grad Celsius aus Die Betriebstemperatur muss min 10 Grad Celsius betragen Transportieren Sie das Ger t vorsicht...

Page 12: ...gespeichert Wird dies nicht gew nscht muss das Ger t aus und wieder eingeschaltet werden Danach befindet sich der Syntrack immer im Normalmode Das kurzzeitige Erl schen des Displays beim Dr cken der S...

Page 13: ...ung der Leuchtdioden oberhalb der Regler Diese Leuchtdioden signalisieren dass der darunterliegende Regler im Moment nicht g ltig ist d h entweder via MIDI Controller gesteuert oder vom Programmspeich...

Page 14: ...ht gew nscht ist muss die Wavenummer mit WAVESELECT auf 99 gebracht werden keine Welle Im Auslieferungszustand kann ebenso das Programm 99 angew hlt werden es enth lt die Wavenummer 99 Damit das exter...

Page 15: ...in den Speicher des Syntracks geschrieben werden ist hierbei Vorsicht geboten Es ist z B m glich durch abge nderte Daten den MIDI Kanal auf 25 einzustellen Das Ger t verwendet in diesem Fall das tiefe...

Page 16: ...udio Verbindung zum Mixer defekt VOLUME ist Null Mixer nicht korrekt eingestellt 3 GATE Indikator funktioniert aber es kommt kein Sound oder sehr verzerrt Wahrscheinlich verwenden sie ein DC Netzger t...

Page 17: ...EPROM einzusetzen schalten sie das Ger t aus ffnen den Deckel und setzen das zweite EPROM neben das existierende in den Sockel Stellen sie sicher dass die Orientierungsmarke in die gleicher Richtung z...

Page 18: ...x o x o o o o x o o o x x x o o o o o o o o o o o o o o o o Modulation LFO Cutoff Frequency Cutoff LSB Master Volume LFO Frequency Resonance ENV1 Modulation ENV1 Mod LSB Decay ENV1 Distortion Release...

Reviews: