Speco ZIPKIT User Manual Download Page 70

70 

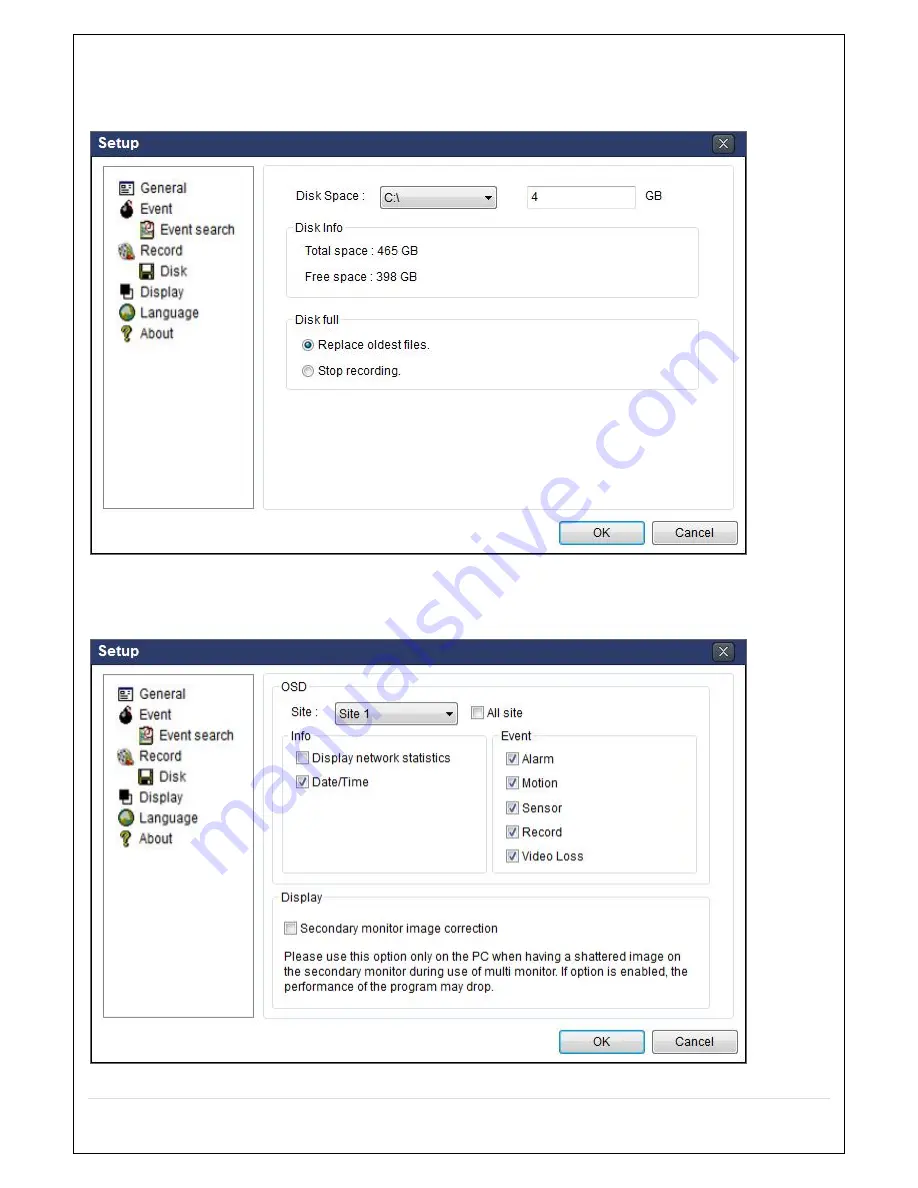
Record Local Storage Setup: 

You can select the local disk to  record and the amount of disk space you 

want  to  allow  the  program  to  use  for  recording.  You  can  also  select  the  option  to  overwrite  data  or  stop 

recording when the maximum amount of disk space is full. 


7-6-4.  Display 

You can select the OSD (On Screen Display) to be displayed. 


Summary of Contents for ZIPKIT

Page 1: ...User Guide Ver 1 2 Models ZIPKIT4D1 Network Video Recorder and IP Camera About This User s Guide Before operating the unit please read this user s guide thoroughly and retain it for future reference...

Page 2: ...or explosion Replace only with the same or equivalent type battery recommended by the manufacture Discard used batteries according to manufacturer s instructions This symbol indicates the presence of...

Page 3: ...ly qualified and experienced personnel should perform installation and servicing Turn off the power of the ZS when connecting Cameras Audio or Sensor Cables The manufacturer is not responsible for any...

Page 4: ...d as specified below Desktop NxZS Bundle IP Camera PoE 4 EA Remote Control Battery 1 5V AAA x 2 EA Quick Setup Guide User Guide Mouse for NxZS Software Manual CD Power Adaptor DC12V 5A for NxZS Power...

Page 5: ...a 10 100 Base T 10 100 Base T Protocols TCP IP UDP DHCP HTTP NTP SMTP RTP RTSP Recording Compression H 264 Baseline Main High Profile Resolution Frame Rate D1 120fps 240fps 1280x720 120fps 240fps 1920...

Page 6: ...e Firefox Safari MAC TBD PC Client Single Multi Client and CMS 64 channels Remote Setup and Upgrade Yes Power Power Supply Voltage DC12V 5A DC48V 2A Temperature Operating Temperature 41 F 104 F 5 C 40...

Page 7: ...etup Main Live Screen 24 4 1 Setup IP CAMERA 25 4 1 1 SCAN Menu 27 4 2 Setup SYSTEM 28 4 3 Setup RECORD Mode 32 4 4 Setup DEVICE Mode 34 4 4 1 Digital Deterrent 36 4 5 Setup DISPLAY Mode 37 4 6 Setup...

Page 8: ...1 Overview 62 7 2 PC Requirements 62 7 3 Installation of the Program 63 7 4 Live Window 64 7 4 1 Main User Interface 64 7 4 2 Control Buttons 64 7 5 Search and Playback Window 65 7 5 1 Main User Inter...

Page 9: ...Setup 91 7 9 1 Live View 91 7 9 2 Video 92 7 9 3 Security 92 7 9 4 Event 93 7 9 5 Network 93 7 9 6 System 94 8 Network Access Using SpecoTech Web Viewer 96 9 Network Access Using the Smart Phone Viewe...

Page 10: ...word to secure installation authorization Network software supports 10 100Mbps USB 2 0 port for video clip exporting and easy firmware upgrade via USB Flash Drive NOTE Under federal law The Fourth Ame...

Page 11: ...ocess 2 1 Initial Boot up and Basic Time Setup 1 During the first boot up the following logo will be displayed 2 After the logo select the language and set date and time as specified below EZ Setup Pa...

Page 12: ...To enable Daylight Saving feature NTP synchronization take the following steps 1 Enter the SETUP mode The default Username is ADMIN and Password is 1111 2 Go to SETUP SYSTEM DATE TIME SETUP 3 Select O...

Page 13: ...ka GMT 9 GMT 8 AK Alaska Aleutian Islands GMT 10 NA AZ Arizona GMT 7 NA AZ Arizona Navajo GMT 7 GMT 6 AR Arkansas GMT 6 GMT 5 CA California GMT 8 GMT 7 CO Colorado GMT 7 GMT 6 CT Connecticut GMT 5 GMT...

Page 14: ...GMT 6 GMT 5 MT Montana GMT 7 GMT 6 NE Nebraska GMT 6 GMT 5 NE Nebraska W GMT 7 GMT 6 NV Nevada GMT 8 GMT 7 NH New Hampshire GMT 5 GMT 4 NJ New Jersey GMT 5 GMT 4 NM New Mexico GMT 7 GMT 6 NY New York...

Page 15: ...4 VA Virginia GMT 5 GMT 4 WA Washington GMT 8 GMT 7 WV West Virginia GMT 5 GMT 4 WI Wisconsin GMT 6 GMT 5 WY Wyoming GMT 7 GMT 6 NOTE If you want the unit to automatically synchronize the local time t...

Page 16: ...Z Camera Setup is displayed Click NEXT to proceed Set up the Date Time settings and click NEXT to get to the camera setup Configure individual cameras in the EZ Camera Setup Select the Channel to conf...

Page 17: ...onfiguration STATIC and then click TEST Button It will automatically setup the network for the system Setup DDNS setting DDNS Dynamic Domain Name System allows a DNS name to be constantly synchronized...

Page 18: ...O if the ZS is not using an internet connection Select Auto Configuration DHCP or Manual Configuration STATIC and then click TEST button when ready Input the Network Settings if Manual Configuration S...

Page 19: ...he ZS Series Setup Items Default Description Network Type DHCP The IP Camera must act as a DHCP client for the Plug and Play Encoding Type CBR The CBR is recommended because of the internal buffer str...

Page 20: ...orts to connect the IP Camera the ZS will not be able to find and connect to the camera The LAN Port can be connected to a router but not the PoE Ports 2 6 IP Camera SETUP through SpecoTech Web Viewer...

Page 21: ...rofile Video Stream is used for both Recording and Live Display High Quality Main Profile Video Stream can be viewed through the network when selected Normal Secondary Quality Video Stream is used by...

Page 22: ...tors for Audio Input 1 Connector for Audio Output CVBS OUT MAIN Composite Video Output HDMI OUT HDMI output port Connector to the HDMI Monitor 1280x720 and 1920x1080 VGA OUT Connector for VGA Monitor...

Page 23: ...ay or to pause the recording in playback mode REW Plays video backwards rewinds additional selection increases backwards playback speed ESC During Setup Returns to the previous menu screen During Play...

Page 24: ...d select setup from the submenu or press the setup button on the remote control Table 4 0 1 Live Screen and Quick Operation Window When the ZS prompts the LOG IN window enter the PASSWORD using the vi...

Page 25: ...1 1 IP Camera mode setup screen Table 4 1 1 Menu items in IP CAMERA mode setup Item Description CHANNEL To manually connect each camera click on the to get this window Under the column labeled Type Se...

Page 26: ...box will be pop up Enter ID and PASSWORD of IP Camera PROTOCOL Select the Brand of the Camera SCAN Automatic IP Camera Search the network for IP Camera IP Enter the IP Address of the desired Camera PO...

Page 27: ...gure 4 1 3 Search IP Camera Screen Select the specific manufacturer of IP Camera and then on click the scan button Select the camera on the list and then click the register button After the registrati...

Page 28: ...w the system information Software Version Storage Size IP Address MAC Address and DDNS Status LANGUAGE Select the display language using the mouse or the remote control Once a language is selected the...

Page 29: ...k Time Protocol which synchronizes the time of the computer systems over variable latency data networks PRIMARY SNTP SERVER Input the address of the primary NTP time server SECONDARY SNTP SERVER Input...

Page 30: ...propriate mail server ID PASSWORD Enter the appropriate mail server PASSWORD MAIL TO Enter the appropriate email address to enable sending e mail reports using a virtual keyboard MAIL FROM To set the...

Page 31: ...he camera detects sensor MOTION DETECTION Enable Email Notification when the camera detects motion NO CONNECTION Enable Email Beep and Alarm output Notification when the camera signal is lost HDD TEMP...

Page 32: ...following settings using the mouse or the remote control To change the values of all channels take the following steps Select the button to change the values of all channels RECORDING MODE Assign the...

Page 33: ...ct CHANNEL select NONE CONTINUOUS MOTION or SENSOR Highlight area To copy a schedule to a different channel select the channel from the COPY SCHEDULE menu Figure 4 3 2 Schedule Recording Setup Screen...

Page 34: ...e Alarm out is available Set alarm dwell time from 5 to 60 seconds or infinite DIGITAL DETERRENT Setup schedule and audio recordings for Digital Deterrent CONTROLLER Set the controller speed type and...

Page 35: ...35 The options are from 0 to 99 SENSOR Select the type of each sensor Option is Off Normal Open or Normal Close IEE 802 3af POE STATUS POE Power Of Ethernet Status Monitoring Menu...

Page 36: ...able 4 4 2 Item for Digital Deterrent Setup Screen Item Description IMPORT FROM USB Import up to 8 sound files from USB EXPORT TO USB Export the sound file to USB RECORD Select a channel and set up th...

Page 37: ...ouse or the remote control To return to the previous setup menu screen press the ESC button Figure 4 5 1 DISPLAY Setup Screen Table 4 5 1 Menu Items in DISPLAY Setup Screen Item Description OSD Enable...

Page 38: ...Setup NETWORK Mode Select the NETWORK tab Then the network menu is displayed as pictured below Navigate through the menu items or change the settings using the mouse or the remote control Figure 4 6...

Page 39: ...ay and DNS are manually assigned by the user IP ADDRESS The fixed IP address of the ZS unit SUBNET MASK The subnet mask for the LAN GATEWAY The IP address of the Gateway DNS PRIMARY The primary addres...

Page 40: ...only within the same LAN the TCP port number does not need to be changed Network access beyond a router To access ZS beyond a router firewall you must open the proper TCP ports for live playback stre...

Page 41: ...ITY SETUP Only the Admin will have access to the menu PASSWORD CHECK Select the Checkbox to enable the functions or leave the Checkbox blank to disable the functions SETUP Enable Disable access to Set...

Page 42: ...USER3 Select USER PASSWORD using the mouse or the remote control Select username and enter the current password And enter a new password enter the same password again to confirm and select OK Then th...

Page 43: ...ontinue recording and overwrite the oldest existing recorded data once the hard drive is full When disabled recording will stop once the hard drive is full DISK FORMAT Once clicked the user will have...

Page 44: ...44 RECORDING LIMIT Enable disable a recording limit RECORDING LIMIT DAYS Set the recording limit days 1 90 days If the RECORDING LIMIT DAYS are set to 1 the data will be overwritten after 24 hours...

Page 45: ...the configuration of the ZS to another ZS using the USB Flash drive Plug in the USB flash drive on the front panel and press the button to start the import process LOAD DEFAULT Select this option to r...

Page 46: ...201 3 Plug in the USB flash drive on the rear panel 4 Navigate to CONFIG menu of SETUP 5 Select SOFTWARE UPGRADE 6 Follow the procedure from Figure 4 9 2 to Figure 4 9 4 Figure 4 9 2 Figure 4 9 3 Figu...

Page 47: ...tor Icons in Live Viewing Screen Icon Description Indicates the ZS is locked Note to unlock right click on the live view screen and click on Unlock Indicates audio is muted on all channels Indicates t...

Page 48: ...disk from 0 99 Indicates that HDD is recycled Continuous recording in progress Manual recording in progress To set the Manual recording mode press the Record button on the front panel Motion alarm rec...

Page 49: ...on to start EZ Setup Wizard CONNECT Select this option to disconnect connect from IP Camera AUDIO MUTE Select this option to mute audio on all channels CAMERA PTZ Pop up the PTZ user interface ENABLE...

Page 50: ...50 EXPORT HELP Displays window with instructions for exporting video SYSTEM LOCK Locks the ZS from unauthorized user access SYSTEM SHUTDOWN Select this option to shutdown system...

Page 51: ...urn to the previous menu Press the PTZ button to close the OSD menu AUTOSCAN Press the right key to start auto scan Press the left key to stop auto scan PRESET Select PRESET and then press the left ke...

Page 52: ...ouse and drag to make rectangular shape 5 3 SEARCH Screen To enter the search screen menu select SEARCH menu on the screen using the mouse or press SEARCH icon on live screen Figure 5 3 1 Search Scree...

Page 53: ...nute Thumbnail Screen Figure 5 3 6 Play Mode Screen 1 When the EZSearch menu is selected the user can see a calendar which displays recorded dates with highlights Select a specific date on a calendar...

Page 54: ...ove red box Press the PLAY button after selecting the specific time Press the PREV to return to the SEARCH window 5 3 3 Event Search The Event Search window is used to find stored video Figure 5 3 9 E...

Page 55: ...fic instance by setting the date and time in the GO TO SPECIFIC TIME menu Use the mouse or the remote control to change the date and time value and press the PLAY button after setting If there is no v...

Page 56: ...the log data will be displayed Press the SAVE button to save the data and then the data is saved as a text file format 5 4 Play Mode During playback of a recorded event the mode changes from SEARCH t...

Page 57: ...k position moves 60 seconds backward Press to play or pause recorded video Jump Step forward Playback position moves 60 seconds forward 2x 4x 8x 16x 32x speeds at 2x2 screen display mode 2x 4x 8x 16x...

Page 58: ...h the backup function 1 When you press BACKUP button on the selected channel or all channels the ZS will ask whether to archive a Still Image a NSF or AVI and select the proper media type 2 Select USB...

Page 59: ...re Video can be easily archived onto the USB flash drive or a hard drive In playback mode press the EZCOPY button to launch the backup function 1 Press EZCOPY button on the selected channel or all cha...

Page 60: ...d navigate through the days using the mouse or the remote control 2 Once you have selected the date press the NEXT button to open the list of stored data 3 Use the mouse or the remote control to scrol...

Page 61: ...with the video 2 Otherwise the video and time stamp over video can t be properly played back and displayed on Window Media Player Timestamp On AVI The subtitle is embedded to the video clip file The...

Page 62: ...k 7 2 PC Requirements Minimum PC Requirements Recommended PC Requirements Before installing the program check the PC specifications The ZS remote software may not perform correctly if the PC does not...

Page 63: ...d double click SpecoTech Multi Client XXXX exe 1 Select a destination folder and click Next 2 Select the program folder and click Next 4 The installation status screen is displayed 5 After the install...

Page 64: ...k window to search and play videos that are recorded in the remote ZS SITE MANAGEMENT THUMBNAIL REFRESH Click this icon to refresh and renew thumbnail image of the connected sites SITE ADDITION Click...

Page 65: ...UDIO Use the volume control bar to set the audio level MIC Use the microphone volume control bar to set the micro phone level PRESET TOUR SCAN MENU User can control PRESET TOUR SCAN MENU CHANNEL SPLIT...

Page 66: ...fic site CONNECT Click this icon to connect the selected site sites DISCONNECT Click this icon to disconnect the selected site sites SETUP Click this icon to setup configuration of SpecoTech Multi Cli...

Page 67: ...le Channel Viewing 7 6 Setup of SpecoTech Multi Client Click the setup icon to setup the configuration of SpecoTech Multi Client software The SETUP window is displayed as below 7 6 1 General Security...

Page 68: ...68 7 6 2 Event Event log can be archived and searched Event Log Specify the location to save event logs and select event to archive...

Page 69: ...e 7 6 3 Record Record Setup You can set the recording conditions as the following Always Event or Auto record And you can also select target ZIP and channel channels When you set the recording conditi...

Page 70: ...rd and the amount of disk space you want to allow the program to use for recording You can also select the option to overwrite data or stop recording when the maximum amount of disk space is full 7 6...

Page 71: ...71 7 6 5 Language English French and Spanish is selectable 7 6 6 About About provides network client version information...

Page 72: ...ing window is displayed as below Select the REMOTE SETUP Then the setup window is displayed The specified menu screen is displayed on the upper left of the screen Enter the password of the ZS when pro...

Page 73: ...amera o Protocol Select the Brand of the IP Camera o IP Enter the IP Address of the desired Camera o Port Enter the Camera stream Port Number default 554 o Web Port Enter the Camera Web Port Number de...

Page 74: ...ble remote access through network client software NTP SETUP Sets whether to synchronize the time using NTP server or not o Primary SNTP Server Input the NTP primary server address o Secondary SNTP Ser...

Page 75: ...NOFICIATION ON or OFF o HEALTH CHECK Allows the user to set MAIL STATUS periodically DAILY or WEELY or MONTHLY o HDD TEMPERATURE o HDD BAD SECTOR o HDD ALMOST FULL o HEALTH CHECK RESTART SHUTDOWN PAN...

Page 76: ...the specified channel only Recording Setup o RECORDING MODE CONTINUOUS MOTION SENSOR SCHEDULE o PRE RECORD Sets whether to perform or not pre recording o POST EVENT RECORD Sets the duration of the eve...

Page 77: ...gital deterrent can be set and a sound file can be uploaded to the ZS To set up schedule select CHANNEL select SOUND TYPE select Area CONTROLLER Set the controller speed type and ID CHANNEL Select the...

Page 78: ...not date and time as well as channel number on the screen OSD CONTRAST Adjust the character contrast on the screen MAIN MONITOR SEQUENCE Setting for automatically switching the displayed video SEQUENC...

Page 79: ...lly o SUMBIT UPDATE Select ON to submit the settings o ezDDNS Enable ezDDNS to register the host name automatically NETWORK PORT When connecting multiple ZSs to the network set a unique port number NE...

Page 80: ...n accessed USER NAME SETUP Select which Username to change o NEW USER NAME Input the new username PASSWORD SETUP Select Username to change Password o CHANGE Select whether to KEEP or CHANGE the curren...

Page 81: ...by overwriting when the hard disk becomes full DISK INFO Hard drive information RECORD LIMIT Sets whether to limit or not the recording data storage period 7 7 9 Remote Upgrade Shows the current Firm...

Page 82: ...ddress Input IP address Public IP address of a router that ZS is connected or Domain name o Port Number Default Port Number is 5445 o ID Input ID of ZS Default ID is admin o Password Input network pas...

Page 83: ...s 1 Select the site sites to modify from the directory window 2 Click NET FINDER button And then the following window will be displayed as below 3 Click MODIFY button and then the modified information...

Page 84: ...sites to connect from the directory window 2 Click CONNECT button and then site sites displays display as connected 7 8 2 2 Disconnect 1 Select site sites to disconnect from the directory window 2 Cli...

Page 85: ...Click CAPTURE button And then the Capture window will be displayed as below 3 Set Save Path File Name and File Format And then click OK button 4 Still image is saved as set in Capture window 7 8 4 Rec...

Page 86: ...isk and set the values 4 Click RECORD ON button And the color of button is changed 5 Live video data is recorded as set in Record and Disk setup These video data can be searched and play backed with L...

Page 87: ...ct site sites to connect from the directory window 3 Click CONNECT button And then Green bar displays on Search calendar and timeline scale window 6 Move the marker on the timeline scale to where ther...

Page 88: ...er the Live Window 2 Select the site to connect from the directory window 3 Click Connect And then Green bar displays on Search calendar and timeline scale window 4 Move the marker on the timeline sca...

Page 89: ...line scale to select the beginning point of the backup 4 Click EZCOPY END button on the timeline scale to select the ending point of the backup Then the selected starting point and the ending point on...

Page 90: ...90 7 AVI video data is recorded as set in AVI Backup window AVI format video can be played back by using Window Media Player or other media player that is compatible with AVI format video...

Page 91: ...Select the IP CAMERA SETUP Then the setup window is displayed The specified menu screen is displayed on the upper left of the screen Enter the password of the IP Camera when prompted NOTE The default...

Page 92: ...are different depending on input formats Framerate Determine the maximum number of frames of video images to compress The frame rate of actually transmitted video can be affected by the network bandw...

Page 93: ...ion to trigger an event for motion detection The value determines the sensitivity of the motion detection within a block the smaller the more sensitive 7 9 5 Network Network Type Select the Network Ty...

Page 94: ...start Pressing Reboot Server button will cause the system to reboot Do not press the Reboot button unless the server needs a reboot Factory Default Set all settings to the factory default values Syste...

Page 95: ...are file from PC Press Firmware Upgrade button to start to upgrade Messages for showing status downloading upgrading will be displayed The camera will reboot automatically after completing upgrade Do...

Page 96: ...for Internet Explorer 1 Check the IP address of the ZS from SETUP SYSTEM DESCRIPTION IP ADDRESS or 2 Input the IP address or Domain name address that you pre registered 3 Click this bar Then the dial...

Page 97: ...nput IP address Public IP address of a router that ZS is connected or Domain name Port Number Default Port Number is 5445 ID Input ID of ZS Default ID is admin Password Input network password of ZS De...

Page 98: ...default 5445 ID default admin and Password default 1111 Then click Save button Note Network Port and Web Port must be forwarded before adding a new site 3 Select a registered device and select LIVE Th...

Page 99: ...6 Drag and drop channels Touch and drag one channel to the other channel to swap the channel location To swap the channel drag a channel to another channel 7 Digital Zoom In Out Double tap on the desi...

Page 100: ...sing the PTZ icon on the screen control PTZF control 9 1 3 Playback 1 Select Mode as Playback and click CONNECT button Then select Date Time and click PLAY button 2 The app will display the selected c...

Page 101: ...App 9 2 1 Live 1 Open the installed Speco Player App and select the Live Preview Then click the menu button of the phone to add a remote device 2 Select the registered device and select LIVE VIEW and...

Page 102: ...l display to 4 channels split display 9 2 2 Playback 1 Select the registered device and select PLAYBACK and select up to 4 channels to search Then click START button 2 The app will display the selecte...

Page 103: ...screen then the channel name will be highlighted in Yellow Using the PTZ menu icons on the screen control PTZF APPENDIX Network Connection LAN 1 Install the network client software from the supplied...

Page 104: ...ress Port Number and Password on the connect window Site Name Input a name that properly describes a site IP Address Input IP address Port Number Default Port Number is 5445 ID Input ID of ZS Default...

Page 105: ...105 5 Select a site by checking the box and Press button to connect to the site...

Page 106: ...in name using the virtual keyboard and click ENTER button 3 When a manual host name is completed Go to SETUP NETWORK DDNS SUBMIT UPDATE and select ON to submit the settings on the SPECO DDNS 4 When DD...

Page 107: ...DDNS STATUS 7 Check the NETWORK PORT Default 5445 WEB PORT Default 80 and the IP Address of the ZS from SETUP NETWORK 8 Port forward the NETWORK PORT Default 5445 and WEB PORT Default 80 of the priva...

Page 108: ...t a name that properly describes a site IP Address Domain name or Public IP address of a router that ZS is connected Port Number Default Port Number is 5445 ID Input ID of ZS Default ID is admin Passw...

Reviews: