background image


9  

1DU00L5B-A.0 


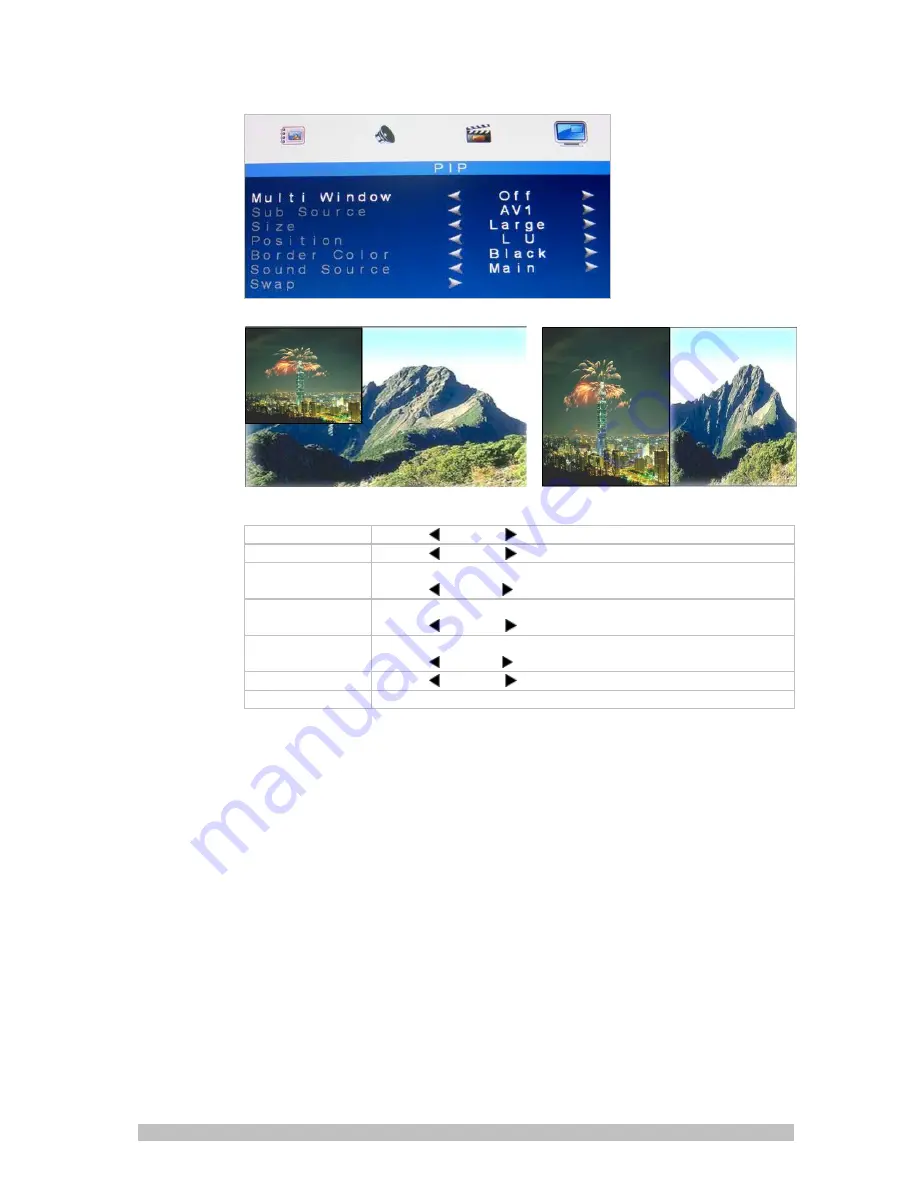
PIP/POP Setup Mode


PIP 

POP


1. Multi Window


Press   -/


OR   +/ 


to select “PIP, POP, Off ” mode.


2. Sub Source


Press   -/


OR   +/ 


to select “AV, VGA” mode.


3. Size


Adjust the size of Sub Source window. 
Press   -/


OR  +/ 


to select “Large, Small, Mid ”


4. Position


Move the position of Sub Source window. 
Press   -/


OR   +/ 


to select “L U, R D, R U, L R” position.


5. Border Color


Choose the border color of Sub Source window. 
Press   -/


OR   +/ 


to select “Black, Blue” color.


6. Sound Source


Press   -/


OR   +/ 


to select “Main, Sub” mode.


7. Swap


Press   S/Select   to Swap the Source of Main and Sub.


Note:


1.  AV1 and AV2 , HDMI and VGA cannot be displayed at the same time on the 

monitor  in  PIP / POP mode. 

2.  If POP mode is selected both images are scaled to fit the screen. 

Summary of Contents for VM17LED

Page 1: ...1 1DU00L5B A 0 VM17LED VM19LED...

Page 2: ...to look at Package Contents One LED Monitor 12V DC Adapter Power cord D Sub 15 pin VGA connector Cable User s Guide Hardware Installation The following sections in this guide give clear step by step...

Page 3: ...int Sharpness Color Temp DNR OSD Languages English German French Italian Spanish Russian Turkish Polish Dutch Czech Auto Adjustment Yes Only for VGA mode De interlace Yes Wall mount Optional Accessori...

Page 4: ...80 6 800x600 56 35 156 56 250 7 800x600 60 37 879 60 317 8 800x600 72 48 077 72 188 9 800x600 75 46 875 75 000 10 1024x768 60 48 363 60 004 11 1024x768 70 56 476 70 069 12 1024x768 75 60 023 75 029 13...

Page 5: ...chose item M Enter the main menu of the on screen display OSD Switch setting item Decrease the value of the chose item A Switch mode PC AV1 AV2 HDMI A M Power 6 Key feature Keys Function Description...

Page 6: ...1DU00L5B A 0 LED Status Display The following table describes the various power states of the LED monitor as represented by different LED color Power State LED Color On Green Standby Red No power Blan...

Page 7: ...his is used to adjust the image Tint Press OR to adjust the parameter 5 Saturation This is used to adjust the image saturation Press OR to adjust the parameter 6 Sharpness Adjust the sharpness It make...

Page 8: ...R to adjust the parameter 4 V Position Move the display picture up or down Press OR to adjust the parameter 5 V Zoom Adjust the V size of the display picture Press OR to adjust the parameter 6 Clock P...

Page 9: ...ition of Sub Source window Press OR to select L U R D R U L R position 5 Border Color Choose the border color of Sub Source window Press OR to select Black Blue color 6 Sound Source Press OR to select...

Page 10: ...leaning fluids based on alcohol methylated spirit or ammonia The glass plate has a hard surface coating to prevent scratches However the use of strong chemical cleaning agents may damage this coating...

Page 11: ...s card slot Ensure that the computer s power switch is ON Ensure that the monitor s power switch is ON Unplug the power cord of the monitor from the AC outlet wait a few minutes then to plug the power...

Page 12: ...ermined by turning the equipment off and on the user is encouraged to try to correct the interference by one or more of the following measures Reorient or relocate the receiving antenna Increase the s...

Page 13: ...sons will walk on her cord Use the proper power cord with correct attachment plug type If the power source is 120 V AC use a power cord that has UL and C UL approvals If the power source is a 240 V AC...

Page 14: ...14 1DU00L5B A 0...

Reviews: