background image

O

O

I

I

N

N

T

T

5

5

6

6

B

B


O

O

w

w

n

n

e

e

r

r

s

s


M

M

a

a

n

n

u

u

a

a

l

l


Rev.1.2  (April,  2012) 


26 


5.2.  Cannot  connect  to  the  Video 

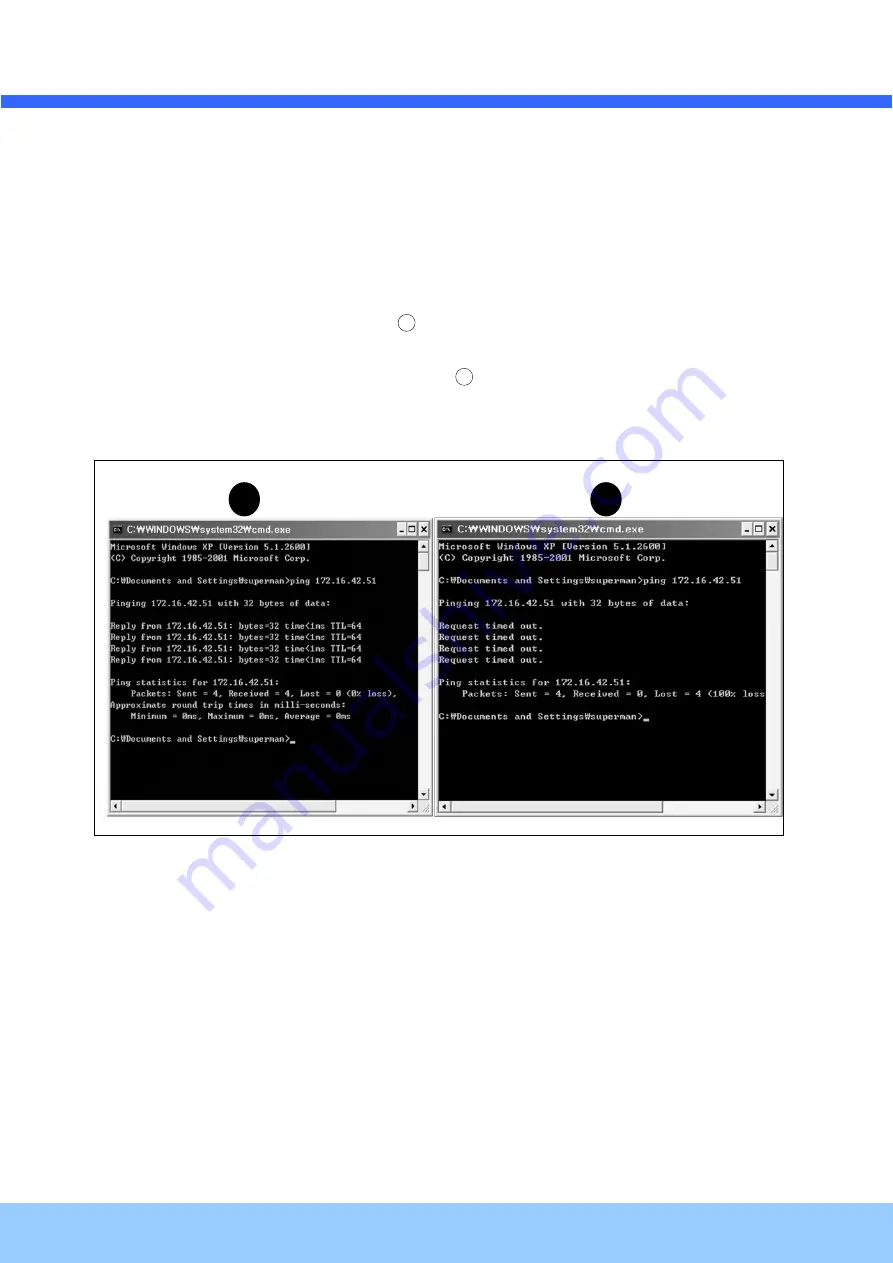
Check the status of the network connection through PING test.   

Try the following on your PC: 


-


Start > Run > Cmd > Ping IP address (Ex : Ping 172.16.42.51)


-


If  “Reply  from 

~”  message  is  returned  (

  in  the  figure  below)

,  the  network  connection  is  in  normal 

state. Try connection to the video again. If the problem persists, or refer to other trouble shooting notes. 


-


If  “Request  timed  out”  message  is  returned.  (

  in  the  figure  below),  the  network  connection  or 

network setting is not in normal state. Check the network cable and settings. 


Summary of Contents for OINT56B

Page 1: ...O OI IN NT T5 56 6B B O Ow wn ne er r s s M Ma an nu ua al l Rev 1 2 April 2012 1 ONSIP OINT56B...

Page 2: ...nt or relocate the receiving antenna Increase the separation between the equipment and receiver Connect the equipment into and outlet on a circuit different from that to which the receiver is connecte...

Page 3: ...ne er r s s M Ma an nu ua al l Rev 1 2 April 2012 3 Revision History Date Revision Details 2011 11 01 1 0 First manual revision creation 2012 04 20 1 2 Caution Any changes or modifications to this de...

Page 4: ...iew 11 2 3 Physical description 12 2 4 Functional Description 14 2 5 Accessories for installation 16 3 On Site Installation 17 3 1 Bracket 17 4 Getting Started 18 4 1 PC Requirement 18 4 2 Quick Insta...

Page 5: ...ua al l Rev 1 2 April 2012 5 6 4 Lens Setting 35 6 5 Exposure Setting 36 6 6 White Balance White Bal Setting 38 6 7 WDR Setting 39 6 8 Backlight Setting 40 6 9 SPECO DNR Setting 42 6 10 Day Night Sett...

Page 6: ...6B for the real time video audio data through various client solutions running on PC or smart device Real time 2 way communication is available through bidirectional audio communication feature Design...

Page 7: ...ble Relay Output 0 N A RS 232C N A Mic Line In Selectable in Admin page Line Out 1 V p p output for amplified speaker CVBS output For temporal use in installation Power Supply PoE N A DC Adaptor 12V D...

Page 8: ...ril 2012 8 ID and Password protection IP filtering for restricting administrative access for audio and bi audio Time management Sync to PC Synchronize to PC Manual Manual time setting Internet Time Se...

Page 9: ...Security surveillance buildings stores manufacturing facilities parking lots banks government facilities military etc Remote monitoring hospitals kindergartens traffic public areas etc Teleconference...

Page 10: ...duct Description 2 1 Contents The product package contains followings Contents Description Remarks OINT56B IP camera OINT56B main unit Power Adaptor 12VDC Adaptor option Tools and Mounting Screws Scre...

Page 11: ...012 11 2 2 Product Preview OINT56B IP Installer CMS Software NVR Weather proof Bullet IP Camera PC software to allocate an IP address to the IP Camera PC software to view and record the A V streaming...

Page 12: ...er r s s M Ma an nu ua al l Rev 1 2 April 2012 12 2 3 Physical description 2 3 1 External View Figure 2 1 External view of OINT56B 2 3 2 Connector information Figure 2 2 Connector information Audio I...

Page 13: ...O OI IN NT T5 56 6B B O Ow wn ne er r s s M Ma an nu ua al l Rev 1 2 April 2012 13 Figure 2 3 Factory Default switch and Video output connector Focus control OSD control Factory default...

Page 14: ...e and speaker to OINT56B Description LINE OUT 1 V p p audio signal output for amplified speaker MIC LINE GND Ground for audio signals MIC LINE IN Audio input Can be used either for microphone or apply...

Page 15: ...Device Sensor Power Supply Open CollectorType Photo Coupler Figure 2 4 SENSOR input and connection of the sensor Factory Default Switch A switch provided for returning the IP camera to factory defaul...

Page 16: ...O OI IN NT T5 56 6B B O Ow wn ne er r s s M Ma an nu ua al l Rev 1 2 April 2012 16 2 5 Accessories for installation Figure 2 6 Accessories for installation of OINT56B...

Page 17: ...o that no moisture is allowed to penetrate into the unit through the cables or conduits during the life time of the product Products of which the internal parts are exposed to moisture because of impr...

Page 18: ...ming data received from OINT56B can be displayed or stored in a PC running client programs Minimum requirement of the PC is described below Recommended Remark CPU Pentium IV 3G above Main Memory 1GB a...

Page 19: ...Connect PC and OINT56B to network 1 Prepare a PC to run programs for the installation and video connection PC is needed to assign IP address to OINT56B 2 Connect OINT56B as shown in dotted line in Fi...

Page 20: ...assign connection information to Speco NVR program before connection Insert the CD provided with product into the PC and install the Speco NVR Figure 4 2 Speco NVR Follow the sequence below for setti...

Page 21: ...t best suits from the drop down list in You can choose either Static or ADSL and Auto DHCP respectively If ADSL and Auto are selected the fields in is deactivated In case of ADSL fill the User Name an...

Page 22: ...be installed on your PC before actual connection If your PC is not connected to the internet you cannot download Active X module Most convenient way of installing the Active X module is installing Sp...

Page 23: ...word and port and then click the save button After assignment procedure you must click the SAVE button You can see the live video when you click the live view button as below When you exit Speco NVR y...

Page 24: ...phisticated target application it is needed to change parameters The admin page can be connected through http IP_address HTTP_port_number admin htm It is needed to enter ID and password of the adminis...

Page 25: ...aptor If PoE is not applied the power and network connection should be made through separate cables It is recommended to use DC adaptor supplied by provider for the feeding of the power In case of rep...

Page 26: ...Run Cmd Ping IP address Ex Ping 172 16 42 51 If Reply from message is returned in the figure below the network connection is in normal state Try connection to the video again If the problem persists o...

Page 27: ...per recording and still video capture in Speco NVR and Web Viewer Windows Vista 1 UAC User Access Control configuration 1 Double click User Accounts in control panel 2 Double click Turn User Account C...

Page 28: ...wn ne er r s s M Ma an nu ua al l Rev 1 2 April 2012 28 Windows 7 1 UAC User Access Control configuration 1 Double click User Accounts in control panel 2 Double click Change User Account Control sett...

Page 29: ...B B O Ow wn ne er r s s M Ma an nu ua al l Rev 1 2 April 2012 29 2 Privilege Level Control 1 Select NVR icon on the desktop 2 Click right mouse button and select properties 3 Check Privilege Level in...

Page 30: ...l 2012 30 5 4 Technical Assistance If you need any technical assistance please contact your dealer For immediate service please provide the following information 1 Model name 2 MAC address and Registr...

Page 31: ...6B B O Ow wn ne er r s s M Ma an nu ua al l Rev 1 2 April 2012 31 6 Appendix OSD menu control To control OSD menu there are two methods First is Video setup page in Administration Tool using Internet...

Page 32: ...O OI IN NT T5 56 6B B O Ow wn ne er r s s M Ma an nu ua al l Rev 1 2 April 2012 32 Scond is OSD menu controller on camera as below...

Page 33: ...DOOR OUTDOOR LOW LIGHT HALLWAY LOBBY ELEVATOR Used for a quick and easy setup for the installation environment 6 3 Menu Setup 1 Press the Function Setup switch Main setup menu is displayed on the moni...

Page 34: ...2012 34 4 To finish the setting select RETURN and press the Function Setup switch NOTE An item with the icon also has sub menus To select a sub menu select an item with the icon and press the Function...

Page 35: ...ction you can control the screen brightness 1 When the SETUP menu screen is displayed select LENS by using the Function Setup switch so that the arrow indicates LENS 2 DC You can adjust the minimum sh...

Page 36: ...hutter speed automatically If ESC is selected the shutter speed is automatically controlled depending on the ambient illumination of the subject MANUAL You can control shutter speed manually NTSC MODE...

Page 37: ...d OFF Deactivates the INTENSIFY function AUTO Activates the INTENSIFY function RETURN Select this to save the changes in the EXPOSURE menu and return to the SETUP menu NOTE If you press the Function S...

Page 38: ...00 K and 8 500 K MANUAL Select this to fine tune White Balance manually Set White Balance first by using the ATW or AWC mode After that switch to MANUAL mode fine tune the White Balance and then press...

Page 39: ...etaining the same light level for brighter spots to even out the overall brightness of images with high contrast between bright and dark spots 1 When the SETUP menu screen is displayed select WDR by u...

Page 40: ...e Function Setup switch BLC Enables a user to directly select a desired area from a picture and to view the area more clearly HLC High Light Compensation If the scene contains extremely bright light a...

Page 41: ...e amount of light area in the screen optimize the installation angle for the best HLC performance When dark the HLC is only activated when a bright light exceeding a specific size in NIGHT ONLY mode T...

Page 42: ...esired mode using the Function Setup switch OFF Deactivates SPECO DNR Noise is not reduced ON Activates SPECO DNR so that noise is reduced 3 Set the SPECO DNR mode to ON and press the Function Setup s...

Page 43: ...a desired mode using the Function Setup Switch according to the picture display you want COLOR The picture is always displayed in color B W The picture is always displayed in black and white BURST MO...

Page 44: ...can select brightness of illumination about changing the day night mode DWELLTIME You can select the duration time about changing the day night mode 3s 5s 7s 10s 15s 20s 30s 40 60s The day night switc...

Page 45: ...Ma an nu ua al l Rev 1 2 April 2012 45 6 11 Special Setting 1 When the SETUP menu screen is displayed select SPECIAL by using the Function Setup switch so that the arrow indicates SPECIAL 2 Select a d...

Page 46: ...Yellow Green Red Blue SHARPNESS As you increase this value the picture outline becomes stronger and clearer Adjust this value appropriately depending on the sharpness of the picture RETURN Select this...

Page 47: ...ch 4 Use the Function Setup switch to move to a desired letter and select the letter by pressing the Function Setup switch Repeat this to enter multiple letters You can enter up to 15 letters 5 Enter...

Page 48: ...synchronize the output phase of multiple cameras using the power synchronization function Line Lock without using a synchronization signal generator INT Internal Synchronization Type L L Power Synchr...

Page 49: ...elected MD area The color of the area can be selected from brown orange blue cyan green yellow magenta and red RETURN Select this to save the MOTION DET menu settings and return to the SPECIAL menu PR...

Page 50: ...a desired RETURN mode using the Function Setup Switch SAVE Save the current settings and RETURN the MAIN SETUP menu NOT SAVE Do not save the current settings and RETURN the MAIN SETUP menu RESET Reset...

Reviews: