Speco N16NRP User Manual Download Page 15

EZ Setup & Main Interface 


NVR  User  Manual 


11 


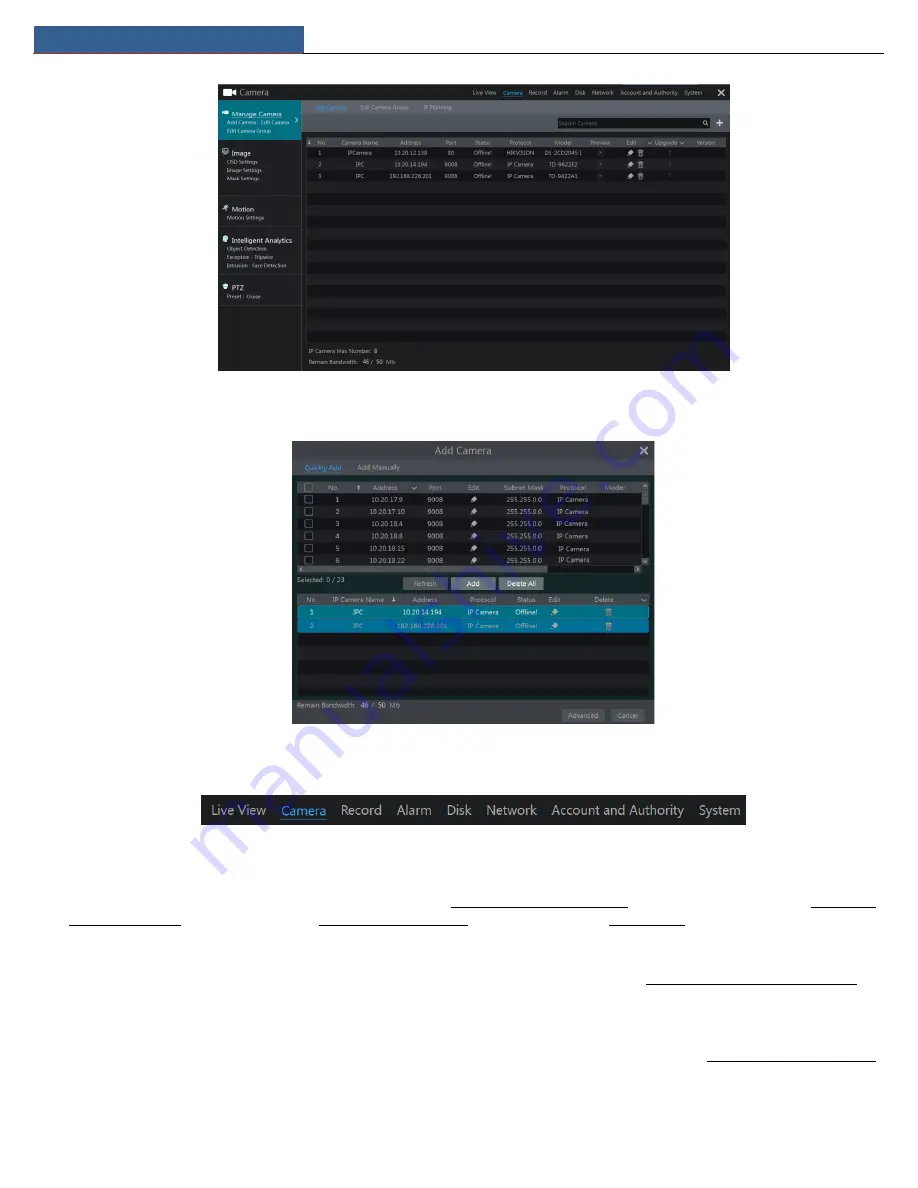
There are some function items on the left side of the camera management interface. Click each item to go to corresponding interface or window. 
For instance, click “Add Camera” to pop up the window as shown below. 


Click the main menus on the top of the camera management interface to go to corresponding interfaces. Refer to the picture below. For instance, 
you can go to the system setup interface by clicking “System” tag. 


3.2.3    Main Functions 


Camera 

The module covers the functions such as 

Camera Management

 (see Chapter 4 Camera Management for details), 

Image Settings 

(see 5.3 Preview 

Image Configuration for details), 

Motion

 (see 9.2.1 Motion Configuration for details), and 

PTZ

 (see Chapter 6 PTZ for details) and so on.   


Record 

The module covers the functions such as 

Encode Parameters 

and

 Record Schedule 

and so on. Please see Chapter 7 Record & Disk Management for 

details. 


Alarm 

The module covers the functions such as 

Sensor and Motion Alarm Handling 

and 

Alarm Out Settings

. Please see Chapter 9 Alarm Management 

for details.   


Disk 

Summary of Contents for N16NRP

Page 1: ...NRP 8 and 16 Channel User Manual N8NRP N16NRP Version 1 0 Features and specifications are subject to change please check www specotech com for firmware updates...

Page 2: ...moist environment In case any solid or liquid get inside the machine s case please turn off the device immediately and get it checked by a qualified technician Do not try to repair the device by your...

Page 3: ...Introduction 35 8 3 Record Search Playback Export 37 8 3 1 EZ Search 37 8 3 2 Museum Search 38 8 3 3 Time Search 39 8 3 4 Event Search 39 8 3 5 Bookmark Search 40 8 3 6 Snapshots 40 8 3 7 View Export...

Page 4: ...iew Network Status 58 11 2 Basic Configuration 58 11 2 1 General Configuration 58 11 2 2 Date and Time Configuration 58 11 3 Factory Default 59 11 4 Device Software Upgrade 59 11 5 Backup and Restore...

Page 5: ...k tool bar operation of the preview window Supports camera group view and scheme view in sequence quick sequence view and dwell time setting Supports motion detection and video mask Supports multiple...

Page 6: ...otocol and so on Supports allow and block list function and the allow and block IP address IP segment address can be set Supports multiple browsers including IE8 9 10 11 Firefox Opera Chrome available...

Page 7: ...he PoE ports of the recorder 2 Connect a monitor to the recorder via VGA or HDMI cable not included 3 Connect the included optical mouse into any USB port of the recorder 4 Connect the power adapter t...

Page 8: ...n Disconnect the power 2 2 Remote Control It uses two AAA size batteries Open the battery cover of the remote control Place batteries Please take care the polarity and Replace the battery cover Key po...

Page 9: ...box and then click the box The input keyboard will pop up automatically 2 4 Text input Instruction The system includes two input boxes Refer to the above pictures The left box is the number input box...

Page 10: ...t your own password when you use the wizard for the first time the default username of the system is admin select the login username and enter the password you set by yourself Click Edit Security Ques...

Page 11: ...alid UPnP Refer to the following picture You can view the external IP address of the NVR Enter the external IP address plus port in the address bar of your browser to access the NVR please see 11 1 6...

Page 12: ...k segments for being in the same network segment with the NVR Click OK to save the settings Click to edit the added camera as shown on the above right Enter the new camera name IP address port usernam...

Page 13: ...t button Click it to pop up area Full screen button Click it to show full screen click it again to exit the full screen Screen mode button Dwell button see 5 2 2 Quick Sequence View and 5 2 4 Scheme V...

Page 14: ...to 5 2 1 Preview By Display Mode for detail configuration of the display mode Double click one display mode in the list to switch to the display mode for previewing Introduction of area Icon Button Me...

Page 15: ...face by clicking System tag 3 2 3 Main Functions Camera The module covers the functions such as Camera Management see Chapter 4 Camera Management for details Image Settings see 5 3 Preview Image Confi...

Page 16: ...figuration for details Account and Authority The module covers the functions such as Account Management see 10 1 Account Management for details and Permission Management see 10 3 Permission Management...

Page 17: ...n below You can quickly add or add the IP camera manually Quickly Add Check the cameras and then click Add to add cameras Click to edit the camera s IP address username and password and so on Click De...

Page 18: ...ce Note Only the local NVR has unoccupied channels may the IPC of other NVR DVR in the same local network be added And the added IPC supports previewing and recording 4 1 2 Edit Camera Click Edit Came...

Page 19: ...ctly connects to the PoE port of the NVR through ONVIF protocol should be shown automatically in the camera list The IP camera which directly connects to the PoE port is in the same network segment wi...

Page 20: ...rface as shown below This function supports searching other NVRs DVRs that is in the same local network as the local NVR The user may add camera channels of other NVRs DVRs into the unoccupied channel...

Page 21: ...Move tool Click it to move the tool bar anywhere Manually Record On Click it to start recording Instant Playback Click to playback the record click Instant Playback to select or self define the instan...

Page 22: ...lick under the display mode list and then enter the display mode name in the popup window click OK to save the current display mode Method Two Click Start Settings System Basic Output Settings to go t...

Page 23: ...ted see 4 2 1 Add Camera Group for details Go to the live view interface and then select a camera window Double click one camera group on the right side of the interface The cameras in the group will...

Page 24: ...k the right click menu Clear in area to remove a single camera or click to remove all the cameras c Click Apply to save the settings Start Sequence View Go to the live view interface and then click to...

Page 25: ...these items You can click Default to restore the image settings to the default factory settings 5 3 3 Mask Settings Some areas of the image can be masked for privacy Up to four mask areas can be set...

Page 26: ...and the sharpness level of the image edge Wide Dynamic The wide dynamic range WDR function helps the camera provide clear images even under back light circumstances When there are both very bright an...

Page 27: ...if auto mode is selected the time interval setup will be available Click to increase decrease the focal length Click it to focus instantly Day night mode switch autofocus If checked the lens will focu...

Page 28: ...Click to increase decrease the iris of the dome Drag the slider to adjust the rotating speed of the dome Click to start stop recording Click to hide show the analog joystick Click it to return to the...

Page 29: ...any area of the camera image to zoom in the image press and hold the right button to zoom out the image Move the cursor of the mouse to the camera image and then slide the scroll wheel of the mouse f...

Page 30: ...n the Add Preset window select the preset name preset time and preset speed and then click OK button In the Add Cruise window you can click to reselect the preset then change the preset time and speed...

Page 31: ...k to add cruise The operations of the Add Cruise window are similar to that of the PTZ control interface please see 6 1 PTZ Control Interface Introduction for details Edit Cruise Select the camera and...

Page 32: ...Normal record is enabled all the time sensor alarm record will be started when sensor alarm happens Continuous Record Motion Record Sensor Record Normal record is enabled all the time motion sensor a...

Page 33: ...ode parameters and record schedules of each camera See 7 2 Encode Parameters Setting and 7 3 Schedule Setting for details 7 1 2 Advanced Configuration Click Start Settings Record Advanced to go to the...

Page 34: ...shown below 24 7 24 5 and 24 2 are the default schedules you cannot edit or delete 24 7 while 24 5 and 24 2 can be edited and deleted Click the schedule name to display the detailed schedule informati...

Page 35: ...edule of the day to other days Refer to the picture below Check the days in the window and then click OK to save the settings Set Week Schedule Click or and then click Manual beside to set the week sc...

Page 36: ...and set the motion area of each camera See 9 2 1 Motion Configuration for details The camera will start motion based recording once you finish the above settings 7 4 4 Sensor Based Recording Set the...

Page 37: ...en click on the top right corner of the added disk or camera to delete it from the group The deleted disks and cameras will be moved into group one automatically Each group can add the disks and camer...

Page 38: ...Record Disk Management NVR User Manual 34...

Page 39: ...he live view interface to set the default playback time On panel on the right will show you re the channel number and their recorded data coded by color The bar that runs across them represents the pl...

Page 40: ...rch the record in this quadrilateral after drawing it Smart playback settings Click it to set smart playback Introduction of area Button Meaning Click it to go to record search and export interface se...

Page 41: ...k stands for intelligence record Click the record block to set the time and then the playback camera will play the record from the time you set Drag the color block on the time scale to select the bac...

Page 42: ...left top corner of the interface to select the time slice mode Method Three Right click the mouse on any area of the time sliced interface to go back to the upper interface 8 3 2 Museum Search Click S...

Page 43: ...he interface You can set the date on the top left of the interface check the event type as required and click the time scale or click under the time scale to set the time The camera window will play t...

Page 44: ...add the tags can you play the record by tag search Click Start Playback to go to the playback interface and then click on the bottom of the camera window to add bookmarks when you want to mark the pla...

Page 45: ...Playback Backup NVR User Manual 41 8 3 7 View Export Status Click Start Search and Export Export Status or click on the tool bar at the bottom of the playback interface to view the export status...

Page 46: ...e trigger cameras will snap automatically when the sensor alarm is triggered Push check it and choose NO or OFF If it is ON the system will send messages when the sensor alarm is triggered Alarm out c...

Page 47: ...to go to the following interface Enable or disable Record Snapshot Push Alarm out Preset Buzzer Pop up Video and E mail The alarm handling settings of motion alarm the same as the sensor alarm see 9 1...

Page 48: ...out Preset Buzzer Pop up Video and E mail The alarm handling setting of object detection alarm is similar to that of the sensor alarm see 9 1 Sensor Alarm for details Click Apply to save the settings...

Page 49: ...ption detection Exception Alarm Handling Configuration Click Start Settings Alarm Intelligence Alarm Exception to go to the interface Enable or disable Snapshot Push Alarm out Preset Buzzer Pop up Vid...

Page 50: ...on Click Start Settings Alarm Intelligence Alarm Tripwire to go to the following interface Enable or disable Snapshot Push Alarm out Preset Buzzer Pop up Video and E mail The alarm handling setting of...

Page 51: ...setting of intrusion detection alarm is similar to that of the sensor alarm see 9 1 Sensor Alarm for details Click Apply to save the settings You can click Intrusion Config to go to the intrusion dete...

Page 52: ...to save the settings 9 5 Alarm Event Notification 9 5 1 Alarm out Click Start Settings Alarm Event Notification to go to the following interface Set the delay time and the schedule of each alarm out Y...

Page 53: ...y to save the setting You can click Test to test the buzzer 9 5 5 Push Message Click Start Settings Alarm Event Notification Push Message to go to the interface as shown below Check Enable and then cl...

Page 54: ...happens Click to view the detail information as shown below If the exception information is more than one page you can enter the number in the box and then click to jump to the specified page Click t...

Page 55: ...ve the Account and Authority permission can manage the system s accounts Group Administrator owns all the permissions displayed in area except Account and Authority and its permissions cannot be chang...

Page 56: ...Lock Some models may not support this function Click Modify Pattern Lock to pop up a window Enter current password and then check Enable to input pattern lock Recover Password Click Recover Password...

Page 57: ...eck the permissions as needed and then set the Local and Remote permissions Click Add to save the settings 10 3 2 Edit Permission Group Go to Edit Permission Group interface and then click in the grou...

Page 58: ...elete it Click Apply to save the settings 10 5 Preview On Logout Click Start Settings Account and Authority Security Preview On Logout to go to the following interface Set a camera and then enable or...

Page 59: ...hernet port is broken The network addresses of the internal ethernet port can be changed to make the port in the same network segment with the IP cameras which directly connect to the PoE ports of the...

Page 60: ...ick on test to check if ok If so you may now go to your domain name specoddns net with Internet Explorer and access your recorder remotely 11 1 5 E mail Configuration Click Start Settings Network E ma...

Page 61: ...NVR through the web client which is in WAN via router without port mapping Click Start Settings Network UPnP to go to the following interface Make sure the router supports UPnP function and the UPnP...

Page 62: ...nterface Set the device name device No language video format and main output Enable or disable wizard Log In Automatically Log Out Automatically if checked you can set the wait time App Live Self Adap...

Page 63: ...e NVR Click Start Settings System Maintenance Upgrade to go to Upgrade interface Select the USB device in Device Name option and go to the path where the upgrade software exists Select the upgrade sof...

Page 64: ...ally click OK button in the popup window Recover Select the USB device in Device Name option find the configuration backup file and then click Recover button finally click OK button in the popup windo...

Page 65: ...op up a menu list Check contents in the menu list and then the log list will show the checked log contents only Click to play the video log 11 8 View System Information Click Start Settings System Inf...

Page 66: ...ay language on the top right corner of the login interface Enter the username and password of the NVR in the interface and then click Login to go to the live view interface 12 3 Web WAN Access Set the...

Page 67: ...rname and password of the NVR in the interface and then click Login to go to the live view interface 12 4 Web Remote Control The supported browsers of the remote surveillance are IE8 9 10 11 Firefox O...

Page 68: ...an be shown in the left panel View Scheme Click to view the scheme or planning All schemes can be shown in the left panel Double click the scheme name to invoke it quickly Tool Bar Introduction Button...

Page 69: ...in function is designed for P T Z Click the button and then drag the image to zoom in or zoom out the image click the image on different areas to view the image of the dome omni directionally Click i...

Page 70: ...on Backup tasks button Click it to view the backup status Event list button Click it to view the event record of manual schedule sensor motion 12 4 3 Remote Export Click Export in the remote interface...

Page 71: ...of the selected question in the popup window the password for admin will be reset to 123456 by default If you forget the answer of the question this way will be invalid please contact your dealer for...

Page 72: ...s you will fail to add the IP camera Q7 The IP camera which directly connects to the PoE port of the NVR through ONVIF protocol is shown in the camera list but there is no image output why Please make...

Page 73: ...en the USB device path The record can be backed up in the private format and AVI format by NVR If you select the private format when backing up record by NVR a RPAS Recording Player Application Softwa...

Page 74: ...e record backup data can be played by the video player which supports this format b Record backed up through web The record can only be backed up with AVI format through web The record can be backed u...

Page 75: ...0 10800 768 337 5 8100 512 225 5400 384 168 75 4050 256 112 5 2700 The table below shows the recording capacity requirements for record storage in 30 days Record Bitrate Kbps Recording Capacity TB 1CH...

Page 76: ...rt Search Highlighted color to display camera records in a certain period of time different colors refer to different record events Function Play pause FF FB etc Alarm Mode Manual sensor motion except...

Reviews: