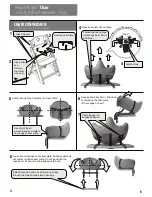
Insert a Wood Nut (a), as shown into the inner holes of the Back.
Attach the Back as shown and insert a Long Screw (d). Loosely
tighten the Long Screw into Wood Nut through the Left Side
with the Allen Key.
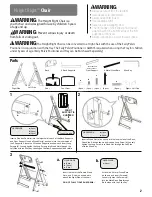
Parts
Left Side
Right Side
Foot Rest
(8 pcs.) (4 pcs.) (4 pcs.) (8 pcs.)
a
b
c
d
e
(6 pcs.)
Right + Left Cap
Seat
2 Back Supports
Front Support
2 Metal Cross Bars
Allen Key
Back
• SHORTER THAN
BACK SUPPORTS
• Always secure child in the restraint
• Never leave child unattended
• Always keep child in view
• Secure straps tightly
• Never use as a stepping stool
• The front edge of the footrest should never
extend beyond the bottom edge of the front
supports at floor level
• Always use chair on a smooth level surface
WARNING
:
!
WARNING
:
The Height Right Chair is a
youth chair and is designed for use by children 3 years
of age and up.
!
3
a.
b.
a
e
d
Insert a Wooden Dowel (e) into the larger hole in each of the Back Supports
and Front Support. Insert a Wood Nut (a), as shown into the inner holes of
the 3 Supports. Attach the 3 Wooden Supports as shown and insert Long
Screws (d). Loosely tighten the Long Screws into Wood Nuts through the
Left Side with the Allen Key. Labeling on the Rear Supports should be visible.
Attach the 2 Metal Cross Bars
as shown and insert Screws(c).
Loosely tighten the Screws(c)
into the Metal Cross Bars through
Both sides with the Allen Key.
Insert the rest of the Dowels, Wood
Nuts, and Screws as needed to
attach the Right Side of the chair.
FRONT
SUPPORT IS
SHORTER
HARDWARE
a (3pcs.)
d (3pcs.)
e (3pcs.)
HARDWARE
a (4pcs.)
d (4pcs.)
e (3pcs.)
HARDWARE
c (4pcs.)
HARDWARE
a (1pcs.)
d (1pcs.)
a
d
d
d
d
c
c
d
c
c
Logos this side
1
2
2
!
WARNING
:
Prevent serious injury or death
from falls or sliding out.
!
WARNING
:
The Height Right Chair can be converted to a High Chair with the use of the Early Pelvic
Positioner in conjunction with the Tray. The Early Pelvic Positioner is ALWAYS required when using the Tray for children
under 3 years of age. (Early Pelvic Positioner and Tray can be Purchased Separately)
Height Right™
Chair
DO
NOT
FULLY
TIGHTEN
SCREWS
.


