IV.
Advanced O
p
eration
1.
Software Installation and PC Interface Setup.
2.
Make sure power is off on amplifier and computer
3.
Plug the interface board into the parallel port of the computer
4.
Plug the interface cable into the interface board and the SP amplifier.
5.
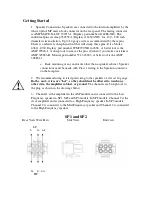
Plug the speaker cable into the back of the SP1 and the loudspeaker. Channel
1 is LF, Channel 2 is MF and Channel 3 is HF.
6.
Plug in XLR cable to input from music or test signal source. Make sure signal
is OFF.
7.
Plug in power cord to SP amp and turn it on.
8.
Turn on computer. Enter CMOS setup. The first screen the computer shows
while booting frequently tells you which key to press to enter Setup mode.
9.
Set the parallel port to EPP mode in CMOS Setup.
10.
Save setup and boot to Windows.
11.
Unzip the files in ALE5.2.zip. Run Setup.exe to install.
12.
Unzip the files in DASDCT3.1.zip. Run Setup.exe to install.
13.
Unzip the files in softwareupdate.zip into the “DCT3.1” folder. Overwrite
any existing files of the same name.
14.
To Load an Existing Configuration
15.
Plug interface cable from PC to amplifier before turning amplifier ON. This
ensures it will come up in slave mode and accept commands from the PC.
16.
Mute all channels from the faceplate of the SP amplifier.
17.
Start DAS DCT 3.1 program
18.
Open TAS3100Example.dat file in folder “DCT3.1”
19.
After a few seconds you will see the EQ GUI box. Select “Detail GUI A”
20.
LOAD your configuration file “_____.cfg”. The configuration file SP2-500-
250.cfg has a typical 2kHz crossover.


