Zone Maximum Volume
Each zone has two trim pots used to limit the maximum volume for that zone
(See Diagram 8)
. With a source running turn down both trim
pots completely counter-clockwise. Turn the volume in the zone full up by holding the button on the remote control for about thirty seconds.
The trim pots can be turned up to a suitable maximum volume. If required, one of the two trim pots can be set to a slightly different level to
act as a “balance” control for the zone.
EXPANSION
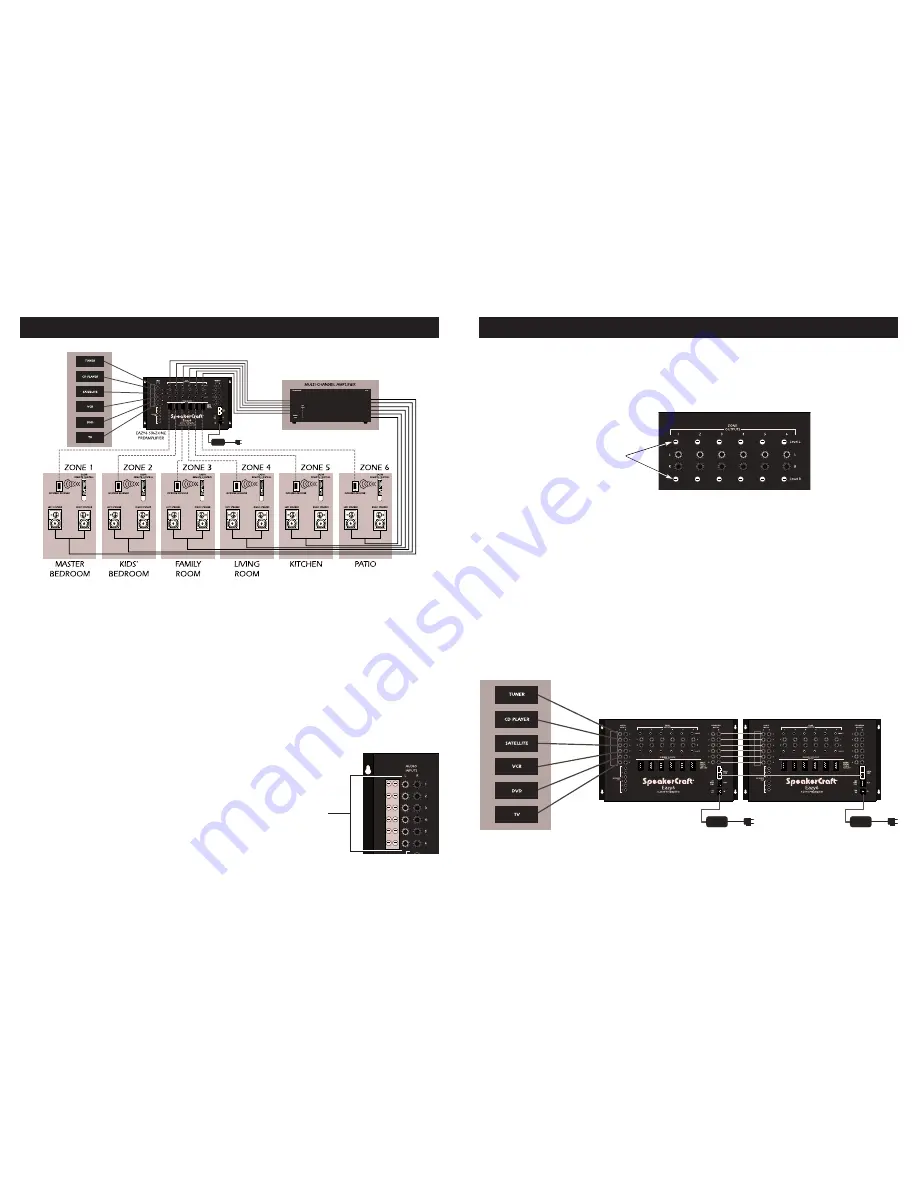
If more than six zones are required, then two or more Eazy6 units can be linked together to achieve the number of zones required. Each link
will require six pairs of RCA audio interconnects and one Cat-5 patchcord terminated with RJ-45 connectors.
The first Eazy6 should be connected and setup as previously detailed. On the right-hand side of the Eazy6 are the six pairs of audio Expansion
Outputs. These should be connected to the next Eazy6 unit using the six audio interconnect leads
(See Diagram 9)
.
NOTE:
When using multiple Eazy6 units, the source level adjustments should only be set on the first unit. Subsequent Eazy6 units should be
left set to the factory default. Maximum volume should still be set for each zone separately.
All control data between the multiple units is conveyed by the Cat-5 patchcord, including IR signals for the source components. Connect the
Cat-5 patchcord from either Data socket of the first Eazy6 to either Data socket of the next Eazy6, etc.
The IR emitters and the “Status” output should always be connected to the first Eazy6 only.
Eazy6 Owner’s Manual
Page 5
Zone Max Volume
Trim Pots
DIAGRAM 8:
Zone Max Volume Adjustments
DIAGRAM 9:
Expanding the Eazy6
Page 4
Eazy6 Owner’s Manual
Power Management
The “Status” output of the Eazy6 is simply connected to the “Trigger” input of the SpeakerCraft Big Bang or other amplifier. Whenever any zone
in the system is active, the amplifier will turn on. When all zones are turned off, the amplifier will turn off.
If required, individual zone power amplifiers can be powered up and down with the zone by connecting the “Trigger” input to the “Status”
output on the IR connector for the relevant zone.
SETUP
The Eazy6 has two sets of adjustments: input level for each audio source and maximum volume for each zone. Both adjustments are made via
trim pots accessible through the faceplate of the Eazy6. The Eazy6 is shipped with these adjustments set to a nominal position.
Once all the connections are made to the Eazy6, the system should be turned on and tested to ensure all audio sources are playing in each
zone. The source level adjustments should be made first, followed by the maximum volume settings for each zone.
Input Level Adjustments
The input level trim pots are located under a cover on the top left-hand side of
the Eazy6
(See Diagram 7)
. Before making any adjustments, listen to each
source, taking note of their relative volumes. Try to identify the source that has
the lowest volume. Once this is done, each of the other sources should be
adjusted down to match the quietest source using the input level trim pots.
Both the left and right input trim pots should be set to the same level.
A quick check should now show that each source is of a similar volume
when selected.
DIAGRAM 6:
IR Router
DIAGRAM 7:
Input Level Adjustments
Input Level Trim Pots
(Located Under Coverplate)


