


This is a publication by Conrad Electronic SE, Klaus-Conrad-Str. 1, D-92240 Hirschau (www.conrad.com).
All rights including translation reserved. Reproduction by any method, e.g. photocopy, microfilming, or the capture in electronic data
processing systems require the prior written approval by the editor. Reprinting, also in part, is prohibited. This publication represent the
technical status at the time of printing.
© Copyright 2015 by Conrad Electronic SE.
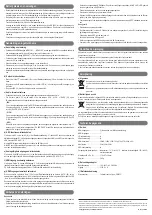
Inserting the battery, replacing the battery
• Normally, the battery is already inserted into the IR remote control by the manufacturer. Simply pull out
the protective plastic strip from the IR remote control (it merely serves as a protection against an early
discharge of the battery). The IR remote control is now operational.
• It is necessary to change the battery when the IR range reduces or the switch no longer reacts to the
control commands of the IR remote control.
Then pull the battery holder (29) out of the IR remote control.
Replace the flat battery with a new battery of type “CR2032”. Ensure correct polarity during insertion (see
imprint “+” on the battery and the battery holder). The positive terminal of the battery points towards the
bottom side of the IR remote control.
Slide the battery holder containing the battery back into the IR remote control, ensuring the correct orienta-
tion.
Dispose of the old, empty battery with respect to the protection of the environment; see chapter “disposal”.
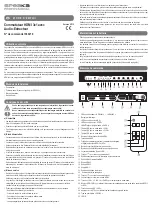
Connection and Start-up
a) Set-up and connection
• Connect the three HDMI outputs “HDMI IN 1”.... “HDMI IN 3”) to your playback devices (e.g. a Blu-ray
player, a game console etc.) using suitable HDMI cable.
• Connect the HDMI output “HDMI OUT” (20) to the corresponding input of a monitor/TV set.
• Connect the round low-voltage plug of the enclosed power adapter to the corresponding socket (16) at the
switch.
• Plug the power adapter into a mains socket.
• Position the switch in such a way that the IR receiver (2) at the front is not obstructed. Do not cover it;
otherwise operation of the switch via the IR remote control is not possible.
• Protect the surfaces of valuable furniture by using an appropriate underlay to avoid scratches and pres-
sure marks.
b) Turning the switch on/off
• Press the “ ” button on the switch (15) or on the IR remote control (23) to switch the switch on or off.
If IR remote control is used, point the IR-LED (30) in the direction of the IR receiver (2) on the switch.
• The Power LED (14) lights up red when the switch is switched on.
c) Selection of audio format
• First, switch on the switch, the playback device and your TV set/monitor.
• You may select the audio mode with the “Audio“ button (12) on the switch or with the three buttons “2CH”,
“5.1CH” or “PASS” on the IR remote (25).
“2CH”:
The playback device receives EDID information that at the most 2-channel audio signal is possible. The
switch sends an analogue stereo audio signal to both cinch sockets (22). The “2CH” LED (6) lights up.
“5.1CH”:
The playback device receives EDID information that at the most 5.1-channel audio signal is possible. The
switch provides a digital audio signal at the optical output (21). The “5.1CH” LED lights up.
“ADV”:
The switch provides the best possible audio signal supported by the connected devices (e.g., 7.1, if 7.1
amplifier is connected). The “PASS” LED lights up. The analogue or digital audio output may be without
function in this case.
d) Switching the ARC function on/off
The ARC function and therefore the digital audio signal at the digital output (21) can be switched on or off
with the “ARC” button at the switch (10) or the IR remote (27). The “ARC” LED (3) is lit when the ARC func-
tion is switched on.
If the HDMI signal is looped, switch off the ARC function.
Using ARC, you can connect e.g. a game console to the TV set and transmit the audio signal via the switch
to an amplifier.
e) Switching the analogue/digital on/off
You can switch the analogue and digital audio output on/off with the “Spdif/LR” button at the switch (11) or
the IR remote (26). The “SPDIF” LED (4) is lit when the audio output is activated.
f) Selecting the HDMI manually
You can select the HDMI input (1, 2 or 3) with the “Switch” button (9). Every time the button is pressed, the
subsequent input is selected.
The IR remote has 3 separate buttons (24) for this purpose.
g) Selecting the HDMI input automatically
Press the “Auto” button (13) on the switch or the “AUTO” button (28) on the IR remote to switch the automatic
input detection on or off. If this function is switched on, the “Auto” LED (8) is lit and the switch automatically
detects which input is active.
However, this only works if a playback device is active at only one input. If several devices are active (e.g.
if a Blu-ray player and a games console are connected and switched on), you must select the desired input
manually.
Troubleshooting
No image
• First check, whether the TV set/monitor is working properly when connected directly to the play-back
device (without switch).
• Then check the connection of the cable/plug between the switch and the TV set/monitor or the playback
device. Replace damaged cables.
• Use a high-quality HDMI cable. It applies particularly for higher resolutions (full-HD or 4K) or in 3D mode
or when using the ARC function.
• Switch on the TV set/monitor, the switch and the playback device.
• Select the proper input on the TV set/monitor.
• If the Blu-ray player has various outputs, check in the set-up menu of the Blu-ray player whether the proper
output is activated.
• To play back copy-protected films, the TV set/monitor should support HDCP standard.
No sound
• Select another audio mode.
• The TV set/monitor is connected via a DVI cable and an adapter. No sound signal is transferred via a
DVI cable.
• As a test, switch the ARC function on and off.
• Does the TV set deliver an ARC signal?
• Is a high quality HDMI cable used, which supports ARC?
• Check whether the correct input on your amplifier is activated and whether all cables are correctly
connected.
Maintenance and cleaning
The product does not require any maintenance and should never be disassembled for any reason. Any
maintenance or repair work may only be performed by an expert.
Prior to cleaning the device, pull the power adapter out of the mains socket.
Use a clean, dry, soft cloth for cleaning. Do not use aggressive cleaning agents, as these can cause discol-
ouration. To prevent scratch marks, do not press too strongly on the surface when cleaning.
Dust can easily be removed using a clean, long-haired brush and a vacuum cleaner.
Disposal
a) General
The product must not be disposed of with the household waste.
Please dispose of the product at the end of its service life according to the current statutory
requirements.
Remove any battery that might be inserted and dispose of it separately from the product.
b) Batteries and rechargeable batteries
As the end user, you are required by law (Battery Regulation) to return used batteries. Do not dispose of
used batteries in the household waste!
Batteries/rechargeable batteries containing hazardous substances are labelled with these sym-
bols to indicate that the disposal of them in the household waste is forbidden. The symbols of the
critical heavy metals are: Cd=Cadmium, Hg=Mercury, Pb=Lead (name written on the battery/
rechargeable battery, e.g., under the rubbish bin symbol on the left).
You can return your used batteries/rechargeable batteries free of charge at the official collection points of
your community, in our stores, or at places where batteries or rechargeable batteries are sold.
You thereby fulfil your statutory obligations and contribute to the protection of the environment.
Technical data
a) Switch
HDMI inputs ............................................. 3 (one of them with MHL support)
HDMI outputs ........................................... 1
3D-support .............................................. yes
4K-support ............................................... yes
HDMI resolutions ..................................... 4Kx2K, 1080p, 1080i, 720p, 576p, 576i, 480p, 480i
Colour depth ............................................ 24bit, 30bit, 36bit
ARC support ........................................... yes
Ambient conditions .................................. Temperature -10 °C to +55 °C, air humidity 10% to 90% relative,
not condensing
Dimensions (W x D x H) .......................... 179 x 67 x 28 mm
Weight ..................................................... 365 g
b) Power adapter
Operating voltage .................................... 100 - 240 V/AC, 50/60 Hz
Output ...................................................... 5 V/DC, 1 A
c) IR remote control
Power supply ........................................... 1x type “CR2032” battery