background image

6

Large LED

Small LED

Status

White ON

Red ON

Guest is active and projecting.

White ON

OFF

Transmitter and receiver successfully paired.

White Flash

OFF

Transmitter and receiver connection in progress.

Red Flash

OFF

Transmitter and receiver connection fail.

7 Setup and connection

7.1 Transmitter connection

Notes:

The transmitter should already be paired with the receiver. If there is a connection problem or you
wish to pair additional receivers, refer to section “Operation → Pairing transmitter and receiver”.

For the transmitter to computer connection, depending on your port configuration you may need a
longer HDMI cable.

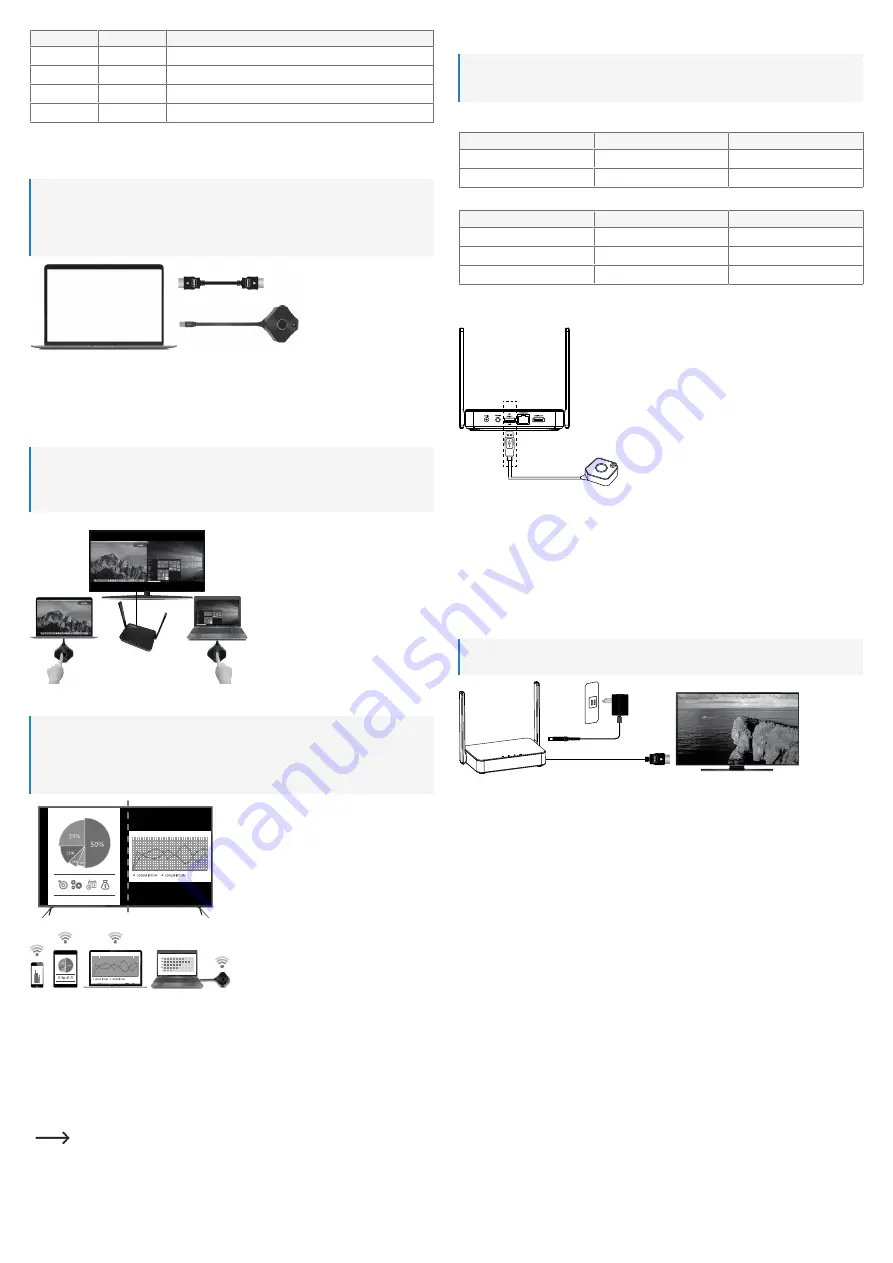
1. Connect an HDMI cable from the transmitter to an HDMI port on the host computer.

2. Connect the USB-A (power supply) plug to a port on the host computer.

à

The status lights on the transmitter will light up to indicate it is receiving power.

à

Refer to the section “Transmitter dongle status lights” for further details.

7.1.1 Connecting additional transmitters

Notes:

You can connect up to 32 transmitter dongles to the receiver.

Refer to section “Pairing transmitter and receiver” to connect additional transmitters to the re-
ceiver.

7.2 Mobile device screen mirroring

Notes:

In addition to using hardware transmitters, you can also mirror your mobile device screen through
the receiver 5 GHz Wi-Fi network.

You can update the receiver SSID, password and various other settings via the administrator con-
sole. See section “Admin settings” for further information.

P

RECONDITIONS

:

a

Your device supports 5 GHz Wi-Fi.

a

The receiver is connected and powered on.

1. Access the Wi-Fi settings on your device:

- Connect to SSID: SP-WTR-500
- Password: 12345678

2. Access the screen mirroring function on your device and select SSID “SP-WTR-500”.

If two transmitters are already sharing a screen, you should disconnect one transmitter to al-
low the mobile device to mirror.

8 Operation

Note:

Only two transmitters can project their screen contents at the same time. Refer to section “Operation >
Transmitter” for further details.

8.1 Transmitter

Large button (mirror)

Host

Guest

Single click

Mirror/disconnect

Send mirror request

Hold for 3 seconds

Full screen mirror

Send full screen mirror request

Small button (control)

Host

Guest

Single click

Allow guest to mirror

-

Double click

Deny request

-

Hold for 3 seconds

Stop display

-

8.2 Pairing transmitter and receiver

Relink the transmitter and receiver if the large and small LED status lights are flashing.

P

RECONDITIONS

:

a

The receiver is connected. See section “Receiver connection”.

a

The receiver home screen is shown on the HDMI display.

1. Connect the transmitter USB-A connector to the 

USB

 port on the receiver. The transmitter will auto-

matically enter pairing mode.

2. “Pairing…” will show on the display followed by “Pairing OK” when complete.

à

The transmitter is now paired to the receiver.

8.3 Receiver connection

Note:

An additional HDMI cable is needed to connect the receiver to an HDMI enabled display.

1. Connect one end of the HDMI cable to the 

HDMI OUT

 port on the receiver and the other end to an

HDMI input on your display.

2. Connect one end of the power adaptor to the 

DC IN

 socket on the receiver and the other end to a

power outlet.

3. Press the 

POWER

 button to switch the product ON.

9 Receiver settings console

You can access the various administrator and advanced settings through a web browser.

Access those settings using one of the following methods:

Direct link (P2P)

Wi-Fi Access Point (AP) or router

9.1 Direct link (P2P)

Connect directly to the receiver 5 GHz network.

P

RECONDITIONS

:

a

The receiver should first be connected to the power supply and switched ON.

1. Using a computer or mobile device, search for Wi-Fi SSID: “SP-WTR-500”.

2. Open a web browser on the connected device and enter IP address “192.168.168.1” into the address

bar.

3. Enter the login details. See to section “Operation Login / reset password” for further information.

9.2 Wi-Fi Access Point (AP) or router

Connect to the receiver via LAN or WLAN.

This is an option if you want to mirror device screen through the receiver that are not in the same room.

P

RECONDITIONS

:

a

The receiver should first be connected to the power supply and switched ON.

a

The receiver should be connected to a LAN or 5GHz WLAN. “Network Management” settings on the
receiver can be configured via direct link. See section “Receiver settings console → Direct link” for
further information.

Summary of Contents for 2377753

Page 1: ...elzeug Halten Sie es von Kindern und Haustieren fern Lassen Sie Verpackungsmaterial nicht achtlos herumliegen Dieses könnte für Kinder zu einem ge fährlichen Spielzeug werden Falls Sie Fragen haben die mit diesem Dokument nicht beantwortet werden können wenden Sie sich an unseren technischen Kundendienst oder an sonstiges Fachpersonal 5 2 Handhabung Wenn kein sicherer Betrieb mehr möglich ist nehm...

Page 2: ...versorgt wird à Weitere Informationen dazu finden Sie im Abschnitt LED Statusanzeigen des Sender Dongles 7 1 1 Koppeln weiterer Sender mit dem Empfänger Hinweise Sie können bis zu 32 Sender Dongles mit dem Empfänger koppeln Informationen zum Koppeln weiterer Sender mit dem Empfänger finden Sie im Abschnitt Koppeln von Sender und Empfänger 7 2 Spiegeln des Bildschirminhalts eines Mobilgeräts Hinwei...

Page 3: ...tellen 9 4 Einstellungen Einstellungen Beschreibung Download Android APK Laden Sie die mobile App direkt auf Ihr Android Gerät herunter Al ternativ können Sie auch den Google Play Store aufrufen und den Suchbegriff QuattroPod eingeben Mit der App lässt sich Ihr Android Gerät in einen zusätzlichen Sen der Dongle umwandeln Network Management Hier können Sie die Einstellungen hinsichtlich der WLAN Ve...

Page 4: ...max 1920 x 1080 p bei 60 Hz Kanalbandbreite TDMS max 10 2 Gbit s Frequenzbereich 5 150 5 825 GHz Sendereichweite max 30 m Sendeleistung max 10 dBm Abmessungen B x H x T ca 76 x 22 x 69 mm Gewicht ca 68 g 14 3 Allgemeines Frequenzband 5 GHz Unterstützung des Empfängers geteilter Bildschirm max 2 Inhalte gleichzeitig 32 Sender Dongles Komprimierung H 264 Latenzzeit 0 2 Sekunden Länge des HDMI Kabels...

Page 5: ...ental use Safe operation can no longer be guaranteed if the product is visibly damaged is no longer working properly has been stored for extended periods in poor ambient conditions or has been subjected to any serious transport related stresses Handle the product carefully Jolts impacts or a fall even from a low height can damage the product Consult an expert when in doubt about the operation safe...

Page 6: ...rror disconnect Send mirror request Hold for 3 seconds Full screen mirror Send full screen mirror request Small button control Host Guest Single click Allow guest to mirror Double click Deny request Hold for 3 seconds Stop display 8 2 Pairing transmitter and receiver Relink the transmitter and receiver if the large and small LED status lights are flashing PRECONDITIONS a The receiver is connected ...

Page 7: ...re the screen max 2 split screen allowed Unstable Wi Fi con nection Wi Fi interference or out of range Minimize interference from other wireless devices e g Wi Fi Router Microwave air condi tioner etc Do not cover the transmitter and receiver Make sure the transmitter and receiver are within range 11 Cleaning and care Important Do not use aggressive cleaning agents rubbing alcohol or other chemica...

Page 8: ...service d assistance technique ou un autre technicien spécialisé 5 2 Manipulation Si une utilisation du produit en toute sécurité n est plus possible arrêtez de l utiliser et protégez le de toute utilisation accidentelle Un fonctionnement sûr ne peut plus être garanti si le produit est visiblement endommagé ne fonctionne plus correctement a été stocké pendant une période prolongée dans des conditi...

Page 9: ...0 Mot de passe 12345678 2 Accédez à la fonction de mise en miroir de l écran sur votre appareil et sélectionnez le SSID SP WTR 500 Si deux émetteurs partagent déjà un écran vous devez déconnecter l un d entre eux pour permettre à l appareil mobile de fonctionner en miroir 8 Fonctionnement Remarque Seuls deux émetteurs peuvent projeter leur contenu d écran en même temps Reportez vous à la sec tion ...

Page 10: ...es Alimentation électrique insuffi sante Vérifiez que l alimentation électrique correspond aux entrées nominales indiquées dans la section Données techniques L écran n apparaitra pas sur l affichage après pression sur le bouton de l émet teur Vous êtes la troisième per sonne à vouloir partager du contenu sur l écran Le premier ou le deuxième utilisateur doit ap puyer sur le bouton xx pour retirer ...

Page 11: ...ijn beantwoord neem dan contact op met onze technische klantendienst of ander technisch personeel 5 2 Omgang Als het product niet langer veilig gebruikt kan worden stel het dan buiten bedrijf en zorg ervoor dat niemand het per ongeluk kan gebruiken Veilig gebruik kan niet langer worden gegarandeerd als het product zichtbaar is beschadigd niet meer naar behoren werkt gedurende een langere periode o...

Page 12: ...12345678 2 Open de schermspiegelingsfunctie op uw apparaat en selecteer SSID SP WTR 500 Als twee zenders al een scherm delen moet u één zender loskoppelen zodat het mobiele apparaat kan spiegelen 8 Bediening Opmerking Slechts twee zenders kunnen gelijkertijd hun scherminhoud projecteren Zie paragraaf Bediening Zender voor meer informatie 8 1 Zender Grote knop spiegelen Host Guest Enkele klik Spieg...

Page 13: ...ng Controleer of de voeding overeenkomt met de nominale ingangsspecificaties in paragraaf Technische gegevens Het scherm ver schijnt niet op de display na op de zendknop te druk ken U bent de derde persoon die inhoud wilt delen naar de dis play De eerste of tweede gebruiker dient op de xx toets te drukken om hun apparaat te verwijde ren zodat iemand anders hun scherm kan delen max 2 splitscherm to...

Reviews: