


DFG460-4
Operating Manual
STARTING WORK
1. BEFORE STARTING WORK ENSURE THAT THE GRINDING HEADS HAVE BEEN
FITTED, SEE PAGE 2
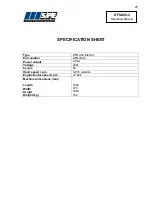
2. Ensure the power supply is correct for DFG460-4 - This should be a 220v 16 amp supply
from the mains or generated with a minimum of 8 kva on 50 cycles.
3. Connect a vacuum to the port at the rear of the machine to control the dust.
4. The height of the operating handle can be adjusted by using the handwheel at the rear of
the machine. Turning the handwheel anti-clockwise will raise the handle and clockwise will
lower the handle.
The grinding head of the machine can pivot and the movement can be altered by adjusting
the two grinding head stops at the front and rear of the frame.
5. After connecting the machine to the power supply turn the red isolator switch to the ON
position. The red light will illuminate on the electric panel.
6. Turn on the vacuum.
7. Ensure that the emergency stop button is out by turning clockwise.
8. Turn the speed control knob on top of the electrical panel to a low speed setting.
9. Press the green button on top of the electrical panel. The green light will illuminate and the
inverter will power up. There may be a delay of 2-3 seconds before the electric motor starts.
10. To increase the grinding speed, turn the speed control knob on top of the electrical
panel to the next level. With experience the operator will be able to feel the correct speed
setting for the grinding process.
11. To stop the machine, press the red emergency stop button.
The machine can be disassembled to enable it to fit into a small vehicle. Unplug the motor
lead from the electrical panel then take out the pins in the yokes at the base of the main
handle and also the one at the bottom of the height adjustment tube, lift the handle assembly
from the frame of the machine.
1