


6
EN
BR 102E
Rags, cloths, cord, string and the like should
never be left around the work area.
Always switch the machine off prior to leaving
it down.
The tool must be used only for its prescribed
purpose. Any use other than those mentioned
in this Manual will be considered a case of
misuse. The user and not the manufacturer
shall be liable for any damage or injury result-
ing from such cases of misuse.
To use this tool properly, you must observe
the safety warnings, the assembly and op-
eration instructions in this booklet. All persons
who use and service the machine have to be
acquainted with these Original Instructions
and must be informed about its potential haz-
ards. Children and frail people must not use
this tool. Children should be supervised at all
times if they are in the area in which the tool is
being used. It is also imperative that you ob-
serve the accident prevention regulations in
force in your area. The same applies for gen-
eral rules of occupational health and safety.
The manufacturer shall not be liable for any
changes made to the tool nor for any damage
resulting from such changes.
Power tools must not be used outdoors in
rainy weather, or in moist environment (after
rain) or in close vicinity with easily lammable
liquids and gases. The working place should
be well lit.
Know your product
Before using the power tool, familiarize your-
self with all the operating features and safety
requirements.
Use the tool and accessories only for the ap-
plications intended. All other applications are
expressly ruled out.
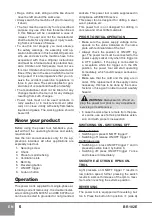
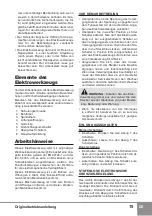
1. Securing screw
2. Chuck
3. Place for spindle ixing
4. Ventilation slots
5. Belt clip
6. Reversing button
7. ON/OFF trigger
8. Lock-on button
Operation
This power tool is supplied from single-phase al-
ternating current mains only. It is double insulat-
ed according to EN 60745-1 and IEC 60745 and
can be connected to grounded or not grounded
sockets. This power tool is radio suppressed in
compliance with EMC Directive.
This power tool is designed for drilling in steel,
wood, plastics, etc.
This power tool is not designed for drilling in
concrete and other brittle materials.
PRIOR TO INITIAL OPERATION
Make sure the power supply voltage corre
-
sponds to the value indicated on the name
plate with technical data of the tool.
Always check the position of ON/OFF trig
-
ger. The power tool must be connected to the
power supply socket only when this trigger is
in OFF position. If the plug is connected to
a receptacle while the trigger is in the ON
position, the power tool will start operating
immediately, which could cause a serious ac-
cident.
Make sure that the cord and the plug are in
order. If the replacement of the supply cord is
necessary, this has to be done by the manu-
facturer or his agent in order to avoid a safety
hazard.
WARNING:
Always switch off and un-
plug the power tool prior to any adjustment,
servicing or maintenance.
In case the work area is remote from the pow
-
er source, use as short as practicable exten-
sion cord with proper cross-section.
SWITCHING ON - SWITCHING OFF
Brief activation
Switching on: press ON/OFF trigger 7.
Switching off: release ON/OFF trigger 7.
Continuous use
Switching on: press ON/OFF trigger 7 and in
pressed position lock it by button 8.
Switching off: press ON/OFF trigger 7 once
and release it immediately.
SMOOTH ELECTRONIC RPM CON-
TROL
Light pressure on ON/OFF trigger 7 results in
low rotation speed, further pressing the switch
results in a smooth increase of the rpm to maxi-
mum when reaching the extreme position.
REVERSING
The power tool is equipped with reversing but-
ton 6. Press the button 6 in position <= (side A)
Summary of Contents for BR 102E
Page 2: ...B 5 2 3 4 6 7 8 1 B A ...
Page 68: ...66 RU BR 102E 66 68 69 I 71 A 72 72 74 75 SPARKY SPARKY SPARKY SPARKY ...
Page 69: ...67 RU YYYY Www YYYY ww BR ...
Page 71: ...69 RU 1 a b c 2 a b c d e f 3 a b c ...
Page 72: ...70 RU BR 102E d e f g 4 a b c d e f g 5 a ...
Page 73: ...71 RU ...
Page 74: ...72 RU BR 102E 1 2 3 4 5 6 7 8 EN 60745 1 IEC 60745 ...
Page 75: ...73 RU 7 7 7 8 7 6 6 A B 7 6 2 2 2 2 3 2 3 6 ...
Page 76: ...74 RU BR 102E 6 35 mm 1 4 SPARKY SPARKY ...
Page 77: ...75 RU SPARKY SPARKY ...
Page 78: ...76 UK BR 102E 76 78 79 80 A 82 82 84 85 SPARKY SPARKY SPARKY SPARKY ...
Page 79: ...77 UK YYYY Www YYYY ww BR I ...
Page 81: ...79 UK 1 a b c 2 a i i b c d e f i 3 a b c d ...
Page 82: ...80 UK BR 102E e f g 4 a b c d e i f g 5 a ...
Page 83: ...81 UK i ...
Page 84: ...82 UK BR 102E 1 2 3 4 5 6 7 8 i EN 60745 1 IEC 60745 7 7 7 8 7 6 6 A B 7 6 ...
Page 85: ...83 UK 2 2 2 2 3 2 3 6 6 35 mm 1 4 ...
Page 86: ...84 UK BR 102E SPARKY SPARKY ...
Page 87: ...85 UK i SPARKY SPARKY ...
Page 88: ...86 BG BR 102E 86 88 89 91 A 92 92 94 95 SPARKY SPARKY SPARKY SPARKY ...
Page 89: ...87 BG YYYY Www YYYY ww BR ...
Page 91: ...89 BG 1 a b c 2 a b c d e f 3 a b c ...
Page 92: ...90 BG BR 102E d e f g 4 a b c d e f g 5 a ...
Page 93: ...91 BG ...
Page 94: ...92 BG BR 102E I 1971 40o 1 2 3 4 5 6 7 8 EN 60745 1 IEC 60745 ...
Page 95: ...93 BG 7 7 7 8 7 6 6 A B 7 6 2 2 2 2 3 2 3 6 ...
Page 96: ...94 BG BR 102E 6 35 mm 1 4 SPARKY SPARKY ...
Page 97: ...95 BG SPARKY SPARKY ...
Page 98: ......