background image

V.1409A 


    Page | 11 

NOTES FOR REGISTERING A USER ACCOUNT: 

1)


If your chosen username has already been taken a “MEMBER EXISTS” error will appear once you 
click REGISTER. Enter a different username and try again.  

2)


Only one user account can be registered to an email address. If you attempt to register multiple 
accounts with the same email address a “MEMBER EXISTS” error will appear. 

3)


The chosen username and email address must not have been used before for successful 
registration with the SpaNET server.  

4)


If you have made a mistake or are experiencing difficulties with your user account registration, or 
wish to change your details please email 

[email protected]


Configure your Spa/WiFi module  


Once you have registered a user account with SpaNET you are now ready to configure your spa. 
The configuration process is a once off setup event that programs the SpaNET WiFi module with 
your wireless router’s login details (SSID and password) to provide Internet access to your spa. 
Unless your router login details change (i.e. you change ISP) you will never need to run the 
setup procedure again. The login details will be stored in the SpaNET WiFi module and will be 
remembered even if power to the spa or router is turned OFF. To complete the process require: 

a)


An active WiFi, 3G or 4G Internet connection on your smart device 

b)


Your login credentials for your wireless router (SSID name and password) 

c)


Router left in default WPA/WPA2 security encryption. DO NOT use WEP encryption. 
 

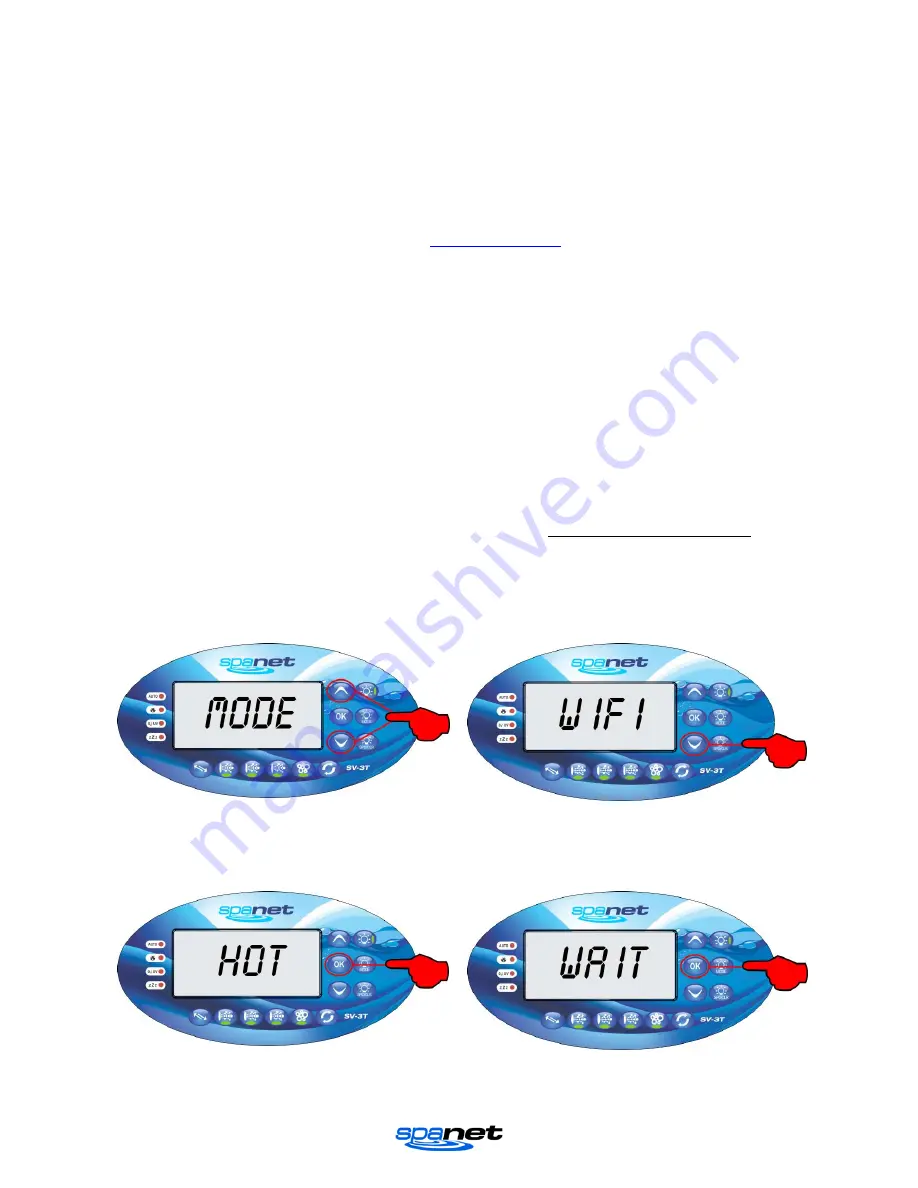
Step 1: On your spa side keypad press and 

hold the UP + DOWN buttons simultaneously 

until the display shows [MODE] 


Step 2: Press the DOWN button multiple times 

until display shows [WIFI] 


Step 3: Press the OK button and the display 

will show [HOT] 


Step 4: Press the OK button to activate the Hot 

Spot mode. The display will briefly show [WAIT] 


The above steps place the SpaNET WiFi module into Hot Spot Mode (HOT) enabling your smart 
device to connect directly to the WiFi module for configuration. 

Summary of Contents for SV SmartStream

Page 1: ......

Page 2: ...sconnect Bluetooth Connection 7 Volume Control 7 Loudness 8 Audio Input Sources 8 EEPROM non volatile Memory 8 Reset to Factory Defaults 8 SmartSTREAM WiFi Module 9 SpaLINK App Overview 9 Installing the SpaLINK App on your smart device 9 Register a User Account 9 Configure your Spa WiFi module 11 Spa List Screen 17 Online Offline Spas 17 Edit Spa List 18 Troubleshooting Spa WiFi Module Configurati...

Page 3: ...ching and allowing complete control over volume fader balance treble midrange bass subwoofer levels and sub frequency adjustments The SmartSTREAM controller can operate as a standalone stereo system for your spa or be connected via a data cable to a SpaNET SV Series spa control When connected to a SpaNET SV Series spa control the SmartSTREAM s WiFi module allows remote control of the SV Series spa...

Page 4: ...he tap key is pressed Each release of the tap key operates the function Single Key Functions FUNCTION KEY NOTES Power on off 1 Press hold for 4 seconds to turn on or off Volume 2 Increases amplifier volume Volume 3 Decreases amplifier volume Play Pause 4 Works with Bluetooth source only Track 5 Works with Bluetooth source only Track 7 Works with Bluetooth source only Mute 6 Mutes amplifier Source ...

Page 5: ...r midrange filter Bass 6 2 Increases audio processor bass filter Bass 6 3 Decreases audio processor bass filter Subwoofer 7 2 Increases audio processor subwoofer gain Subwoofer 7 3 Decreases audio processor subwoofer gain Subwoofer frequency 1 7 Select subwoofer cut off frequency 1 to 4 1 Flat no cut off 2 80Hz 3 120Hz 4 160Hz Each press steps to the next setting A chirp sound is produced to refle...

Page 6: ...X where XXXX is the last four digits of the Bluetooth module s serial number This name appears on the smart device phone tablet PC list of Bluetooth devices to connect to 1 Ensure the SmartSTREAM system has Bluetooth mode selected with the Bluetooth indicator LED flashing 2 Search for Bluetooth devices from your smart device phone tablet PC 3 Select the SpaNET SV AMP XXXX device from the list to p...

Page 7: ...ng the best audio quality DEVICE HOW TO ADJUST VOLUME Smart Device Volume adjusted on the smart device itself recommend setting to maximum Bluetooth Module Adjusted via SmartSTREAM keypad using Hold Tap function Hold key 8 and Tap keys 2 or 3 to increase or decrease volume recommend setting to maximum NOTE A beep will sound when volume has reached its maximum level SmartSTREAM Amplifier Adjusted v...

Page 8: ...udio source is currently selected There is a fourth indicator LED for the Bluetooth source labelled by the Bluetooth symbol The Bluetooth indicator LED will either be flashing or on steady depending on Bluetooth status refer Bluetooth section of this user manual for further details NOTE The last used audio source will be remembered when the SmartSTREAM is powered OFF and used when the system is ne...

Page 9: ...iding access to your spa from any location at any time Your Apple or Android smart device becomes a wireless remote for your spa enabling complete control over all spa accessories including pumps air blowers and LED spa lights and lighting effects In addition the app provides total control over every possible spa configuration setting There are no shortened menus or minimal access to limited setti...

Page 10: ...plete If your registration was successful the app will automatically login with your details and proceed to the spa list page ready for you to add your spa to your account NOTE Shortly after completing your registration you will receive an email confirming your login details Your name Create username for login Your email address Create password for login Confirm password for login ...

Page 11: ...h your wireless router s login details SSID and password to provide Internet access to your spa Unless your router login details change i e you change ISP you will never need to run the setup procedure again The login details will be stored in the SpaNET WiFi module and will be remembered even if power to the spa or router is turned OFF To complete the process require a An active WiFi 3G or 4G Int...

Page 12: ... not see the above screen please open the app and login with your username and password entered during registration Step 6 Press on NEW DEVICE to add your spa to your spa list Step 7 Your display should change to the following setup screen refer below Step 7a Press your smart device home button to return to your icons and navigate to your WiFi settings screen ...

Page 13: ... the SV WiFi network go back and re enter the SpaLINK app Press on X to close the setup instructions Step 10 Press on SETUP to begin a WiFi scan to locate your home wireless network A spinning wait icon will appear whilst the scan is taking place Wait for the scan to complete before pressing anything else Step 11 Select your wireless network for the spa to connect to for Internet access ensure sig...

Page 14: ...reliable communication and operation of the app The signal strength of your wireless network should be no less than 80db for reliable operation If the signal strength is not acceptable you may need to relocate your wireless router closer to the spa install a WiFi range extender to boost the signal or install a higher powered antenna to the SpaNET SmartSTREAM module underneath your spa If your wire...

Page 15: ...y into the SpaNET WiFi module for connecting to your wireless router If you type the password incorrectly the SpaNET WiFi module will be unable to login and connect to your wireless router and the whole setup procedure will need to be run again Step 13 Press OK to confirm the wireless network settings SSID Password have been saved to the SpaNET WiFi module Step 14 Your display will now show the sc...

Page 16: ...y revert to your normal WiFi network by itself Step 15 Once connected to your usual WiFi network re enter the SpaLINK app Press on the X to close the setup instructions Step 16 Enter a name for your spa and press REGISTER Complete Your WiFi module is configured and will attempt to connect to the Internet The app will return to your spa list showing your spa as offline greyed out ...

Page 17: ...n configured so long as there is power to your spa and your wireless router is available for Internet access your spa should show online in your spa list ready for remote access at anytime However to ensure your spa connection remains stable and to ensure your spa automatically reconnects to the Internet if there is a power outage or your wireless router resets your WiFi module will periodically r...

Page 18: ...ss and hold the UP DOWN buttons until display shows MODE 2 Press the DOWN button until display shows WIFI 3 Press the OK button to enter WIFI menu display will show HOT 4 Press the UP button to change display to INFR 5 Press the OK button to confirm INFR infrastructure mode display will briefly show WAIT and then return to the default temperature display After these steps allow the WiFi module ano...

Page 19: ... the following steps 1 Turn the mains power to the spa OFF and leave powered OFF for 2 minutes 2 Turn the mains power back ON and wait for the priming sequence to complete and default temperature display to appear 3 On the spa side keypad press and hold the UP DOWN buttons until display shows MODE 4 Press the DOWN button until display shows WIFI 5 Press the OK button to enter WIFI menu display wil...

Page 20: ... and used in accordance with the instructions may cause harmful interference to radio communications However there is no guarantee that interference will not occur in a particular installation If this equipment does cause harmful interference to radio or television reception which can be determined by turning the equipment off and on the user is encouraged to try to correct the interference by one...

Reviews: