Southworth Pallet Unloader Installation, Operation & Maintenance Manual Download Page 21

Southworth Products

PUN Manual

PUN Manual

21

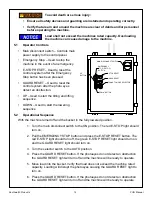
3.  Each valve used on this machine is designed with a solenoid coil which can be 

changed without removing the valve or spilling any hydraulic fluid. To change the 

solenoid:
•  Disconnect the wire leads to the solenoid.
•  Loosen the knurled nut at the top of the solenoid, and remove the nut and 

O-ring.

•  Slide the solenoid off of the core tube.

4.  To clean the parts on the valve spool, you must remove it from the valve 

body. De-pressurize the hydraulic system by lowering both lifting mechanisms 

completely. Be sure to turn off the power to the machine.

5.  Unscrew the core tube. Remove the valve plunger and inspect it for dirt or metal 

chips which could block the valve action. Clean the valve plunger as required, 

then blow it clean with compressed air. Before reassembly, verify that the inside 

of the valve body is clean and free of debris. Depress the plunger by hand 

several times to be sure it moves freely.

6.  To reassemble, reverse the steps listed above. The nut which holds the solenoid 

should be finger-tight only!

8.6    Removing a Cylinder

To avoid death or serious injury:

•  All repair or maintenance shall be performed with the bucket in the fully 

lowered position. See the Maintenance section before beginning any work.

•  Hydraulic Cylinders are heavy. Falling cylinders can cause serious injury.

This section will tell you how to remove a cylinder from the tilt mechanism or the dump 

mechanism. Two cylinders are used on each mechanism. Both types of cylinders are 

double-acting, and both have the same bore diameter. The following procedure will apply 

to both cylinder types.
Before beginning this procedure, please read and understand this entire section. 

1.  Before you remove a cylinder, be sure that you have these items on hand: 

•  Replacement cylinder or cylinder packing kit.
•  A supply of new hydraulic oil. Contaminated oil may damage the new 

packing.

•  Containers to catch the used oil.
•  A clean place to work which will not be damaged if you spill some oil 

(especially if repacking the existing cylinder).

2.  Lower the bucket completely to the loading position (as discussed earlier).
3.  Turn off the electrical power at the main disconnect or circuit breaker. Follow 

Summary of Contents for Pallet Unloader

Page 1: ...UN Installation Operation Maintenance Manual Southworth Products Corp P O Box 1380 Portland ME 04104 1380 Phone 207 878 0700 or 800 743 1000 Fax 207 797 4734 www SouthworthProducts com Email Service S...

Page 2: ...n 8 4 1 Preparation 8 4 2 Positioning the Machine 9 4 3 Hydraulic Connections 9 4 4 Electrical Connections 10 4 5 Checking the Hydraulic System 11 4 6 Testing 11 5 Operation 11 5 1 Operator Controls 1...

Page 3: ...3 Setting End of Travel for Tilt Down Function 20 8 4 Inspecting and Cleaning the Control Valve 20 8 5 Repacking a Cylinder 22 8 6 Replacing a Cylinder 23 9 Hydraulic System Information 25 9 1 Hydraul...

Page 4: ...on manual is not intended to be or to create any other warranty express or implied including any implied warranty of merchantability or fitness for a particular purpose all of which are hereby express...

Page 5: ...ade only with written permission from Southworth 2 Safety Before installing operating or servicing this machine read understand and follow all safety instructions and warnings 2 1 Safety Alert Symbols...

Page 6: ...res to protect the operator and nearby personnel from severe injury or death These features and devices shall be installed and functioning correctly during operation Side Guarding Protects operator an...

Page 7: ...Southworth Products PUN Manual 7 3 2 Label Locations 3 4 APPLY 2995191T TO BOTTOM OF ENCLOSURE SHOULD BE CENTERED AND WHEN ENCLOSURE IS TILTED 90 1 2...

Page 8: ...e sure to read and understand all of the warnings Select the location where the unit will be installed Choose a location where the floor is firm flat and level As the unit operates it is very importan...

Page 9: ...material and unskid the unit Move the unit into position supporting the base of the unit 2 Level the machine using shims as necessary Grout beneath the entire base from leave no gaps Allow grout to fu...

Page 10: ...s 3 Connect port C to the base of the lifting cylinders 4 Connect Vent Line from top of lifting cylinders to the tank 4 4 Electrical Connections To avoid death or serious injury This unit requires thr...

Page 11: ...rs notice how the bottom of the enclosure meets the floor The front edge load edge of the enclosure should touch at the same time as any other part of the enclosure If any other part of the base of th...

Page 12: ...onal Sequence With the machine turned off and the bucket in the fully lowered position 1 Turn the main disconnect switch to the ON position The red E STOP light should turn on 2 Pull the EMERGENCY STO...

Page 13: ...ntil the obstruction is cleared and the GUARD RESET button has been pressed If the EMERGENCY STOP button has been pressed Steps 2 3 must be performed to resume operation 5 3 Run Time Fault Sequence If...

Page 14: ...UN Manual 14 2 To test and diagnose problems with the machine by using the UP and DOWN buttons 5 5 Operational Sequence Illustration FULLY LOWERED POSITION TILTED TO TILT UP PROXIMITY SWITCH FULL TILT...

Page 15: ...be removed safely from either the tilt or dump mechanisms when the bucket is completely lowered Normally you should never need to work under the bucket Always stay clear of the space under this enclo...

Page 16: ...the tilt frame on to the support stands This may damage the machine and over stress the floor anchors 7 Turn the main disconnect switch to the OFF position Follow Lock Out Tag Out procedures 8 It is...

Page 17: ...the main pivot pins and bushings and the cylinder clevis pins and bushings for signs of wear To avoid death or serious injury If you are going to repair the main pivot pins and bushings on either the...

Page 18: ...er current protection in case of an overload The protective circuit will reset after it has cooled Look for anything which may be preventing the motor from turning The motor may be running backwards I...

Page 19: ...g under any raised parts of the unit support the body of the unit using a set of strong supports The down side of the control valve for this part of the system may not be work ing The down side of the...

Page 20: ...ing the floor Position this switch so that the bucket stops lowering when the front lip of the bucket just contacts the floor When the bucket reaches this limit the switch should send a signal to stop...

Page 21: ...which holds the solenoid should be finger tight only 8 6 Removing a Cylinder To avoid death or serious injury All repair or maintenance shall be performed with the bucket in the fully lowered positio...

Page 22: ...ualified hydraulic repair shop During reassembly it is very important to keep all of the parts free of dirt dust metal chips water and other contamination Most of the problems with hydraulic systems a...

Page 23: ...diameter of the cylinder tube with a light coating of hydraulic oil Carefully insert the piston and rod back into the cylinder Be very careful not to damage the piston ring O ring or BU washer as you...

Page 24: ...the model number and the serial number of the lift You can find these numbers on the name plate which is located on the crossbar at the base of the cylinder s When you are ordering parts for a cylind...

Page 25: ...st and oxidation inhibitors and anti wear properties If the lift will be used at ambient temperatures below 0 F use aircraft hydraulic oil Use Type 15 aircraft hydraulic oil The following are equivale...

Page 26: ...Southworth Products PUN Manual 26 9 2 Hydraulic Plumbing Schematic...

Page 27: ...Southworth Products PUN Manual 27 9 3 Hydraulic Arrangement...

Page 28: ...Southworth Products PUN Manual 28 9 4 Hydraulic Connections CONNECT PORT B TO BOTTOM CONNECTION CONNECT PORT A TO TOP CONNECTION CONNECT PORT C TO RIGHT CONNECTION...

Page 29: ...AN AUTO MODE SELECTOR MAIN DISCONNECT SWITCH GUARD RESET E STOP RESET DOWN BUTTON EMERGENCY STOP E STOP BUTTON UP BUTTON CONTROL 2CR 1CR 6FU 4FU 5FU 1FU 4CR TRANSFORMER PLC 3FU RELAY 2FU 7FU TERMINAL...

Page 30: ...Southworth Products PUN Manual 30 10 2 Electrical Schematic...

Page 31: ...ch noncompliance Southworth Products Corp s obligation under this warranty is limited to the replacement or repair of defective components at its factory or another location at Southworth Products Cor...

Reviews: