background image

S

TRATO

S

TEAM 

E

LECTRIC 

C

OUNTERTOP 

S

TEAMER


S

ERVICE


O

WNER

M

ANUAL 

1189951


(10/08) P

AGE 

31

 OF 

56 


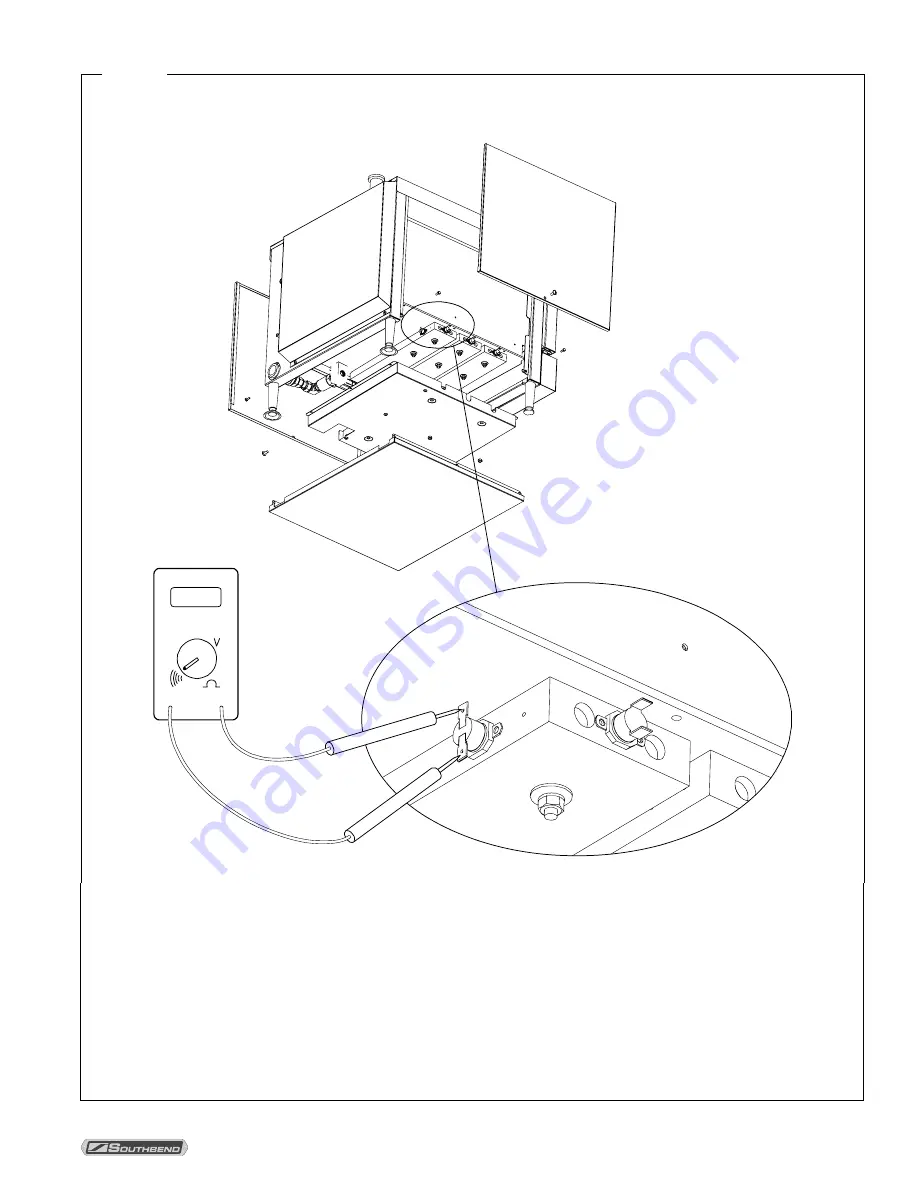
Figure 20


Water-Level-Control Sensor Check 

Continuity


1. 

DISCONNECT POWER AT CIRCUIT BREAKER

2.  Remove the left and right side panels. 

3.  Remove bottom panel (four screws). 

4.  Remove insulation cover panel (four nuts). 

5.  Locate the water-level-control sensor (at the rear edge of the rear element block). Disconnect wires B1 and B2 

from the sensor. 

6.  Place test leads across water-level-control sensor terminals (as shown above) and check for continuity when 

the sensor is cool. If no continuity, replace sensor. 

7.  Reconnect wires and reassemble. 


Summary of Contents for StratoSteam STRE-3D

Page 1: ...ty damage injury or death Read installation operation and maintenance instructions thoroughly before installing or servicing this equipment 1100 Old Honeycutt Road Fuquay Varina NC 27526 USA www south...

Page 2: ...AFETY Do not store or use gasoline or other flammable vapors and liquids in the vicinity of cooking appliances Keep area around cooking appliances free and clear of combustibles WARNING BURN HAZARD Co...

Page 3: ...ns Introduction 3 Specifications 4 Operation 7 Cleaning Maintenance 10 Installation 12 Service 19 Each steamer has two serial plates located on the exterior of the steamer see Figure 1 below Read thes...

Page 4: ...ed for commercial use only not for household use CLEARANCES WARNING MINIMUM CLEARANCES FROM COMBUSTIBLE CONSTRUCTION Minimum clearance from combustible and non combustible surfaces is 0 on the sides b...

Page 5: ...d Water Inlet optional 1 4 Compression 12 3 8 315 3 3 8 87 3 3 4 96 1 3 4 44 Drain Box Overflow Vent Drain Connection 1 NPT 1 1 4 32 5 1 4 132 24 611 6 152 23 586 28 3 4 733 24 3 4 627 19 3 4 500 74 1...

Page 6: ...n 1 4 compression cold water Pressure 30 to 60 PSI Total Dissolved Solids TDS 60 PPM or less Hardness 2 grains 35 PPM or less pH 7 0 to 7 5 Chlorine and or bromine 1 PPM or less Maximum Fill Capacity...

Page 7: ...in the table in the following section Pan specifications are shown on page 4 The door may be opened or closed at any time The steamer temporarily shuts off while the door is open Timer can be used as...

Page 8: ...Light Lights when the steamer has electric power and Control Lever is turned to ON Thermometer Indicates temperature in cooking cavity Steamer is ready to cook when temperature reaches 190 F 88 C Cook...

Page 9: ...in a perforated pan place a solid pan underneath the perforated pan with the cooked food in order to prevent dripping on the floor The steamer is designed to accept standard 12 x 20 pans Fractional si...

Page 10: ...gs or food products remove them using a non metallic scouring pad RINSE THOROUGHLY WITH CLEAN WATER Dry thoroughly with a clean cloth 5 Ensure drain opening inside of cavity is clear 6 Clean drain ope...

Page 11: ...rkened areas that sometimes appear on stainless steel surfaces where the area has been subjected to excessive heat These darkened areas are caused by thickening of the protective surface of the stainl...

Page 12: ...oper operation Improper leveling may void the warranty STEP 1 UNPACKING IMMEDIATELY INSPECT FOR SHIPPING DAMAGE All containers should be examined for damage before and during unloading The freight car...

Page 13: ...iently to allow the legs to be attached For safety shore up and support the steamer with an adequate blocking arrangement strong enough to support the load 2 Screw the legs into the holes see Figure 4...

Page 14: ...5 5 Go on to Installation Step 3 Figure 5 Installation on Countertop STEP 2C MOUNTING ON CABINET BASE If the steamer is to be mounted on the optional cabinet base first attached the legs to the cabin...

Page 15: ...is connection in the drain system Make the drain line from the steamer to the air gap above the open funnel as short as possible There should be no horizontal piping between the steamer and the air ga...

Page 16: ...omine 1 PPM or less Connect a cold water line to the water inlet strainer on the back of the steamer as shown in Figure 6 The connector on the steamer is a 1 4 6 mm compression fitting If the unit was...

Page 17: ...ght side panel of the steamer WARNING A POSITIVE GROUND CONNECTION IS ESSENTIAL DO NOT ALLOW ANY TAMPERING OR ADJUSTMENT OF ANY CONTROL OR WIRING THE STEAMER IS FACTORY SET ADJUSTING ANY INTERNAL COMP...

Page 18: ...ower light comes on 4 Check that the timer and buzzer operate correctly 5 Open the door and check that water is entering the cavity NOTE the fill rate is slow 6 Wait four minutes then check that some...

Page 19: ...the securing screw near the center of the bottom edge of the panel To remove the top panel remove the two securing screws on the rear face then slide the top panel forward and off The door is field r...

Page 20: ...ON and the door is shut Hence when cooking water flows continuously into the cooking cavity However if the Cook Idle switch is set to IDLE MODE water will not enter the cavity If a high level thermost...

Page 21: ...Safety Switch not visible Pressure Relief Vent Drain Box Overflow Vent not visible Water Inlet not visible Water Drain not visible Water Solenoid Drain Valve Contactor Buzzer behind panel Power Switc...

Page 22: ...ctor Measure the resistance across the leads each cartridge Replace any cartridge that shows either an open or short circuit Check main fuses 480V models only and replace as needed Is measured resista...

Page 23: ...for obstructions Turn steamer back on and wait 10 minutes High limit thermostats OK No Yes Replace high limit thermostats as necessary DISCONNECT POWER AT CIRCUIT BREAKER Check that water supply pres...

Page 24: ...On When Timer Runs Out Disconnect buzzer lead wires from the timer Buzzer does not come on when timer runs out Replace timer Replace buzzer Timer OK No Yes DISCONNECT POWER AT CIRCUIT BREAKER No Yes...

Page 25: ...E 3D Model STRE 5D Allowable Resistance Ohms Allowable Resistance Ohms Three Phase Single Phase Three Phase Single Phase Serial Plate Voltage A B and B C A C A C A B and B C A C A C 208 10 to 12 14 to...

Page 26: ...that connects the control panel component wires to the wiring harness 5 As shown above place one test lead on terminal L1 of the contactor and the other test lead in position 1 of connector PL1 the s...

Page 27: ...ctuator on top of contactor Actuator should travel freely and spring back when released 4 Check for continuity between contacts L1 and A as shown above There should be no continuity 5 Repeat Step 4 fo...

Page 28: ...sconnect from the timer the wire that leads to the buzzer 5 Disconnect connector PL1 to separate the other buzzer lead wire from the wiring harness 6 Place test leads between positions 1 and 3 on the...

Page 29: ...tuator rod actuates the door switch when the rod moves 4 Disconnect the wiring harness from the switch terminals at the two places shown above where the test probe tips are located 5 Place the test pr...

Page 30: ...cavity bottom to cool before performing this test 2 DISCONNECT POWER AT CIRCUIT BREAKER 3 Remove left side panel 4 Disconnect wires from left and right terminals of each high limit thermostat 5 Test e...

Page 31: ...ht side panels 3 Remove bottom panel four screws 4 Remove insulation cover panel four nuts 5 Locate the water level control sensor at the rear edge of the rear element block Disconnect wires B1 and B2...

Page 32: ...ld be approximately 800 ohms Replace if necessary 6 Apply waterline pressure to water inlet Water should not leak out of the compression fittings If necessary replace water solenoid Check to see that...

Page 33: ...STRATOSTEAM ELECTRIC COUNTERTOP STEAMER SERVICE OWNER S MANUAL 1189951 10 08 PAGE 33 OF 56 Figure 22 Wiring Diagram for 208 220 240 Volt Units Built on or after September 1 2008...

Page 34: ...REE PHASE TO SINGLE PHASE OR VICE VERSA CONSULT FACTORY WARNING FOR PHASE CHANGES NOTE a ALL STRE 3D ELEMENTS ARE 1500 W EACH b ALL STRE 5D ELEMENTS ARE 1834 W EACH POWER MICROSWITCH HEATER T STATS PO...

Page 35: ...STRATOSTEAM ELECTRIC COUNTERTOP STEAMER SERVICE OWNER S MANUAL 1189951 10 08 PAGE 35 OF 56 Figure 24 Wiring Diagram for 480 Volt Units Built on or after September 1 2008...

Page 36: ...BUZZER 5 THERMOSTAT DOOR SWITCH COM NC NO CONTACTOR COIL 16 NC KEY THIS UNIT REQUIRES A KIT TO BE FIELD CONVERTED FROM THREE PHASE TO SINGLE PHASE OR VICE VERSA CONSULT FACTORY WARNING FOR PHASE CHAN...

Page 37: ...ts Diagram Page Structural Parts 38 Control Parts for units built on or after September 1 2008 40 Control Parts for units built between January 7 2008 and August 31 2008 42 Control Parts for units bui...

Page 38: ...5072 1 1 DOOR SWITCH ASSEMBLY see page 45 for individual parts 5 1185036 1 1 FLOOR PANEL 6 1185103 1 SIDEWALL ASSEMBLY STRE 3D 1185123 1 SIDEWALL ASSEMBLY STRE 5D 7 1178668 1 PAN GUIDE LEFT SIDE STRE...

Page 39: ...TRATOSTEAM ELECTRIC COUNTERTOP STEAMER SERVICE OWNER S MANUAL 1189951 10 08 PAGE 39 OF 56 Figure 26 3 4 1 2 6 7 8 9 10 9 15 12 13 16 17 19 5 20 11 14 18 Structural Parts See parts list on previous pag...

Page 40: ...50 1 LIGHT AMBER 240V SIGNAL 11 1190689 1 POLYPANEL STRE 3 5EZ CONTROL 12 1189725 1 FRONT PANEL W A for STRE 3EZ 1189726 1 FRONT PANEL W A for STRE 5EZ 13 1185782 2 BOLT SHLDR 1 4 20X1 8 14 1189710 1...

Page 41: ...STEAMER SERVICE OWNER S MANUAL 1189951 10 08 PAGE 41 OF 56 Figure 27 5 6 1 2 7 8 9 10 11 12 15 16 13 14 17 18 19 20 21 23 22 24 3 4 25 26 27 Control Parts for units built on or after September 1 2008...

Page 42: ...W 6 32X3 8 SS PHIL PAN HD 10 1170350 1 LIGHT AMBER 240V SIGNAL 11 1185058 1 POLYPANEL CONTROL 12 1189725 1 FRONT PANEL W A for STRE 3D 1189726 1 FRONT PANEL W A for STRE 5D 13 1185782 2 BOLT SHLDR 1 4...

Page 43: ...ER SERVICE OWNER S MANUAL 1189951 10 08 PAGE 43 OF 56 Figure 28 5 6 1 2 7 8 9 10 11 12 15 16 13 14 17 18 19 20 21 22 25 23 24 26 3 4 Control Parts for units built between January 7 2008 and August 31...

Page 44: ...05 1 GUAGE THERMOMETER 2 IN 5 1170350 1 LIGHT AMBER 240V SIGNAL 6 1178388 1 VALVE LEVER W A 7 1177770 1 BUSHING VALVE LEVER MOUNT 8 1177865 1 NUT HEX 5 8 18 BRASS 9 1178276 1 CAM ACTUATOR 10 1178549 1...

Page 45: ...ordered see page 38 Key Part Number Qty Description 1 1185070 1 ARM DOOR SW SWING STRATOSTEAM 2 1185071 1 BRACKET W A STRATOSTEAM DOOR SWITCH 3 1185195 1 SWITCH DOOR SPDT 15 AMP SUBMINIATURE 4 1146320...

Page 46: ...PANEL EXTERIOR DOOR for STRE 5D 3 1183430 3 SCREW 10 32X1 4 SS RND HD 4 1189580 1 BRACKET DOOR LATCH COVER 5 1149902 2 SCREW 10X1 2 PHIL TRUSS HEAD 6 1189738 1 DOOR INS COVER S A for STRE 3D 1189739...

Page 47: ...6527 6 WASHER 10 LOCK SS 300 4 1146526 4 WASHER 10 FLAT 5 1185053 1 PANEL W A R2 STACKABLE 6 1185028 2 HINGE PLATE W A 7 1185115 1 GASKET DOOR R2 REDESIGN 8 1146268 2 BOLT 1 4 20X5 8 HEX HEAD SS 9 660...

Page 48: ...1 NIPPLE 1 8 NPT 3 4 LNG 6 1174933 1 SOLENOID VALVE 7 1184261 1 TEE 1 8 STREET 8 1184262 1 REDUCER 3 8 TO 1 8 NPT 9 PP 636 1 FLOW REGULATOR 10 PP 286 1 FITTING 3 8 NPT X 1 4 COMP 11 1185151 1 TUBE 1 4...

Page 49: ...TRATOSTEAM ELECTRIC COUNTERTOP STEAMER SERVICE OWNER S MANUAL 1189951 10 08 PAGE 49 OF 56 Figure 33 3 4 1 2 5 6 7 12 13 14 9 10 15 8 11 16 17 18 19 20 Water Train Parts See parts list on previous page...

Page 50: ...T 5 1183983 1 HINGE ASSEMBLY UPPER RIGHT 6 1183984 1 HINGE ASEMBLY LOWER RIGHT 1183986 1 HINGE ASSEMBLY LOWER LEFT 7 1184527 1 COVER 24 BASE BOTTOM 8 1185141 1 BODY SIDE CAB SS OPEN LT 9 1185144 1 PAN...

Page 51: ...STRATOSTEAM ELECTRIC COUNTERTOP STEAMER SERVICE OWNER S MANUAL 1189951 10 08 PAGE 51 OF 56 Figure 34 3 4 1 2 5 6 7 8 9 10 13 14 11 12 15 Cabinet Base Parts See parts list on previous page...

Page 52: ...CARTRIDGE 208V 60HZ for Model STRE 5D 1181502 6 HEATER CARTRIDGE 220V 50 60HZ for Model STRE 3D 1181772 6 HEATER CARTRIDGE 220V 50 60HZ for Model STRE 5D 1181503 6 HEATER CARTRIDGE 240V 60HZ for Mode...

Page 53: ...STRATOSTEAM ELECTRIC COUNTERTOP STEAMER OWNER S MANUAL 1189951 10 08 PAGE 53 OF 56 Notes...

Page 54: ...STRATOSTEAM ELECTRIC COUNTERTOP STEAMER PAGE 54 OF 56 OWNER S MANUAL 1189951 10 08 Notes...

Page 55: ...STRATOSTEAM ELECTRIC COUNTERTOP STEAMER OWNER S MANUAL 1189951 10 08 PAGE 55 OF 56 Notes...

Page 56: ...low maintenance We all recognize however that replacement parts and occasional professional service may be necessary to extend the useful life of this appliance When service is needed contact a Southb...

Reviews: