background image

2

Copyright Notes:

This product incorporates copyright protection technology that is protected by

method claims of certain U.S. patents and other intellectual property rights owned

by Macrovision Corporation and other rights owners.

Use of this copyright protection technology must be authorized by Macrovision

Corporation, and is intended for home and other limited viewing uses only unless

otherwise authorized by Macrovision Corporation.  Reverse engineering or

disassembly is prohibited. 

Region Management information:

This product is designed and manufactured to respond to the Region Management

Information that is recorded on DVD disc. If the Region number described

on the DVD disc does not correspond to the Region number of this digital 

video player. the disc cannot be played on by this digital video player.


INSTALLATION:

   Before Installation:

   - We recommend you to let a professional technician install the unit in vehicle.


   - Disconnect negative battery terminal of vehicle.

   - Revome the trim ring from unit (if installed).

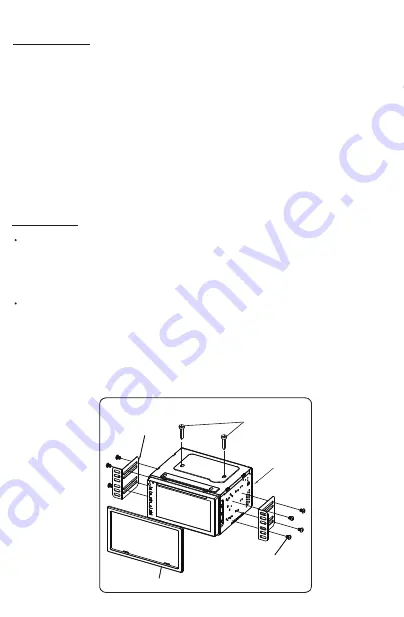
   - Remove 2 transit screws lacated on top of the unit.

   Installation Process:

   - Carefully remove the existing head unit.

   - Before finally installing this product, connect wiring harness temporarily and

     make sure it’s all connected up properly and test the head unit if it can work

     properly. (Consult a qualified technician if you unsure)

   - Mount this video player using both “L” mounting metal brackets and screws

    (M5x6bm) to the vehicle.

    Note: if you need other screws to fix other terminal, please buy from your dealer

    according to the drilling of holes size.


Head Unit

Plastic Trimring

Screws

(M5x6BM)

Metal Brackets

Remove 2 screws

before installation.

Summary of Contents for VR-65B

Page 1: ...USER S MANUAL...

Page 2: ...en the vehicle s motor is switched o This could cause the vehicle battery to discharge and the vehicle can no longer be started 4 Do not apply strong mechanical stress like drop shock or any force to...

Page 3: ...ber of this digital video player the disc cannot be played on by this digital video player INSTALLATION Before Installation We recommend you to let a professional technician install the unit in vehicl...

Page 4: ...2 Video Output Socket 2 Yellow FL Front Left CH RCA Output Socket White FR Front Right CH RCA Output Socket Red WHITE WHITE BLACK GREEN GREEN BLACK SWC GND SWC 1 SWC 2 REVERSE PARKING BRAKE B ILLUMINA...

Page 5: ...e the volume 5 EJECT BUTTON Insert the disc label side facing up until the mechanism senses its presence and draws the disc in Press it to eject the disc 6 IR REMOTE SENSOR 7 RESET SYSTEM The RESET bu...

Page 6: ...y to select di erent modes RADIO DISC USB Bluetooth AUX IN AV IN 3 BAND Band Selector button In radio mode press this button to select band 4 5 8 26 Cursor keys UP DOWN LEFT RIGHT In DVD VCD MP4 MP3...

Page 7: ...all the preset stations In DVD VCD playback press the numeric keys to choose the desired chapter title or track In BT mode press the numeric keys to input the telephone number 21 MUTE button Press thi...

Page 8: ...SWC About OSD Language English Chinese Arabic Hebrew Turkish Russian Persian Thai German French Portuguese Spanish Italian Indonesian Bulgarian Brake Detection Enables or Disables the brake detection...

Page 9: ...on to adjust Year Month Day Hour Minute Second Tap the button to con rm adjustments Tap the button to preset 24 Hours format as sytem clock time format SWC Steering Wheel Control Tap SWC to enter the...

Page 10: ...ap this item to set the Brightness Contrast Hue Saturation Sharpness of this TFT screen Brightness 0 32 Contrast 0 32 Hue 0 32 Saturation 0 32 Sharpness 0 32 Tap the icon to clear all video settings D...

Page 11: ...AM2 bands 11 Stereo Mono Reception Tap this button to choose FM STEREO or MONO audio e ect 12 DX LOC Reception Tap this button to choose local or distant reception mode 13 SOUND E ect and EQ Setting 1...

Page 12: ...ging for iPhone andriod mobile phone The charging current consumption is 2 ampere DVD Playback Insert a video disc in the disc slot for video disc playback Press MODE button on the remote control or t...

Page 13: ...o Search by Track 18 PCB Playback Control On O 19 Slow Playback 20 Zoom In Zoom Out 21 Audio Track Selector 22 Previous Page 1 Enter into the Home Page 2 Turn o the screen 3 Current Media Type 4 Media...

Page 14: ...rrent Media Type 4 Media Playback Information Display 5 Time 6 Return to List of les 7 EQ Settings 8 Previous Track Fast backward 9 Play Pause 10 Next Track Fast forward 11 Repeat Playback 12 Random P...

Page 15: ...wing Recent Call List Tap icon to view the income calls Tap icon to view the outgoing calls Tap icon to view the missed calls Tap icon to view the contacts phonebook Tap icon to download the contacts...

Page 16: ...can mirror the screen of Android smartphone onto this DVD player s screen 4 This DVD player will switch into phone link mode automaically as below interface Using of the Icons 1 Volume adjustment 2 Ex...

Page 17: ......

Page 18: ......

Page 19: ......

Page 20: ......

Reviews: